

Your PC won’t power on. You hit the button and nothing happens, no fans, no lights, no beep. Before you assume the whole machine is dead, you want to know one thing: is the power supply even alive? The paperclip check answers that in about five minutes with a tool you already have in a desk drawer. By jumping two pins on the 24-pin connector, you trick the PSU into turning on outside the case, so you can watch whether the fan spins and rule the unit in or out. It won’t confirm the supply is delivering clean, stable voltage, but it’s the quickest way to catch a totally dead one.
This walkthrough covers the jump-start method step by step, with the safety bits that actually matter. If the check tells you the PSU is the problem, we’ll point you toward replacements, and you can compare current options in our roundups of the best modular PSUs for a gaming PC and the best 1000W units for 2026. Let’s get into it.
What you’ll need
The tool list is short. A single metal paperclip, straightened out, or a short piece of insulated jumper wire if you’d rather not hold bare metal. That’s the whole kit for the check itself. Keep the PSU’s own power cable handy, plus the wall outlet, and maybe a spare case fan or old drive to give the unit a small load. Work on a dry, non-conductive surface like a wooden desk, not carpet or bare metal. Good lighting helps, since you’ll be reading tiny pins.
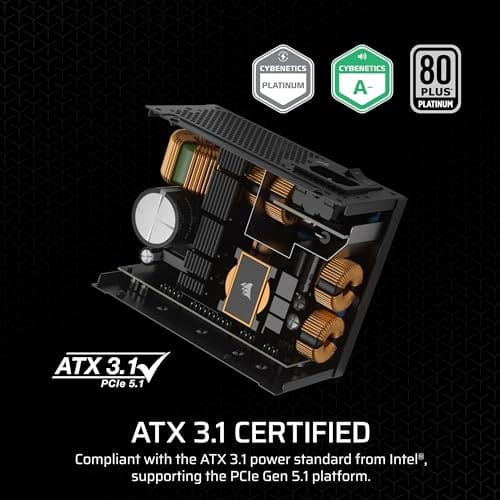
If the check confirms a dead supply and you’re building something compact, a strong replacement to keep in mind is the Corsair SF750 (around $159.99, 4.1 rating). It’s a fully modular SFX unit with an 80 Plus Platinum rating, ATX 3.1 compliance, and PCIe 5.1 readiness, and it ships with an SFX-to-ATX bracket so it drops into a standard case too. Overkill for the check, but a clean landing spot if you need to buy.

Pros
- ATX 3.1 compliant with PCIe 5.1 support, resists transient spikes from RTX 50 and RX 9000 series GPUs.
- Zero RPM Mode eliminates fan noise at low and medium loads, a real advantage in acoustically sensitive SFF builds.
- Fully modular design with short SFX cables reduces cable management friction in sub-10-liter cases.
- 105 degree C Japanese capacitors indicate quality component selection typical of high-tier SFX units.
Cons
- Limited owner feedback at time of writing; real-world noise, ripple, and transient performance are unverified by community data.
- Short SFX cables are unsuitable for mid-tower or full-tower cases without aftermarket cable extensions.
- 750W ceiling may fall short for extreme SFF builds pairing a 300W-plus TGP GPU with a high-core-count CPU.
The Corsair SF750 (2024) is a high-end SFX PSU targeting SFF builders who need substantial wattage in a compact footprint. With 80 Plus Platinum certification and ATX 3.1 compliance, it sits at the upper tier of the SFX market, aimed at builders pairing it with current-gen discrete GPUs inside sub-10-liter cases.
The most defining specification here is ATX 3.1 compliance combined with PCIe 5.1 readiness. This means the unit is rated to handle the sharp transient power spikes that RTX 50 and RX 9000 series GPUs can produce, where non-compliant PSUs may trigger overcurrent protection. At 750W, it covers most single-GPU SFF configurations without derating concerns.
The honest trade-off is the review data gap. At time of writing, no substantial owner feedback exists to validate Corsair's noise and ripple claims under real load. The Zero RPM Mode claim and 92mm fan acoustics are based on spec sheets only. Buyers should also note that SFX cable lengths are intentionally short and will not reach connectors in mid-tower or larger cases without extensions.
Buy this if you are building an SFF PC around a single high-TGP GPU and need confirmed ATX 3.1 compliance in a modular SFX unit. Skip this if you want a large ATX case build, need more than 750W for a dual-component high-wattage system, or require extensive owner testing before purchasing.
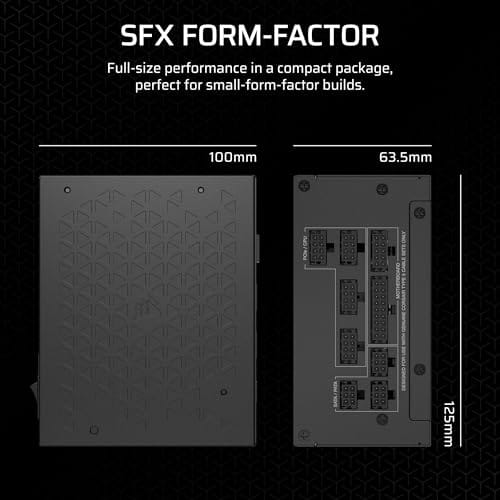
Form Factor and Mounting: This is a standard SFX form factor PSU, not SFX-L. Verify your case specifies SFX compatibility before purchasing. An SFX-to-ATX bracket is included, allowing installation in ATX-footprint cases, though short cable lengths will require extensions in anything larger than a compact SFF enclosure.
Power Standard and Connector: ATX 3.1 compliant with PCIe 5.1 readiness. The unit supports the 12V-2x6 connector standard, relevant for RTX 40 and RTX 50 series GPUs as well as AMD RX 7000 and RX 9000 cards with high transient draw. Non-ATX 3.1 units can trigger OCP shutdowns above 150 percent peak load spikes.
Efficiency and Thermal Operation: 80 Plus Platinum certification indicates roughly 92 percent efficiency at 50 percent load under 115V. The 92mm PWM fan uses a fluid dynamic bearing and Zero RPM Mode activates at low loads, which in SFF cases where airflow is restricted can noticeably reduce system acoustic output.
GPU Wattage Pairing: At 750W, this PSU pairs appropriately with GPUs up to approximately 300W TGP when combined with a mid-range CPU. For a 320W-plus TGP GPU alongside a 65W-plus CPU, headroom becomes tight and a higher-wattage SFX unit should be considered instead.
Step 1: Power down and disconnect everything
Safety first, and this step isn’t optional. Shut the PC down fully, then flip the switch on the back of the power supply to the off position. Now pull the main AC cable from the wall and from the PSU. Press the case power button a couple of times to drain any charge left in the capacitors. Static is your enemy here, so touch a grounded metal surface or wear an anti-static strap before you handle anything inside.
Give it a full minute with everything unplugged. Modern supplies hold residual charge for a short while after they lose wall power, and you don’t want to be poking at pins while that’s draining. Patience now saves your components later.
If the PSU smells burnt, clicks repeatedly, has visible scorch marks, or recently popped during a storm, stop here. Don’t open the metal PSU housing, don’t remove its internal screws, and don’t try to repair the board inside. The paperclip check is for the external connectors only. Inside the box are capacitors that can hold dangerous charge after the cord is pulled. Leave that sealed.
Step 2: Unhook the PSU from the motherboard and drives
The paperclip check works on the power supply by itself, so it needs to come off everything it feeds. Unplug the big 24-pin (sometimes 20+4) connector from the motherboard. Unplug the 8-pin (or 4+4) CPU power connector up near the top of the board. Then disconnect the PCIe power cables from the graphics card and the SATA or Molex leads from your drives.
You can leave the PSU mounted in the case if you like, but it’s easier to pull it out entirely so you can see what you’re doing. Set it on your non-conductive surface with the 24-pin connector facing up and the fan pointing where it won’t blow into anything. The only cable that stays relevant is the 24-pin, since that’s where you’ll place the jumper.
Take a photo before unplugging if you’re new to this. Modular power supplies can make cable routing look more confusing than it is, and a quick phone shot gives you a map for reassembly. Don’t mix modular cables from another PSU brand or another model, even if the plug fits at the PSU end. Pinouts can differ. A wrong cable can destroy a drive or graphics card in seconds.
Step 3: Find the green wire and a black neighbor
Look at the 24-pin connector and find the single green wire. That’s the PS_ON signal, pin 16 on the standard layout. In a running PC the motherboard grounds this pin to tell the supply to switch on. Your job with the paperclip is to do that grounding by hand. Right next to it, and all around it, you’ll see black wires. Those are ground, and any one of them will do.
Hold the connector so the clip latch faces you and the pins are easy to read. Note exactly which hole has the green wire and pick a black one beside it. On a fully modular unit like the Corsair SF750, remember the 24-pin cable plugs into the PSU on the other end, so keep that side seated. Getting the right two pins is the whole game. Green to any black, nothing else.
Step 4: Bend the paperclip and bridge the two pins
Straighten the paperclip, then bend it into a U shape with two short legs that can reach between the green pin and your chosen black pin. Insert one leg into the back of the green pin’s slot and the other into the black pin’s slot, pushing until each makes solid contact with the metal terminal inside. If you’re using insulated jumper wire, strip a little from each end and do the same.
Make sure the paperclip only touches those two terminals and nothing else. A stray leg brushing a neighboring pin is how you cause a short. Once the bridge is seated firmly, double-check it visually. Green and black, connected, everything else clear. Now you’re ready to give it power.
Step 5: Reconnect AC and do the power-on check
Plug the AC cable back into the PSU and the wall. Flip the rear switch to on. With the green and black pins jumped, a healthy supply should react instantly: the fan spins up. That fan spin is your pass signal for this power-on check. It means the PSU’s basic circuitry works and it’s willing to turn on. Watch for a second or two, listen for odd clicking or buzzing, and sniff for any burning smell.
For a slightly better read, connect an old case fan or a spare drive to one of the PSU’s peripheral cables before you flip the switch. Some supplies won’t stay on with zero load, and a small draw keeps the unit honest. If the fan spins with that light load attached, the supply is almost certainly alive. When you’re done, flip the rear switch off, pull AC, and remove the paperclip before reconnecting anything.
Don’t panic if a modern low-noise PSU spins for a moment and then the fan stops while the connected load keeps running. Many semi-passive units shut the fan off at light load by design. In that case, watch the attached fan or drive instead of the PSU fan. If the peripheral keeps running, the supply stayed on. If everything shuts off, treat that as a fail signal and move to the troubleshooting section.
Troubleshooting common issues
The fan doesn’t spin at all
First, recheck your pins. The single most common miss is bridging the wrong two, so confirm you’ve got the green wire and a true black ground, not an adjacent colored rail. Make sure the rear switch is on and the AC cable is fully seated at both ends. Try a different wall outlet or a known-good power cable. If the pins are right, the switch is on, and there’s still no movement, the supply is very likely dead and it’s replacement time.
The fan spins but the PC still won’t boot
A spinning fan only proves the PSU turns on, not that it delivers clean voltage under real load. A supply can pass this basic bench check and still fail when the CPU and GPU pull serious current. If the paperclip check passes but the system stays dead once reassembled, the fault may be a marginal PSU, the motherboard, or the CPU. A dedicated PSU checker or a multimeter reading the rails gives you the fuller picture.
The fan spins for a second, then stops
A brief spin followed by a shutdown often means the unit’s over-current or over-voltage protection tripped, or it simply won’t hold without a load. Attach a small load like a fan or an old drive and try again. If it still cuts out, that self-protection behavior points to an internal fault, and the supply shouldn’t go back into a working build.
What a passing result really tells you
Be clear about the limits here. The paperclip method is a go or no-go signal, nothing more. A dead unit that refuses to spin is confirmed dead, which is genuinely useful and saves you money on parts you didn’t need. But a spin is not a clean bill of health. Voltage regulation, ripple, and behavior under a 400-watt gaming load all stay invisible to this method. Treat a pass as “worth investigating further,” not “definitely fine.”
Going further with a proper diagnosis
If you want real numbers, a dedicated PSU checker plugs into the 24-pin and reads each rail, or you can back-probe the connector with a multimeter while it’s jumped and confirm the 12V, 5V, and 3.3V lines sit within spec. That’s the level of detail a paperclip can’t reach. For overclockers and high-end GPU owners pushing big transient loads, that extra step is worth it, and our guides to the best 1000W PSU for a high-end GPU cover units built for that headroom.
If you’re reading rail values manually, don’t chase perfection. ATX guidance allows some tolerance, so a 12V rail won’t always show exactly 12.000V on a basic meter. What you’re looking for is a wildly low, wildly high, or unstable reading. If a rail jumps around at idle, it’s not going to behave better once a GPU starts pulling current. Replace it before it takes something else with it.
Wrapping up
The paperclip check is one of the handiest five-minute diagnostics in a PC owner’s toolkit. Straighten a clip, jump the green pin to a black one, apply wall power, and watch the fan. Spin means alive, silence means dead. Just respect the safety steps, drain the capacitors, work on a non-conductive surface, and never confuse a passing spin with a fully healthy supply. If yours came up dead, size the replacement to your build and don’t cut corners on a unit that feeds everything else. That’s the part you never want to skimp on.


























Write Your Review
No reviews yet. Be the first to share your experience!