Colored squares across your desktop. Pink flashes in a boss fight. Green pixels crawling over the Windows logo. If you’ve never seen GPU artifacting before, it’s the kind of thing that makes you wonder if you just torched a $700 card. Sometimes you did. More often, it’s a driver that didn’t uninstall cleanly, a fan choked with cat hair, or a sag-stressed PCIe contact that costs five bucks to fix. The order you check things matters. Software first, then hardware, then thermals. Skip ahead and you’ll spend a weekend chasing a problem that wasn’t there.
The quick diagnosis (30-second check)
Don’t crack the case yet. First question: are the artifacts showing up on the Windows desktop, or only inside a game? Desktop artifacts at idle usually point at driver corruption or a dying display output. Gaming-only artifacts point at thermals, VRAM under load, or voltage droop. Reboot. That’s it, just reboot. It clears a surprising number of one-off driver glitches and costs you 30 seconds.
Now watch the boot sequence carefully. If you see artifacts on the motherboard POST screen or the Windows logo (before any driver loads), you’ve got a hardware problem. If the screen is clean until Windows finishes booting and then artifacts appear, it’s almost certainly driver-side. That single observation saves hours of guessing.
Most likely cause – thermal throttling or VRAM failure
Heat kills VRAM cells. Modern GDDR6X chips are rated to roughly 95C, but they get unstable before they hit that ceiling. If your hotspot temperature is climbing past 95C under load, you’re not throttling, you’re cooking. Pull up HWInfo64 or GPU-Z, run a game for ten minutes, and watch the hotspot reading. Anything above 90C sustained is a red flag in 2026.
The fix isn’t glamorous. Clean the GPU fans. Dust mats down between the fins and turns your heatsink into an insulator. A can of compressed air and five minutes of attention drops temps noticeably. If you’ve owned the card three-plus years and you’re comfortable with the warranty implications, a repaste with a quality compound can buy you another 5-10C of headroom. Most 2026 cards ship with decent factory paste, so don’t repaste a brand-new card chasing imaginary gains.
VRAM failure looks different. It gets worse over weeks, not minutes. Memory cells fail one at a time, and the artifacts spread. Run MemTestGPU or OCCT’s VRAM check for at least an hour. If you see errors logged, the chips are dying and no amount of repasting will save you.

Pros
- All-aluminum construction avoids plastic fatigue sen in cheaper braces after long GPU load cycles.
- 74-120mm screw adjustment covers most PSU shroud to GPU shroud gaps in ATX cases.
- Magnetic base allows tool-free install and repositioning on steel chassis floors.
- Rubberized top pad prevents shroud scratches on 2 to 3 slot cards.
Cons
- Very limited owner feedback at time of writing, so long-term durability signal is thin.
- Magnetic base needs a ferrous stel chassis floor, so aluminum or tempered glass bottoms will not hold.
- Weight capacity, footprint dimensions, and top pad width are not specified in source data.
The nkomax L is a budget GPU anti-sag brace aimed at builders running heavier 2 to 3 slot cards where the PCIe slot alone bows under weight. It targets ATX and mid-tower owners with a 74 to 120mm gap between PSU shroud and GPU underside who want a metal support instead of a plastic prop.
The defining feature is the all-aluminum body with a screw-driven height adjuster and a magnetic base. In practice, that means one hand tightening under the card and a base that snaps onto the stel chassis floor without adhesive. Anti-sag braces in this class typically hold cards up to roughly 1.5kg reliably, though nkomax does not publish a rated capacity.
Trade-offs are typical at this tier. There is no published load rating, no listed footprint, and the magnet will not grip aluminum or glass chassis floors, which rules out some show builds. The74-120mm range also excludes very tall PSU shrouds or vertical mount setups where the card sits higher off the flor.
Buy this if you have a stel-floor ATX case, a saging 2 to 3 slot GPU, and want a metal brace with adjustable height. Skip this if your chassis flor is non-ferrous, your PSU shroud clearance fals outside 74 to 120mm, or you need a published weight rating for a heavy 4-slot flagship card.
Height range: The L variant adjusts from 74m to 120mm between base and support pad. Measure from your chassis floor to the underside of the GPU shroud before ordering, since shorter mini-ITX cases or tall PSU shrouds can push the required height outside that window.
Mounting method: A magnet embedded in the base holds the brace to the chassis floor with no screws or adhesive. This assumes a steel or SPC floor, which is standard on most ATX cases. Aluminum-bodied cases and open benches will not retain the brace by magnet alone.
Material and finish: The body is aluminum with polished anodize, sandblasted anodize, and CNC edge finishing per source. A cushioning pad on the support head protects the GPU shroud from scratches on repeated adjustment.
Not specified: Weight capacity, base footprint, pad width, and total mass are not listed in source data. If your card exceeds roughly 1.5kg or has an unusually narow shroud contact area, verify fit and load rating with the seller before purchase.
Second most likely cause – driver corruption or overclock instability
Driver corruption is sneaky. A Windows update that interrupts a GPU driver install, a power cut mid-update, or an old driver that didn’t fully uninstall when you swapped cards. The system runs, but it’s in an inconsistent state, and artifacts pop up at random.
The fix is Display Driver Uninstaller. Boot into Safe Mode, run DDU, choose the clean uninstall option, then reboot and pull the latest driver directly from Nvidia or AMD’s site. Not Windows Update, not GeForce Experience auto-install. The clean .exe from the manufacturer. This single procedure resolves a wild number of artifact reports on r/buildapc.
Overclock instability is the other big one. If you bumped the memory or core clock in MSI Afterburner months ago and forgot about it, a driver update can quietly destabilize what used to be a rock-solid OC. Dial it back to stock and recheck. If the artifacts vanish, you’ve got your culprit. Re-tune carefully if you want the performance back.
The weird one (rare but happens) – PCIe slot issue or PSU rail droop
This one catches people. PCIe slot contacts can develop a thin layer of oxide or pick up dust over a few years, especially in dusty rooms. The card boots fine, but at heavy 3D load when the bus is hammering data through, the connection flakes and you get artifacts. Power down, pull the GPU, and clean the gold edge connector with 99% isopropyl alcohol on a lint-free cloth. Reseat firmly. Make sure the locking tab on the PCIe slot clicks.
PSU rail droop is the other oddball. An aging or undersized PSU can’t hold 12V steady when the GPU pulls a transient spike. You’ll see clean idle behavior and clean light gaming, then artifacts only when the card pulls full power. Check with a multimeter or a proper PSU tester if you have one. If you’re running a 650W unit with a card that recommends 850W, that’s your problem. Run your build through OuterVision’s PSU calculator and upgrade if you’re under-spec.
Step-by-step fix
Here’s the diagnostic order that won’t waste your weekend:
(a) Note exactly when artifacts appear. Boot screen? Desktop only? Specific game? Write it down before you start changing things or you’ll forget.
(b) Reboot. Yes, really. One in five cases ends here.
(c) Clean driver install. Boot Safe Mode, run DDU, reboot, install the latest WHQL driver from Nvidia or AMD directly. Don’t let Windows Update touch it.
(d) Run HWInfo64 and FurMark together for five minutes. Watch the hotspot temp. Above 95C, you’ve got a thermal problem. Stop here and fix airflow first.
(e) Power down. Pull the GPU. Look at the PCIe edge connector. Dusty or discolored? Clean it with isopropyl on a cotton swab.
(f) Reseat the card firmly. Check the locking tab actually engages.
(g) If you’ve got a second PCIe x16 slot, try the card there. Slot failures are rare but they exist.
(h) Check the power cable. 12V-2×6 connectors on 40-series and 50-series cards are notorious for partial seating. Push until you hear the click. Same for 8-pin PCIe cables.
(i) If you’ve got a spare PSU lying around, swap it in. Borrowed PSUs from friends count.
(j) Run MemTestGPU overnight. Eight hours of clean memory checks means VRAM is healthy. Errors logged means the chips are failing and you’re heading toward RMA.

Pros
- Aluminum alloy rod with anodized finish holds up better than plastic braces
- 0.5mm increment adjustment covers 70-120mm range for varied case floor heights
- Magnetic base with silicone pads grips steel chassis and protects PCB contact points
Cons
- Limited owner feedback at time of writing makes long-term durability hard to verify
- Magnetic base will not anchor on aluminum, tempered glass, or non-ferrous case flors
- Max load capacity, warranty length, and weight are not specified in source listing
The Acer GPU Support Bracket is a budget anti-sag accessory in the L size, covering a 70-120mm height range with a 14.7mm anodized aluminum rod. It targets builders running heavier 2.5-slot or 3-slot GPUs in mid-tower and full-tower cases who want basic mechanical support without a full vertical mount kit.
The defining feature is the 0.5mm incremental adjustment paired with a magnetic silicone-paded base. In practice, that means you can fine-tune contact against the GPU backplate without over-lifting the card and stressing the PCIe slot. Brackets in this tier typically prevent 1-3mm of visible sag on cards in the 1.5-2kg range, based on category norms.
Trade-offs are typical at this price. The magnet only bonds to steel chassis floors, so tempered glass bottoms, aluminum Lian Li style cases, and mesh-flor builds lose the anchoring benefit. Source data does not specify load capacity, exact weight, or rod hardness, and owner feedback is limited, so long-term crep under sustained load is unverified.
Buy this if you run a heavier GPU in a steel-flor mid-tower and want a simple adjustable prop under120mm tall. Skip this if your case uses a glass or aluminum bottom panel, or if your GPU sits above 120mm from the flor where this L size cannot reach.
Height range and adjustment: The L variant covers 70m to 120mm with0.5mm precision increments via a detachable spiral rod and fixing ring. That resolution is finer than typical thumb-screw braces, which usually step in 2-5mm, and allows near-zero preload against the GPU backplate.
Materials and finish: The rod is aluminum alloy with anodized outer finish for rust resistance. Rod diameter is listed at 14.7mm, thicker than the8-10mm rods common on generic braces, giving more resistance to lateral flex under a 2.5-slot or 3-slot card.
Contact and anchoring: Top and bottom feature silicone pads to protect the GPU shroud or backplate from scratches. A magnet in the base anchors the bracket to steel chassis floors. Non-ferrous surfaces such as tempered glass or aluminum panels will not hold the magnet.
Installation and support: Tool-free hand tightening enables roughly 30-second calibration inside the case. Acer lists an 18 plus 18 month warranty structure and a stated 18 hour support response window. Exact load capacity, weight, and base footprint are not specified in the source listing.
When it’s not fixable – what to replace
You’ve reinstalled drivers three times, repasted, reseated, swapped PSUs, and the artifacts haven’t budged. That’s a hardware failure inside the card itself, and you’re looking at replacement or RMA.
If you’re inside the warranty window (most 2026 cards ship with 3-year coverage from Nvidia’s AIB partners and AMD’s board partners), contact the manufacturer first. Don’t try Amazon returns past the 30-day window, they’ll bounce you to the manufacturer anyway. Box the card, screenshot the artifacts, save your purchase receipt.
Out of warranty is harder. Third-party repair shops can sometimes reflow BGA chips on the GPU die and bring a card back from the dead, but you’re looking at roughly $150 for the work with no guarantee. Weigh that against a current-gen mid-range card at $400-1000. Often the math points to replacement. Newegg and Amazon both run trade-in programs that’ll take your dead card for parts credit, which softens the blow a little.
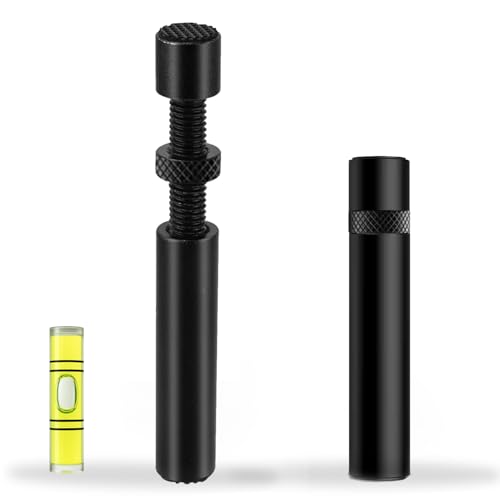
Pros
- All-aluminum construction handles sustained load from long triple-slot GPUs without visible crep
- Height adjustment covers a wide range of case floor to GPU distances
- Tool-free install means no screws into case flor or PSU shroud
Cons
- Limited owner feedback at time of writing, real-world durability under 3kg-plus cards is unverified
- Exact height range, base dimensions, and weight capacity are not specified in listing
- No RGB or magnetic base, purely functional if your build leans on visual accents
The California JOS GPU Support Bracket is a budget-tier anti-sag accessory built around an aluminum alloy body with a height-adjustable column. It targets builders running long, heavy modern GPUs such as triple-slot RTX 40-series or Radeon RX 7000 cards who want a simple mechanical fix for PCIe slot stress.
The defining feature is the all-aluminum construction versus the plastic braces common at this price. Aluminum resists long-term creep under sustained load better than ABS, which maters for cards pushing 1.5 to 2kg. Height adjustability, per the listing, covers ATX, M-ATX, and ITX layouts, though exact millimeter range is not specified.
Trade-offs are typical at this tier. There is no published weight capacity, base footprint, or adjustment range, so buyers cannot verify fit against a specific case flor to GPU gap before ordering. There is no RGB, no magnetic base, and no anti-slip pad callout in the source data. Owner feedback is effectively absent at time of writing.
Buy this if you need a low-cost aluminum sag fix for a heavy GPU and can tolerate missing dimensional specs. Skip this if your build needs a documented weight rating, a specific height range for a tight PSU shroud gap, or integrated RGB to match a themed build.
Material: All-aluminum alloy body per the listing, positioned against plastic competitors at this tier. Aluminum holds shape better thanABS under 1.5 to 2kg triple-slot GPUs, though the exact aloy grade, wall thickness, and anodizing finish are not specified in the source data.
Adjustability: Height adjustable column, tool-free. Listed as compatible with ATX, M-ATX, and ITX cases. Specific minimum and maximum height in millimeters is not specified, so verify your case floor to GPU underside clearance before purchase, especially inITX builds with bottom-mounted PSUs.
Install and base: Tool-free setup with a stability base, no screws into the case flor. Base dimensions and whether it uses rubber or silicone anti-slip contact are not specified. Sits between PSU shroud and GPU in standard ATX layouts without blocking front intake in most mid-towers.
Package: One large black GPU support bracket in an ESD bag. No mounting hardware, screws, or secondary accessories listed. Weight capacity rating, load testing certification, and waranty terms are not specified in the product data.
A few more questions
Are artifacts reversible if I catch them early?
Sometimes, yes. If the cause is thermal stress and you fix the cooling before the VRAM cells permanently degrade, you can dodge the bullet. Same for driver corruption, that’s fully reversible with a clean DDU install. What’s not reversible is physical chip damage. Once VRAM cells have died from prolonged overheating or voltage spikes, they’re gone. The lesson: don’t ignore early artifacting hoping it’ll go away.
Will undervolting help with artifacting?
It can, if the root cause is heat or PSU droop. Undervolting drops power draw and temperatures, which gives marginal VRAM cells more headroom. MSI Afterburner’s curve editor lets you trim 50-100mV without losing much performance on most modern cards. Won’t fix a card that’s already physically failing, but it’s a smart preventive move if you’re running hot. Just don’t undervolt and then blame undervolting when something else goes wrong.
How do I know if it’s the GPU or the monitor cable?
Easy check. Swap the DisplayPort or HDMI cable for a known-good one. If artifacts vanish, it was the cable. Also try a different monitor if you’ve got one handy. Cable artifacts usually look like horizontal lines, flickering, or signal dropouts, not the colored block patterns you get from VRAM failure. If artifacts also appear on the BIOS POST screen, it’s not the cable, it’s the card.