

Maybe your graphics card says it should run at x16 but a game feels sluggish, or you just slotted in a second NVMe drive and want to confirm it didn’t quietly steal lanes from your GPU. Checking how PCIe lanes are allocated on your PC answers both questions in a few minutes. This walkthrough shows you how to read link width, link speed, and generation using free software plus your motherboard’s own documentation. No guessing, no cracking the case open unless you want to.
Lane behavior depends heavily on your chipset and CPU, which is why boards built for chips like the Ryzen 7 9800X3D or the Core i9-13900K publish detailed lane maps in their manuals. Read the value your hardware reports, then compare it against what your board is supposed to deliver. That’s the whole method. If those two numbers match, you’re fine. If they don’t, the rest of this guide helps you find out why.
What you’ll need
Nothing exotic. You’ll want GPU-Z (free, from TechPowerUp) to read your graphics card’s link, HWiNFO64 (also free) for a full system view including NVMe drives, and your motherboard manual, which is usually a PDF on the manufacturer’s support page. A flashlight helps if you plan to physically inspect slots. That’s it. Everything here works on Windows 10 and 11, and most of it has a Linux equivalent through the lspci command.
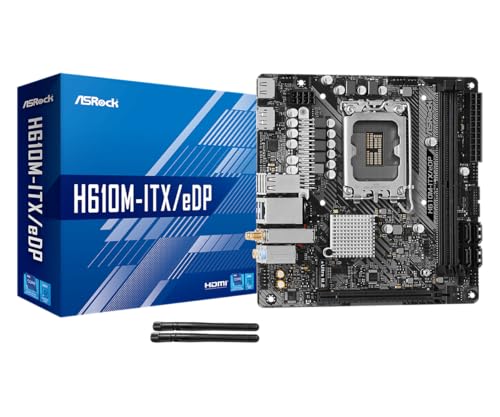
If you’re reading lane specs while shopping for a build, keep the board’s datasheet handy. A compact example is the ASRock H610M-ITX/eDP, a Mini-ITX board around $89.99 that supports Intel 14th, 13th, and 12th Gen Core processors on LGA1700 and runs a PCIe 4.0 slot. Its spec sheet lists exactly how the primary slot is wired, which is the same kind of documentation you’ll cross-reference in Step 4.
Pros
- eDP 1.4 header is rare at this tier, ideal for custom AIO and panel builds
- Dr.MOS 50A 6-phase VRM adequate for 65W LGA1700 CPUs in SFF cases
- PCIe 4.0 x16 slot preserves GPU bandwidth despite H610 chipset limits
- Integrated WiFi 5 and Bluetooth 5.1 plus Intel Gigabit LAN cover connectivity
Cons
- Limited owner fedback available at time of writing, making reliability signal thin
- H610 blocks CPU overclocking and caps DR4 at 3200MHz with no XMP scaling
- Single M.2 slot is Gen3 x4 only, no Gen4 NVMe or secondary M.2
The ASRock H610M-ITX/eDP is a budget LGA1700 Mini-ITX board built around Intel's entry H610 chipset with DDR4 memory and a dedicated eDP 1.4 panel connector. It targets SFF builders, embedded system integrators, and digital signage projects rather than gamers chasing K-series CPUs or high-frequency RAM tuning.
The standout is the eDP 1.4 header, which lets integrators drive a laptop-style FHD 60Hz panel directly, useful for all-in-one and industrial builds. For general desktop use, HDMI 2.1 outputs 4K 60Hz and DisplayPort 1.4 handles up to 8K 60Hz, both dependent on the installed CPU's iGPU capabilities.
Trade-offs are typical at H610 tier: no CPU or memory overclocking, DDR4-3200 ceiling, a single Gen3 x4 M.2, and no rear USB-C. The 6-phase 50A Dr.MOS VRM is fine for 65W non-K chips like a Core i5-13400, but pairing with a 14700K in a hot SFF case is not the intended use.
Buy this if you need a compact LGA1700 board with eDP for a panel PC, signage kiosk, or budget SFF office build. Skip this if you want DR5, K-series overclocking headroom, Gen4 NVMe, or dual M.2 storage on a modern Intel platform.
Socket and chipset: LGA1700 with H610 chipset supports 12th, 13th, and 14th Gen Core CPUs. H610 disables CPU multiplier and memory overclocking, so pair with locked SKUs like Core i3-12100, i5-13400, or i5-14400 for best value rather than K-series parts.
Memory support: 2 DR4 DIMM slots run dual-channel up to 3200MHz with XMP 2.0 and ECC UDIMM in non-ECC mode. Confirm kits against ASRock's QVL, since Mini-ITX 2-DIMM layouts are typically friendlier to Hynix and Micron dies at 3200 CL16.
Storage and PCIe: One PCIe 4.0 x16 slot for GPU, one Ultra M.2 slot (PCIe Gen3 x4 and SATA3), and 4 SATA3ports. Only one M.2, so plan bot NVMe plus SATA SDs for bulk storage in SFF builds.
Form factor and I/O: Standard 6.7 by 6.7 inch Mini-ITX footprint fits ITX cases and thin mITX chassis. Rear I/O includes HDMI 2.1, DisplayPort 1.4, 2 USB 3.2 Gen1, 4 USB 2.0, and Gigabit LAN. Note CNVi Bluetooth shares bandwidth with one rear USB 2.0 port.
Step 1: Identify what’s plugged into each slot
Before you read any numbers, know your physical layout. Most ATX boards have one full-length slot wired for x16 straight to the CPU, a second full-length slot that often shares bandwidth, and one or two shorter x1 slots fed by the chipset. Your GPU belongs in that top slot. NVMe drives sit in M.2 sockets, which also consume PCIe lanes even though they don’t look like traditional slots.
Here’s the catch most people miss. A slot can be physically x16 in length but electrically wired for only x4 or x8. The plastic connector tells you nothing about the lanes behind it. So write down what you have installed: GPU, capture card, NVMe drives, Wi-Fi card, anything. High-core-count platforms like those built around the Core i7-14700K divide lanes differently than budget chipsets, so your specific board matters more than the CPU alone.
If you’re not sure which slots are CPU-fed and which come from the chipset, look at where they sit on the board. The slot nearest the CPU socket is almost always the CPU-connected x16. Slots lower down usually route through the chipset and share a single uplink back to the processor. Knowing that split now saves confusion later, because a chipset slot maxing out at x4 isn’t broken, it’s simply built that way.
Step 2: Read your GPU link in GPU-Z
Install GPU-Z and open it. On the main Graphics Card tab, find the “Bus Interface” line. It shows something like “PCIe x16 4.0 @ x16 4.0.” The first pair is what your slot supports, the second is what it’s currently running. Those two should match under load. If you see “@ x8 1.1” while idle, don’t panic. Modern cards drop to a lower speed to save power when they’re not busy.
To get an accurate reading, click the small “?” button next to the Bus Interface line and run the render load. That forces the card to spin up so you can confirm it hits its full link. A card that reads x16 4.0 idle but x8 4.0 under load has a real problem worth chasing. A card that reads x16 4.0 both ways is doing exactly what it should. Reference boards for the Ryzen 7 9800X3D typically feed the primary slot a full x16 Gen4 or Gen5 link, so that’s your target on a comparable AMD build.
Step 3: Check NVMe and other lanes in HWiNFO
GPU-Z only covers the graphics card. For everything else, open HWiNFO64 in Sensors-off mode and expand the Bus section, then PCI Bus. You’ll see every device, its current link width, and its link speed listed as Gen1 through Gen5. This is where you catch an NVMe drive running at x2 instead of x4, or a Gen4 SSD stuck negotiating a Gen3 link.
Windows Device Manager gives a rougher version of the same picture. Open it, find the device, right-click, choose Properties, then the Details tab, and select “PCI current link speed” and “PCI current link width” from the dropdown. It’s clunky, but it’s built in and needs no download. On Linux, “sudo lspci -vv” dumps LnkCap and LnkSta lines that spell out capable versus active link state for every device at once.
Pay attention to link speed and link width as two separate numbers, because they fail independently. Width is the lane count, x1 through x16. Speed is the generation, and each generation roughly doubles per-lane bandwidth. A drive can show full x4 width but sit at Gen3 speed, which halves throughput even though the lane count looks right. HWiNFO puts both figures side by side, so you catch that mismatch instead of assuming a healthy width means a healthy link.
Step 4: Cross-check against your motherboard manual
Now you have live numbers. Compare them to what your board promises. Open your manual and find the block diagram or the “PCIe Configuration” table. It’ll say things like “PCIE1 runs x16 (from CPU); PCIE2 runs x4 (from chipset)” and, critically, it lists the trade-offs. Many boards drop the top slot from x16 to x8 the moment you populate a specific M.2 socket. That’s by design, not a fault.
This shared-lane behavior is the single most common reason a GPU reads x8 instead of x16. The lanes went to your SSD. Read the fine print. If the manual says installing M.2_2 forces PCIE1 into x8 mode, and you’ve got a drive there, mystery solved. Enthusiast boards for the Ryzen 7 9800X3D and premium Core i9-13900K boards usually document these splits clearly, and higher-tier chipsets simply have more lanes to hand out so the conflicts happen less often.
Step 5: Confirm and set the link in BIOS/UEFI
Reboot and enter your BIOS, usually by tapping Delete or F2 at startup. Look under Advanced, then a menu named something like “PCIe Configuration,” “Onboard Devices,” or “PCH Storage.” Here you can see and often force the generation and width per slot. If a Gen4 GPU is negotiating Gen3, set the slot to Gen4 manually instead of Auto. A weak or long riser cable is a frequent cause of that kind of downgrade.
Save, exit, boot back into Windows, and re-run GPU-Z or HWiNFO to confirm the change stuck. This close-the-loop check is the step people skip, and it’s the one that actually proves the fix. Set it, verify it, done. If forcing Gen4 causes instability or a black screen, drop back to Auto or Gen3. That points to a signal-integrity issue rather than a settings problem.
Troubleshooting common issues
My GPU reads x8 instead of x16
Nine times out of ten, an M.2 drive is sharing those lanes, exactly as your manual’s PCIe table warns. Move the SSD to a chipset-fed socket if your board offers one, or accept the split. Honestly, x8 Gen4 costs most modern cards only a percent or two in real games, so it’s rarely worth losing an NVMe slot over.
The link speed shows Gen1 even at load
A card stuck at Gen1 under render load usually means a dirty slot, a poorly seated card, or a bent pin. Power down, remove the GPU, clean the contacts gently, and reseat it firmly until the latch clicks. Riser cables are another prime suspect. If you’re running one, try the card directly in the slot to rule the cable out.
My NVMe drive negotiates fewer lanes than expected
Some M.2 sockets are wired x2, not x4, and some route through the chipset with a shared uplink. Check which socket the manual recommends for your fastest drive. Moving a Gen4 SSD to the CPU-connected socket often restores full x4 bandwidth, and it’s a two-minute swap once the case is open.
HWiNFO and GPU-Z show different numbers
They shouldn’t disagree on the same device, but they can look like they do if one caught the card idling and the other caught it under load. Re-read both while a game or benchmark is running. GPU-Z’s render-load button is the reliable trigger. If the readings still conflict after that, trust the value reported during active load, since that’s the link your hardware actually uses when it matters.
Wrapping up
Checking a PCIe lane really comes down to two numbers: what your hardware reports and what your board is supposed to deliver. GPU-Z handles the graphics card, HWiNFO covers drives and everything else, and the motherboard manual explains any split you find. Run those readings under load, not at idle, and you’ll dodge the false alarms that trip people up. Do this once and you’ll know your machine’s lane layout cold, which makes every future upgrade a lot less nerve-racking. Quick, repeatable, and free.
Common questions
Does running a GPU at x8 instead of x16 hurt gaming?
For the vast majority of current cards on a Gen4 link, the difference is inside single-digit percentages and invisible in normal play. It matters more on Gen3 systems or with very high-end cards pushing huge frame rates. If you’re gaming at 1440p or 4K, an x8 Gen4 link almost never holds you back.
Can I check PCIe lanes without opening my case?
Yes. GPU-Z, HWiNFO, and Device Manager all read link data from software, so you never touch the hardware. You’d only open the case to reseat a card, move an SSD, or inspect a slot after the software points you there. Start with the free tools every time.
Why does my link speed change when I’m not doing anything?
That’s Active State Power Management doing its job. Your card idles at a lower PCIe generation to save power and heat, then jumps to full speed under load. It’s normal and healthy. That’s why you read the link during a render load rather than at the desktop.
How do I know how many total PCIe lanes my CPU has?
Look up your CPU’s spec page on the manufacturer’s site, which lists the CPU-provided lanes, then add the chipset’s lanes from your board manual. Mainstream desktop chips typically offer 20 to 28 CPU lanes, and the chipset supplies more for storage and peripherals. Your board’s block diagram shows how they’re actually wired.





























Write Your Review
No reviews yet. Be the first to share your experience!