Installing an AIO cooler isn’t hard, but the order matters. Get one step wrong and you’re either reseating the whole thing or chasing temps that climb past 95C under load. AM5 and LGA1851 each have their own quirks – Ryzen 9000 chips have a tiny IHS contact area that punishes uneven pressure, and Intel’s Core Ultra socket uses a different retention frame than LGA1700. Here’s how to mount a 240mm or 360mm AIO right the first time.
What you’ll need
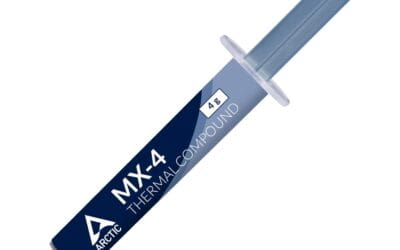
A Phillips PH1 screwdriver, the bracket kit that came with your AIO (or a separate one if you bought the cooler used), a pea-sized portion of thermal paste – most AIOs ship with paste pre-applied – and isopropyl alcohol 90%+ with a microfiber cloth for cleaning the IHS. A small magnetic parts tray helps. So does mounting the radiator before the pump if you’re working in a cramped case.
Confirm your case actually fits the radiator. A 360mm rad needs 397mm of front or top clearance plus 27–30mm of fan thickness. ATX mid-towers handle 360mm on the front, 240mm or 280mm on top. A few tight cases like the NZXT H5 Flow only support 280mm up top.
Step 1: Prep the socket and remove old cooler
Shut down, unplug power, hit the case power button for 5 seconds to drain residual capacitor charge. Ground yourself by touching the case chassis or wear an anti-static strap.
If there’s an old cooler, remove it now. Twist gently before pulling – dried paste glues the cold plate to the IHS, and yanking can lift an AM5 CPU out of the socket if the retention arm is closed. Clean the IHS with isopropyl on a microfiber until it’s mirror clean. Don’t forget to wipe the cold plate of the new AIO too if it’s not factory-fresh.
Step 2: Install the mounting bracket on the motherboard
AM5: you’ll either reuse the stock AMD retention frame (most AIOs use it) or remove it and install Asetek-style standoffs. Corsair Elite and many Arctic Liquid Freezer models reuse the AM5 frame – just unscrew the stock plastic clips, leave the metal backplate alone, and screw the AIO’s adapter brackets onto the existing frame.
LGA1851: the socket uses a new ILM (independent loading mechanism) compared to LGA1700. Most AIO brackets that say “LGA1700 compatible” also fit LGA1851 because the hole spacing is identical. Slot the included backplate behind the motherboard, push four standoffs through from the front, hand-tighten. Don’t crank them with a screwdriver yet.
Step 3: Mount the radiator and fans in the case
Decide orientation first. Best practice: radiator at the front of the case as intake, with fans pulling cool outside air through the rad. Top-mount works too, but if you go top, the radiator should sit slightly above the pump so trapped air rises into the rad and out of the pump loop. Pump cavitation noise comes from air bubbles stuck in the impeller.
Screw fans to the radiator first (push or pull config – push from outside the case is cleaner cable-wise). Use the short fan screws on the case side so they don’t pierce the radiator’s water channels. Long screws into a rad fin equals a leaking AIO and a dead build. Then bolt the whole radiator-plus-fan sandwich to the case using the long mounting screws.
Tubes should exit toward the bottom of the radiator when mounted in front, or toward the back when mounted on top. This keeps air pockets away from the pump.
Step 4: Apply thermal paste
If the cold plate already has factory paste – a thin rectangle of grey compound – leave it alone. Don’t add more on top, you’ll just create air pockets.
Fresh paste application: pea-sized drop in the center of the IHS for Intel rectangular dies, or a thin line across the long axis for AM5 (the dies sit off-center under the IHS). Don’t spread it. Pump pressure spreads it evenly across the contact area. Spreading by hand introduces air bubbles that act as thermal insulators.
Step 5: Seat the pump and tighten in a cross pattern
Lower the pump onto the IHS gently. Tubes should point in a direction that doesn’t kink – usually down toward the front of the case. Once the bracket holes line up with the standoffs, hand-thread each screw 3–4 turns before any of them get tightened down.
Now tighten in a cross or X pattern, half a turn at a time on each screw, going around until all four feel snug against the spring stop. Most AIO brackets have spring-loaded screws that bottom out – when you can’t turn any further without forcing it, you’re done. Don’t overtorque. Cracking a motherboard around the socket from an over-tightened pump is a real way to end a build.

Pros
- Supports Intel LGA1851/LGA1700 and AMD AM5/AM4 in one cooler.
- Motherboard-controlled PWM and 5V ARGB, no included controller required.
- Daisy-chain fan connections simplify wiring for a 360mm setup.
- Pre-applied thermal paste and convex cold plate reduce installation friction.
- Pump noise is listed at 20 dBA for low-noise oriented builds.
Cons
- 360mm radiators require a case with compatible top or front mounts, not ideal for many compact enclosures.
- Full iCUE ecosystem control is optional and requires a separate controller (sold separately).
- Fan speed range, radiator thickness, and tubing length are not specified in the listing.
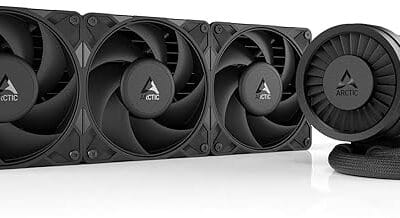
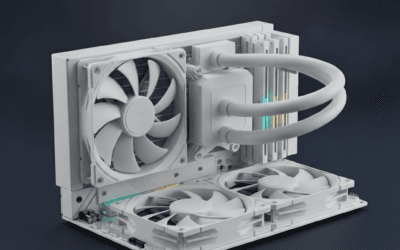
The CORSAIR Nautilus 360 RS ARGB is a mid-range 360mm all-in-one liquid CPU cooler aimed at builders who want straightforward wiring and motherboard-synced lighting. It targets AM5 and LGA1700/LGA1851 systems where a 360mm radiator is commonly chosen for sustained multi-core workloads and quieter fan curves.
The defining feature is the direct-to-motherboard approach: the fans and ARGB lighting are designed to run from standard headers without a separate controller. In real-world terms, a 360mm AIO class cooler typically gives more thermal headroom than smaller AIOs, which can help maintain boost behavior during long renders, encodes, or heavy compile sessions, depending on CPU power limits and case airflow.
Corsair calls out a slightly convex cold plate with pre-applied thermal paste, which is intended to improve contact across the CPU’s integrated heat spreader and make first-time mounting faster. The included RS120 ARGB fans are positioned as radiator-capable, with AirGuide technology and Magnetic Dome bearings for a balance of focused airflow and controlled noise.
Trade-offs are mostly about fit and ecosystem expectations. A 360mm radiator can force case and layout choices, and your motherboard needs an available 4-pin PWM header and a 5V ARGB header to use the simple wiring path. If you want deeper lighting and device control through iCUE, that is listed as optional and may require additional hardware.
Buy this if you want a 360mm AIO with clean cabling, motherboard-controlled PWM and 5V ARGB, and support for current Intel and AMD sockets. Skip this if your case cannot mount a 360mm radiator or if you want fully specified fan and radiator details before buying.
| Type | All-in-one (AIO) liquid CPU cooler |
| Radiator size class | 360mm |
| Included fans | 3x CORSAIR RS120 ARGB |
| Pump noise | 20 dBA (listed) |
| Lighting | 8 RGB LEDs on the pump head and each fan (listed) |
| Fan control connection | 4-pin PWM (listed) |
| ARGB connection | +5V ARGB header (listed) |
| Wiring | Daisy-chain support for fans (listed) |
| Thermal interface | Pre-applied thermal paste (listed) |
| Cold plate | Slightly convex (listed) |
| CPU socket support | Intel LGA 1851, LGA 1700; AMD AM5, AM4 |
| Color | Black |
| Radiator thickness | Not specified |
| Tubing length | Not specified |
| Fan speed range | Not specified |
CPU and socket: The listing includes mounting support for Intel LGA 1851 and LGA 1700, plus AMD AM5 and AM4. This covers most current mainstream Intel and Ryzen platforms called out in the product data.
Case and radiator placement: Plan around a 360mm radiator mount. If your case only supports 240mm or smaller, this cooler will not be a good physical fit. Common placements are top or front, but the correct choice depends on your case and GPU length.
Headers and wiring: The simple setup expects a standard 4-pin PWM fan header for control and a +5V ARGB header for lighting. If your motherboard lacks a 5V ARGB header, you will need an appropriate alternative controller (the listing notes iCUE control is optional with a controller sold separately).
Fan and cable management: Use the included daisy-chain capability to reduce visible wiring. This is especially helpful in builds with multiple intake and exhaust fans where ARGB leads can otherwise get messy.
Thermals and tuning: With a 360mm class AIO, you can typically run lower fan speeds at a given CPU temperature compared to smaller radiators, assuming your case airflow is not restrictive. Dial your PWM curve in BIOS or motherboard software to match your noise and temperature targets.
Step 6: Connect pump, fans, and ARGB
Pump header gets the pump cable, and it should be set to full speed 100% in BIOS – not PWM controlled. Cycling pump RPM hurts longevity and creates audible whining. Most modern boards have an AIO_PUMP header that defaults to constant 12V output.
Radiator fans go to CPU_FAN and CPU_OPT (daisy-chain or splitter if you have three fans on a 360mm). Set a fan curve in BIOS: 30% under 50C, 60% at 70C, 100% at 85C. Anything more aggressive is just noise without thermal benefit, since AIOs have thermal mass that resists short spikes.
ARGB goes to either a motherboard header or the controller box that came with the AIO. Don’t plug 5V ARGB into a 12V RGB header – it fries the LEDs instantly.
Verify it worked
Power on with the side panel off so you can watch the pump and fans spin. Boot into Windows, install the AIO’s software (iCUE, NZXT CAM, Aqua Suite, etc.) and confirm pump RPM reports between 1800–3200 depending on model. If pump RPM reads zero, you’ve got it plugged into the wrong header.
Run Cinebench 2024 multi-core for 10 minutes. Watch Tdie or Package temp in HWInfo64. Ryzen 9 9950X should sit around 78–85C on a quality 360mm AIO. Core Ultra 9 285K targets 75–82C under sustained load. If you’re seeing 95C and throttling within 60 seconds, the cold plate isn’t seated flat – pull it, reapply paste, and remount.
Common questions
Should the radiator go on top or front?
Front intake is best for CPU temps. Top works but feeds the rad already-warmed exhaust air from the GPU, raising coolant temp by 3–5C. The exception: small cases where front doesn’t fit a 360mm, in which case top is fine.
Which way do AIO fans face?
Air should flow through the radiator from outside the case (intake config) or from inside (exhaust). Front-mount intake gives the lowest CPU temps. The fan label faces the case wall, blades face the radiator.
How tight is too tight?
Spring-loaded screws on the pump bracket bottom out – that’s the design. When you feel resistance and can no longer turn easily, stop. Forcing past that point bows the IHS slightly and worsens contact.
Do I need to bleed the AIO?
Sealed AIOs are factory-bled, but tiny air bubbles always migrate to the pump after shipping. Run the system for 4–8 hours on first boot – pump full speed, mild CPU load – and any noise gradually disappears as bubbles work themselves into the radiator.