

You plug a flash drive into the front of your case and nothing happens. The port that worked yesterday is suddenly dead, or maybe every front USB jack quit at once while the rear ports keep humming along. It’s one of the most common PC annoyances, and the causes range from a loose internal header to a disabled BIOS setting to a genuinely fried port. The good news is that most front-panel USB failures are fixable at home in a few minutes, and you rarely need to buy anything. Before you assume the worst, walk through the checks below in order, starting with the easy stuff.
This guide covers the whole chain, from the port you can see to the cable and header you can’t. If you’re chasing airflow or cable-management issues at the same time, our roundups of the best mid-tower cases in 2026 and the best PC case for airflow in 2026 are worth a look, and budget builders can check the best budget PC case in 2026. For now, let’s get those front ports working again.
First check the obvious (the 30-second check)
Start with the device, not the PC. Plug the same flash drive or phone cable into a rear USB port. If it works there, you’ve narrowed the problem to the front panel and can skip to the internal checks. If it fails everywhere, the device or cable is the culprit, not your case. Try a second device in the front port too, since a dead thumb drive fools a lot of people into tearing their PC apart for nothing.
Also reboot once. A hung USB controller sometimes clears on a restart, and Windows occasionally drops a port after sleep. If a single front jack is dead but its neighbor works, that points to a physical port issue rather than a system-wide one. Note exactly which ports fail and which don’t, because that pattern tells you where to look next.
Cause #1: The internal USB header came loose
The most frequent reason all your front ports die at once is a disconnected header. Your case’s front USB cables plug into headers on the motherboard, either a small 9-pin block for USB 2.0 or a taller USB 3.0 connector, and those plugs can wiggle loose during a move, a GPU swap, or aggressive cable management. If every front port is dead but the rear works, this is almost certainly it. A single knocked header kills the entire front cluster.
Power down, unplug the PSU, open the side panel, and find where the front-panel USB cable meets the board. Reseat it firmly and make sure it’s on the right header, since it’s easy to confuse the USB 2.0 plug with a fan or audio header. Check that no pins are bent on the board side. If the connector was half-seated, pushing it home usually brings every front port back to life instantly. This fix costs nothing and solves most cases. While you’re in there, note that the USB 3.0 header is the taller, denser blue block, and its many thin pins bend easily, so line it up carefully and press straight down rather than at an angle.
If reseating doesn’t help, gently unplug and reconnect the header a second time to be sure the plug fully clicked home, and follow the cable back to confirm it isn’t pinched or partially torn where it routes behind the motherboard tray. A cable that’s been crushed during a previous build can lose contact on just a wire or two, killing power or data to the front ports while looking perfectly connected. Give it a light wiggle at both ends. If a port flickers to life when you move the cable, you’ve found a broken conductor and the cable or front panel needs replacing.
Cause #2: USB is disabled or glitched in BIOS or Windows
If the header is solid but the ports are still dead, software is the next suspect. Some motherboards let you disable front USB or specific controllers in BIOS, and a firmware update or a wrong click can flip that setting off. Boot into BIOS, look under the integrated peripherals or USB configuration menu, and confirm the front USB controller and legacy USB support are enabled. While you’re there, updating the BIOS to the current version can resolve controller bugs that a Windows update sometimes exposes.
Inside Windows, open Device Manager and expand Universal Serial Bus controllers. A yellow warning icon means a driver problem. Right-click the affected controller, uninstall it, then reboot so Windows reinstalls it clean. Also disable USB selective suspend in your power plan, because that setting cuts power to idle ports and can leave a front jack unresponsive. These steps take a few minutes and fix a surprising number of dead-port complaints that have nothing to do with hardware. If a single port intermittently disconnects with a familiar chime, that’s often selective suspend or a flaky driver rather than a broken jack, so rule out software before you reach for a screwdriver.
One more software angle: chipset drivers. The USB controllers on your motherboard rely on the chipset driver package from your board maker, and a Windows update occasionally replaces a working driver with a generic one that misbehaves. Download the current chipset and USB drivers directly from your motherboard manufacturer’s support page, install them, and reboot. This restores the proper controller support and often revives ports that Device Manager alone couldn’t fix. It’s a five-minute download that resolves a lot of post-update USB weirdness.
Cause #3: The front-panel cable or port is physically damaged
When one specific port is dead while others on the same panel work, you’re likely looking at physical damage. Front USB jacks take abuse. People jam drives in at an angle, snap connectors sideways, or bend the internal pins over years of use. A cracked solder joint on the small front-panel board, a pinched cable behind the motherboard tray, or a bent pin inside the port itself all produce a single dead jack that reseating the header won’t fix.
Inspect the port with a flashlight for bent or pushed-back pins, and gently trace the front-panel cable to check for crimps or a partial tear. If the cable is damaged but the case is otherwise good, you can sometimes replace just the front I/O module, though on many cases the front USB is integrated and a full case swap is the cleaner fix. If you often move your rig between rooms or to events, transporting it in a padded, shockproof case reduces the knocks that crack these fragile front connectors in the first place.
Pros
- IP67 seal with air-lock valve keeps kit dry during rain, dust, or airline handling
- Pick-and-pluck foam in four layers adapts to cameras, lenses, tools, or medical gear
- Dual padlock holes on the latches allow TSA locks for checked-luggage transport
Cons
- No verified owner fedback at time of writing, so long-term wheel and latch durability is unproven
- Case with foam weighs 32.73 lb empty, which pushes loaded weight near airline checked limits
- Standard-density pluck foam is less protective than custom cut foam for heavy optics or precision instruments
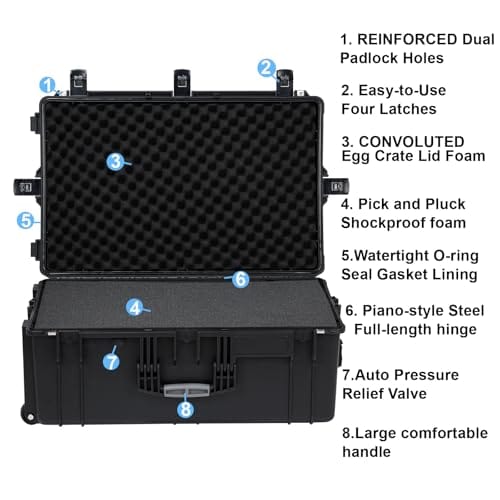
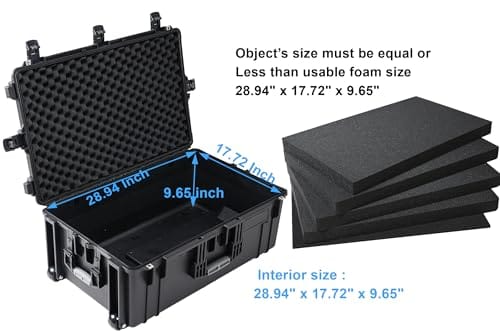
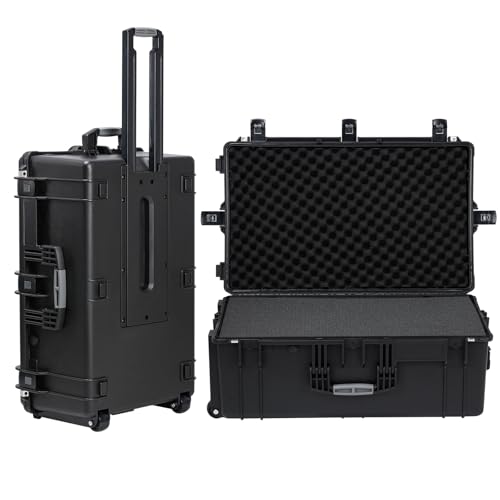
The Regetek Rolling Hard Case is a mid-size wheeled transport case in the Pelican-style category, measuring 32.5 by 20.5 by 13 inch externally with a 28.94 by 17.72 by 9.65 inch usable interior. It targets photographers, drone operators, field service techs, and musicians who need airline-checkable protection for fragile gear.
The defining feature is the IP67 rating paired with a full-length steel hinge and double-latch closure. Cases at this size and seal class typically survive shallow submersion to about 3.3 ft, and the air-lock valve equalizes pressure after altitude changes so the lid does not vacuum shut. Owner feedback is unavailable, so real-world seal longevity cannot be confirmed.
Trade-offs are typical at this tier. The 32.73 lb empty weight with foam eats into airline allowances before gear is loaded, and standard-density pick-and-pluck foam is a compromise between adaptability and impact absorption compared with custom cut foam. Wheels and retractable handles on cases in this class are also the most common long-term failure points.
Buy this if you need a lockable, waterproof rolling case sized for a full mirrorless kit, mid-size drone, or field tolset. Skip this if your payload exceeds the28.94 inch interior length, or if you need documented drop-test certification for professional broadcast use.
Dimensions and weight: Exterior measures 32.5 by 20.5 by 13 inch with an internal usable volume of 28.94 by 17.72 by 9.65 inch. Total weight with foam is 32.73 lb, which is consistent with rotomolded polymer cases in this size class and leaves useful payload room for airline checked baggage.
Sealing and ingress protection: The case is rated IP67 with an O-ring gasket, watertight buckles, and an air-lock pressure equalization valve. Manufacturer states safe submersion to 3.3 ft, and the valve prevents lid suction after temperature or altitude changes during air transit.
Foam configuration: Interior includes four pick-and-pluck layers of standard density foam, one top egg-crate layer, and one bottom pad. The pluck grid lets you shape custom cavities without a knife, though density is not specified in pounds per cubic foot.
Structure and security: Shell uses high-impact polymer with one full-length steel hinge instead of two-point hinges, a double-latch system, dual padlock holes for redundant locking, a heavy-duty top handle, integrated whels, and a retractable pull handle. Waranty is stated at 2 years including replacement parts.
That Regetek rolling hard case at $279.99 is a transport-and-protection accessory, not a PC part, and it carries a 4.6 rating. It’s overkill for a home desktop that never moves, but for anyone hauling a machine around, the foam interior and waterproof shell keep front ports from taking the hits that break them.
Preventive maintenance
A little care keeps front ports alive for years. Insert drives straight, never at an angle, and don’t yank cables sideways to unplug them. Blow dust out of the ports occasionally with compressed air, since packed lint can block a connection and trap heat. When you work inside the case, route the front-panel USB cable so it isn’t stretched taut or pinched behind the motherboard tray, because constant tension slowly loosens the header and frays the wire. If you use the top ports for a phone charger or dock every day, consider a short desktop hub instead, which takes the daily plugging wear off the case ports and extends their life.
When it’s not fixable: what to replace
If you’ve reseated the header, cleared the BIOS and driver angles, and a port is still dead from physical damage, replacement is the honest next step. On some cases you can buy just the front I/O panel, but many modern designs integrate the USB into the chassis, so a new case is the practical fix, and it’s a chance to upgrade your airflow and cable routing at the same time.

Pros
- Patented three-panel tempered glass exposes front, top, and left views of the build.
- Native back-connect motherboard support for hiden 24-pin, EPS, and PCIe cabling.
- Second chamber hides side-mounted AIO tubing for a cleaner primary compartment.
- Swappable top mesh panel suports a 360mm AIO when thermals take priority over glass.
Cons
- Limited owner feedback at time of writing makes long-term reliability signal thin.
- Full specs (GPU length, cooler height, fan count) not published in source data.
- Back-connect layout requires a compatible motherboard, narowing part selection.
The Lian Li O11Vision Compact is a mid-range ATX mid-tower positioned as a smaller sibling to the O11 Dynamic line, developed in collaboration with the PCMasterRace community. It targets showcase builders who want a dual-chamber layout, tempered glass on three sides, and native support for back-connect motherboards in a tighter footprint.
The defining feature is the patented three-panel tempered glass design covering the front, top, and left side. Paired with the second-chamber cable routing and back-connect motherboard compatibility, the front compartment stays visually clean. Builders wanting a 360mm AIO can swap in the included top mesh panel, trading a glass top for airflow.
Trade-offs are typical at this tier. Back-connect support only pays off if you buy a compatible board from ASUS, MSI, GIGABYTE, or similar, which narrows part selection and can raise motherboard cost. Concrete specs like GPU clearance, CPU cooler height, radiator sites, and included fan count are not specified in the source data, so verify against the official manual before finalizing parts.
Buy this if you want O11-family aesthetics with hidden cabling via a back-connect board and a side or top 360mm AIO. Skip this if you need a documented GPU length ceiling, bundled fans, or a traditional cable-visible motherboard build.
Motherboard support: The chassis accepts standard ATX boards and ads native routing for back-connect variants such as ASUS BTF, MSI Project Zero, and GIGABYTE Project Stealth. Cable cutouts on the tray align with rear-side connectors, keping the 24-pin, EPS, and PCIe cables out of the main chamber view.
Radiator and AIO: A swappable top mesh panel is included specifically to enable a 360mm AIO in the rof. When the AIO is mounted on the side instead, the dual-chamber layout routes the tubing into the second compartment, keeping the front-facing glass view unobstructed. Exact side radiator thickness limits are not specified.
Glass and panel layout: Three tempered glass panels cover the front, top, and left side. The top glass panel is the one you swap out when a 360mm radiator is installed, so builders choosing air cooling or a bottom-mounted AIO retain the full three-panel glass look.
Not specified in source: GPU length clearance, CPU cooler height, drive bay count, included fan count, front I/O (USB-C, USB-A), PSU length, and case dimensions are not listed in the provided data. Confirm these against the Lian Li O11VPW official spec sheet before finalizing parts.
The Lian Li O11 Vision Compact at $124.99 is a strong candidate if you’re replacing a case with broken front ports. It’s a white steel and tempered-glass ATX mid tower with back-connect motherboard support, holds a 4.4 rating, and its clean front I/O and cable-routing layout make future maintenance easier. Moving your parts into a fresh chassis with working, well-built ports beats fighting a dead panel forever.
Tools and parts needed
For the basic fixes you need almost nothing: a Phillips screwdriver to open the case, a flashlight to inspect the header and pins, and a can of compressed air for dust. That covers reseating the front USB header and checking for bent pins, which resolves the majority of failures. Keep a spare USB extension or a known-good flash drive handy so you can confirm a port is truly dead versus a bad device. Only if the port is physically broken do you move up to a replacement front panel or a new case. A pair of fine tweezers helps too, in case a header pin sits slightly bent and needs a gentle nudge back into line before the connector will seat.
A few more questions
Why did all my front USB ports stop working at once?
Almost always a loose internal header. The front ports share a single cable that plugs into the motherboard, so if that connector wiggles loose during a move or a build, every front jack goes dead together while the rear ports keep working. Power down, reseat the header firmly, and they usually come right back.
Can a BIOS setting disable my front USB ports?
Yes. Many boards have USB configuration options that can turn off controllers or legacy support, and a firmware update or a mistaken change can flip them off. Enter BIOS, find the USB or integrated peripherals menu, and make sure the front USB controller is enabled. Updating to the current BIOS also fixes controller bugs that Windows updates sometimes surface.
Is it worth fixing a single dead front port?
If the header and software check out and the damage is a bent pin or cracked jack, it depends on your case. Some let you replace just the front I/O module cheaply. Others integrate the USB into the chassis, so a new case like the Lian Li O11 Vision Compact is the cleaner route and upgrades your airflow at the same time.
Could a bad flash drive make me think the port is broken?
Absolutely, and it happens often. Before you open the case, plug a second, known-good device into the front port and try your suspect drive in a rear port. If the good device works up front, the port is fine and the original drive is the problem. This 30-second check saves a lot of needless disassembly.






























Write Your Review
No reviews yet. Be the first to share your experience!