

You boot up, expect to hear that familiar whir, and get silence instead. The case fans aren’t spinning, and now you’re watching temperatures climb and wondering if something expensive just died. Take a breath. A fan that won’t spin is usually a loose connector, a fan-curve setting that keeps it off until a temperature threshold, or a simple dust jam, not a fried board. We researched the common causes and the fixes owners actually use, and most cost nothing but a few minutes with a screwdriver.
This walkthrough works from the fastest checks to the deeper ones, so you don’t replace a fan that was only unplugged. If it turns out a fan is genuinely dead and you’re shopping replacements, our roundups of the best case fans for 2026 and the best CPU air coolers for 2026 point you to reliable options. First, let’s find out why yours went quiet.
First check the obvious
Start with a 30-second sanity check. Many motherboards run a “fan stop” or zero-RPM mode that keeps case and CPU fans off until a temperature threshold is crossed, so a cool idle system with silent fans may be behaving exactly as configured. Boot a game or a stress load for a minute and watch whether the fans kick in as temps rise. If they do, nothing is broken, your fan curve is just aggressive about staying quiet.
Next, look and listen. Give a stationary fan a gentle nudge with a pen while the system is on. If it spins freely and keeps going, the bearing is fine and the issue is power or signal. If it’s physically stuck, dust or a snagged cable is jamming it. This quick triage tells you within a minute if you’re chasing a settings problem, a connection problem, or a dead fan.

While you’re at it, open your BIOS or fan-control software and read the reported RPM for each header. A header showing 0 RPM under load, when its fan is connected and clear, points to a control or wiring fault rather than the fan. A header that reads a healthy 800 to 1,200 RPM while the blades sit still means the tachometer wire works but power isn’t reaching the motor. Those two readings alone narrow the fault before you touch a screwdriver.
Cause #1: The fan connector is loose or on the wrong header
This is the most common culprit by far. Case fans plug into 3-pin or 4-pin headers on the motherboard, or into a fan hub, and those connectors work loose during a build, a GPU swap, or transport. Open the side panel and trace each silent fan’s cable back to its header. Confirm the connector is fully seated and correctly aligned, since a plug offset by one pin, or reversed, leaves the fan dead. The header’s plastic key should line up with the notch on the connector.
Also check which header the fan uses. A fan plugged into a header set to a zero-RPM curve, or a disabled header in BIOS, won’t spin even though it’s healthy. Move the fan to a known-working SYS_FAN or CHA_FAN header to rule the connection in or out. Owner reports show this simple reseat-and-reroute fixes a large share of “dead” fans. The fan was fine, the connection wasn’t.
Watch out for daisy-chained fans and hubs too. If several fans run off one hub or splitter, that hub needs its own power feed, often a SATA connector from the PSU, and a hub that never got plugged in leaves every fan on it dead at once. Trace the hub’s power lead back to the supply and confirm it’s seated. A single unplugged hub cable explains a whole bank of silent fans more often than people expect, and it’s a thirty-second fix once you spot it.
Cause #2: Dust buildup or a seized bearing is jamming the blades
If a fan gets power but won’t turn, or spins up then stalls, physical obstruction is the likely reason. Dust cakes around the hub and bearing over months, and a stray cable can drift into the blades. Power down, open the case, and inspect the stuck fan closely. Blow out the dust with compressed air while holding the blades still so you don’t over-spin the bearing, and clear any cable that’s fouling the blade path.
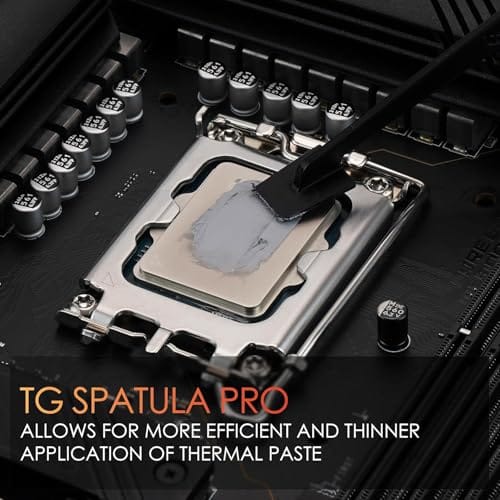
A bearing that has genuinely seized, gritty, noisy, or refusing to spin freely even when nudged, is worn out and due for replacement. Sleeve bearings degrade faster than ball or fluid-dynamic bearings, especially in a hot, dusty case. If cleaning doesn’t revive it, the fan is done. When you’re already inside cleaning fans, it’s a good moment to refresh a CPU cooler that’s caked up too, and Thermal Grizzly Duronaut thermal paste, a 6-gram tube at $24.99 with a 4.4 rating and a set of cleaning wipes, is handy for reseating a cooler after you clean it, even though it’s paste rather than a fan itself.

Pros
- Non-conductive chemistry safer for novices repasting near exposed CPU or GPU capacitors.
- 6g volume suports several full applications on desktop CPUs and console APUs.
- Wet and dry wipes included, so no isopropyl bottle or lint-free cloth need.
Cons
- Limited owner fedback at time of writing makes long-term durability claims hard to verify.
- Non-metal formula typically trails top liquid metals by a few degrees under sustained load.
- Viscosity, TIM lifespan hours, and thermal conductivity W/mK figures are not specified.
Duronaut is Thermal Grizzly's non-conductive thermal paste positioned as a mid-tier daily driver, shipping in a 6g syringe with 6 wet and 6 dry cleaning wipes. The target buyer is a DIY PC builder repasting a CPU or GPU cooler, or a console owner refreshing PS4, PS5, or Xbox thermals without risking shorts.
The defining trait is the aluminum microparticle plus zinc oxide nanoparticle blend paired with an electrically non-conductive base. Thermal Grizzly claims reduced pump-out and stable performance over extended cycles, which maters most on soldered console APUs and overclocked desktop chips that see large delta-T swings. Exact W/mK conductivity is not specified in the source.
Trade-offs are typical for non-conductive pastes at this tier. Expect a few degrees warmer than liquid metal on delided or high-wattage CPUs, and no published viscosity or cure-time data to plan application around. Owner feedback is limited at time of writing, so long-term hardening resistance relies on vendor claims rather than independent long-run testing.
Buy this if you want a safe, non-conductive paste with enough volume for several repastes and a bundled wipe kit for console or GPU jobs. Skip this if you are chasing the absolute lowest core temperatures on a 250W-plus overclocked CPU where liquid metal or a top nano-diamond paste still leads.
Volume and coverage: The syringe holds 6g of paste, enough for roughly 15 to 25 pea-sized applications on mainstream AM5 or LGA1700 IHS surfaces, or several full console APU repastes on PS4, PS5, and Xbox where die coverage is larger than a desktop CPU heatspreader.
Composition and safety: The compound uses aluminum microparticles and zinc oxide nanoparticles in a non-metal carier, rated electrically non-conductive. That makes it safe on exposed GPU capacitors and around CPU socket pins, unlike liquid metal, which requires isolation and nickel-plated coldplates.
Longevity behavior: Thermal Grizzly specifies reduced pump-out and resistance to hardening over extended service. Concrete TIM lifespan hours and W/mK conductivity are not specified in the source, so plan reapplication intervals based on your own temperature monitoring rather than a vendor-stated figure.
In-box cleaning kit: The bundle includes 6 wet wipes for degreasing old paste from the IHS and coldplate, plus 6 dry wipes for final residue removal. Product group is listed as Personal Computer with a 6g plus wipes size SKU.
Cause #3: A failed fan, a dead header, or a fan-curve setting keeping it off
If the connection is solid and the blades are clear but the fan still won’t move, isolate whether the fan or the header failed. Plug the silent fan into a header you know works, one that spins another fan. If it now runs, the original header is dead, which can happen after a surge or board age, and you simply relocate the fan or use a hub. If the fan stays dead on a good header, the fan itself has failed.
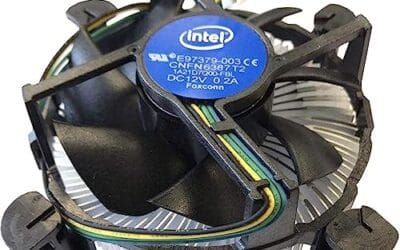
Before condemning anything, revisit your fan curve in BIOS or your control software. A curve set too conservatively can hold a fan at 0 RPM well past comfortable temperatures, and a manual profile of around 30 to 40 percent minimum duty keeps air moving at all times. If you’ve confirmed a fan is truly dead, replacing it is cheap and easy. As a stopgap for airflow over a hot component, a basic cooler-with-fan like the Intel E97379-003, a 4-pin socket cooler at $15.99 with an aluminum heatsink and included fan, can serve on a compatible Intel socket while you source a proper case-fan replacement, though it’s a CPU cooler rather than a dedicated case fan.

Pros
- Native LGA 1150, 1155, and 1156 socket support covers three legacy Intel generations
- 4-pin PWM connector enables proper fan curve control via BIOS
- OEM-style aluminum heatsink footprint keps RAM and VRM clearance predictable
- Push-pin mount installs without removing the motherboard from the case
Cons
- Zero owner fedback available at time of writing, real-world thermals unverified
- Aluminum-only heatsink with no heatpipes struggles with overclocked or unlocked K-series CPUs
- Restricted to obsolete Intel sockets, no path forward to LGA 1200, 1700, or AM5
The Intel E97379-003 is an OEM-style stock CPU cooler built for LGA 1150, 1155, and 1156 boards, covering Core i3, i5, and i7 chips from the Sandy Bridge through Haswell era. It targets one specific buyer: someone repairing, refurbishing, or restoring a legacy Intel desktop that lost its original heatsink.
The defining feature is compatibility, not performance. A 3.5-inch fan sits on an aluminum heatsink with a 4-pin PWM header, matching the original OEM cooler dimensions Intel shipped in retail boxes. Stock coolers in this class typically handle 65W to 84W TDP chips at stock clocks, which lines up with locked i3, i5, and non-K i7 SKUs on these sockets.
Trade-offs are typical for a boxed-style cooler. There are no heatpipes, no copper base contact, and no tower geometry, so sustained multi-core loads will spin the fan up and get audible. Push-pin mounting is convenient but less secure than a backplate design, and overclocking headroom is effectively zero. Owner feedback is not available at time of writing.
Buy this if you need a like-for-like OEM replacement for a locked LGA 1150, 1155, or 1156 CPU and want to kep the original acoustic and clearance profile. Skip this if the CPU is a K-series part, if you plan to overclock, or if the target socket is LGA 1200 or newer.
Socket coverage: Native mounting for LGA 150, 1155, and 1156 only. That spans 2nd, 3rd, and 4th generation Core i3, i5, and i7 desktop chips. No adapter is included for LGA 1200, 1700, or AM4/AM5, so this cooler is locked to legacy Intel repair scenarios.
Heatsink and fan: Aluminum radial-fin heatsink with a 3.5-inch axial fan on a 4-pin PWM connector. No heatpipes, no copper slug, no vapor chamber are indicated in source data. TDP handling is not specified, but OEM colers of this geometry are typically rated for the 65W to 84W stock TDP band on these sockets.
Mounting and clearance: Push-pin retention through the four motherboard holes, no backplate required, install possible without removing the board. Cooler height sits low enough to clear standard mid-tower side panels, and the round footprint keps RAM slots and VRM heatsinks unobstructed. Exact height in mm is not specified.
Acoustics and headroom: Noise level in dBA is not specified. Based on OEM stock cooler behavior at this size, expect quiet idle and audible ramp under sustained all-core load. Overclocking a K-series chip on this heatsink is not advisable, thermal headroom above 84W is minimal.
Preventive maintenance
Most fan failures trace back to dust and heat, both manageable. Clean your fans and filters every few months with compressed air, holding the blades so they don’t spin wildly during cleaning, and keep intake filters clear so fans don’t have to fight a clogged path. Route cables away from blade paths when you build so nothing can drift in and jam a fan later.
Set a sensible fan curve too. A profile that keeps fans at a low but nonzero minimum means air always moves, which lowers component temperatures and reduces the strain that kills bearings early. Fans with fluid-dynamic or ball bearings outlast cheap sleeve-bearing units in warm cases, so favor quality when you replace one. A little upkeep here spares you the whole diagnostic routine down the line.
Positive case pressure helps as well. When your intake fans move slightly more air than your exhausts, the case pulls air mainly through filtered openings rather than every unfiltered gap, so far less dust reaches the blades in the first place. Keep those intake filters clean and the interior stays cleaner for longer. It’s a quiet, no-cost habit that stretches the time between deep cleanings and keeps bearings from choking on grime.
When to call a pro vs DIY
Reseating a connector, cleaning dust, swapping a fan to a different header, and replacing a dead fan are all safe DIY jobs needing only a screwdriver and compressed air. If any of those revive your airflow, you’re finished and out no money. This covers the overwhelming majority of non-spinning-fan cases.
Consider a professional if multiple fan headers are dead at once, which can hint at a motherboard fault, or if fans stop alongside other instability like random shutdowns that point to a failing PSU. A shop can check the board and power delivery under proper diagnostics. When the problem spreads beyond a single fan into system-wide symptoms, expert eyes are worth the cost.
Tools and parts needed
You need very little. A Phillips screwdriver opens the case and mounts fans, compressed air clears dust from blades and bearings, and a spare known-good fan header lets you isolate a bad header from a bad fan. If a fan is dead, a quality replacement case fan is the fix. If you pull a CPU cooler during cleaning, fresh thermal paste like the Thermal Grizzly Duronaut, which ships with cleaning wipes, gets you a proper reseat. That’s the whole kit for this job.
A fan splitter or a powered hub is worth keeping on hand too, since it lets you relocate a fan off a dead header without leaving it unpowered. And a small zip-tie kit helps you route the cables clear of the blades once everything spins again, which prevents the exact snag that caused the jam in the first place. None of these cost much, and together they turn a stalled-fan afternoon into a quick fix.
Common questions
Why are my case fans not spinning at idle?
Most likely your motherboard’s zero-RPM or fan-stop mode is keeping them off until a temperature threshold. Load the system for a minute and watch whether they spin up as temps climb. If they do, nothing’s wrong, your fan curve is just tuned for silence. If you’d rather they always run, set a minimum duty of around 30 to 40 percent in BIOS.
How do I know if a fan is dead or just unplugged?
Move the silent fan to a header you know works, one that spins another fan. If it runs there, the original header or connection was the problem, not the fan. If it stays dead on a proven-good header, the fan itself has failed. Nudging the blades by hand also helps, a healthy fan spins freely while a seized one resists.
Can dust really stop a fan from spinning?
Yes. Dust packs around the hub and bearing over time and can jam the blades outright, especially in a warm, poorly filtered case. Blow it out with compressed air while holding the blades still so you don’t over-spin the bearing. If cleaning restores free movement, you saved a fan. If the bearing stays gritty or stuck, it’s worn out and needs replacing.
Should all my case fans spin at the same speed?
Not necessarily. Intake and exhaust fans often run on different headers with different curves, so one bank can idle low while another ramps under load. What matters is that every fan responds when temperatures climb. If one fan stays dead while its neighbors spin up, that’s the one to investigate, since a healthy fan on a working curve should always react to rising heat.





























Write Your Review
No reviews yet. Be the first to share your experience!