If you’ve never opened your PC, take a flashlight and aim it through the front intake fans. That gray felt you see coating the heatsink? That’s not insulation. That’s three years of dog hair, dust, and sloughed-off human skin choking your airflow. Your CPU temps are 8-12C higher than they should be, your fans are running at higher RPM to compensate, and your case is louder than it needs to be. Two hours and $30 in supplies fixes all of that.
What you’ll need
Don’t skip this list. The right tools turn this from a frustrating job into a satisfying one.
First, an electric air duster. Skip the canned air. Cans run out in 90 seconds, they’re $8 a pop, and the propellant inside can leave residue on hot components. A rechargeable electric duster pushes 80,000+ RPM of clean air for as long as the battery holds out and pays for itself after 3 cleanings.
Second, a set of anti-static brushes. Two sizes covers everything: a small one for between heatsink fins and around RAM slots, a larger one for case dust filters and the bottom of the chassis. Anti-static matters because rubbing a regular bristle brush across exposed PCB can build up enough static to zap a component.
Third, cleaning gel for the keyboard if you’re doing a full setup clean. The dusters handle 95% of PC interior work, but keyboards need a different approach because the gel lifts crumbs out of key gaps without forcing them deeper into the switches.
Fourth, microfiber cloths and isopropyl alcohol (90%+). For monitor screens, case glass, and the occasional thermal paste cleanup if you decide to repaste the CPU while you’re in there. Skip paper towels (they scratch) and tap water (residues build up).
Fifth, a Phillips #1 and #2 screwdriver, a small flashlight, and a clean towel to lay components on. That’s the kit.
Step 1: Power down completely and ground yourself
Shut down Windows. Flip the PSU switch on the back of the case to off. Unplug the power cable from the wall. Press and hold the front power button for 5 seconds to discharge any residual current in the capacitors. Then disconnect the rest of the cables (monitors, USB, audio) so you can move the case freely.
Carry the case to a well-lit area with a flat surface. The kitchen table works if you put a towel down first. The bathroom doesn’t (too much humidity, too many small parts that can roll into impossible corners).
Touch a bare metal part of the case for 5 seconds to discharge any static you’re carrying. If you’ve got an anti-static wrist strap, clip it to the chassis now. If you don’t, just touch the case frame every few minutes throughout the cleaning. Static damage isn’t dramatic when it happens (you won’t see sparks) but it can degrade components silently and shorten their lifespan.
Step 2: Remove side panels and pull dust filters
Lay the case on its side with the main side panel facing up. Most modern cases have tempered glass side panels held by 2-4 thumbscrews on the back edge. Loosen those, lift the glass off carefully (it’s heavier than you think) and set it on a folded towel where it can’t slide.
Pull every dust filter you can find. Bottom of the case (under the PSU), front of the case (behind the front fascia), and top of the case (above the radiator if you have one). Modern cases use magnetic filters that snap right off. Older cases have plastic frames that slide out from inside the case.
Take the filters outside or to a sink. Tap them gently against a hard surface to dislodge bulk dust, then rinse them under cool water until the water runs clear. Set them somewhere airy to dry completely (15-20 minutes). Wet filters back in the case is asking for shorts later.
Step 3: Blow out the heatsinks and fans
This is the satisfying part. Take the electric duster outside or onto a balcony. You do not want to blow PC dust into your living room. It’s gross, and the fine particles will settle on every surface within 10 feet.
Hold each fan blade still with your finger before you blast it. This matters. An unconstrained fan spun by an air duster can reach 6000+ RPM, which is well above its rated speed, and the bearing wear from that single overspun session can shave months off the fan’s life. Just hold the blade still with one finger and blow with the other hand.

Pros
- 110,000 RPM brushless motor pushes 72.4 m/s airflow, competitive at this weight class
- 0.45 lb body with lanyard attachment suits compact desk setups and portable carry
- Up to 240 minutes on gear 1 from dual 2500mAh cells covers extended cleaning sessions
- Four nozzle attachments included for PC slots, keyboard gaps, vents, and car interiors
Cons
- Charging restricted to 5V/2A only; fast chargers not supported, limiting USB-C convenience
- Cannot charge while in use, so a dead unit mid-task means waiting the full 3.5-hour cycle
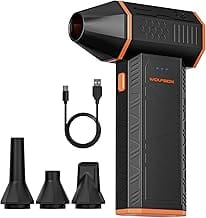
The WOLFBOX MegaFlow 50 is a compact, battery-powered electric air duster sitting at the entry point of the MegaFlow lineup. Rated at 110,000 RPM with a brushless motor and weighing 0.45 lb, it targets PC owners, keyboard enthusiasts, and anyone looking to retire single-use aerosol cans without spending much.
The standout spec is the 72.4 m/s wind speed from such a small form factor. In practice, that translates to clearing dust from heatsink fins, PCIe slot covers, and switch housings without having to disassemble anything. Gear 1 is gentle enough for loose debris around sensitive components; gear 3 handles compacted dust in tight chassis corners. Owner reports broadly confirm the airflow feels meaningful rather than token.
The main honest trade-off is the charging restriction: 5V/2A only, no fast charging, and no use-while-charging. On a modern USB-C desk that runs 65W PD adapters, you will need to locate a legacy charger or a port that downgrades. The non-removable battery also means when capacity degrades after a few hundred cycles, the unit is not field-serviceable, unlike the higher-tier MegaFlow 200.
Buy this if you clean one or two PCs occasionally and want to stop buying aerosol cans. Skip this if you do regular shop-level cleaning across multiple rigs where the MegaFlow 100 or 200's higher airflow and removable batteries would pay off faster.
Motor and Airflow: Brushless motor rated at 110,000 RPM, producing 72.4 m/s wind speed across all three gear levels. Gear selection cycles via the power button with an indicator light confirming current level. Gear 3 requires a long press on the air button to engage, adding a safety buffer against accidental full-power bursts.
Battery and Runtime: Dual 2500mAh cells (non-removable) provide up to 240 minutes on gear 1. Runtime drops progressively on gears 2 and 3; exact figures for higher gears are not specified by the manufacturer. A 3-LED indicator tracks charge state, and the unit auto-shuts off after 3 minutes of standby.
Charging: USB-C input rated strictly at 5V/2A. Fast chargers are explicitly unsupported. Full charge takes 3.5 hours. The unit cannot operate while charging, so plan around downtime. Lights flash in sequence during charge and hold solid when complete.
Accessories and Weight: Ships with 4 nozzle attachments suited for PC vents, keyboard rows, and crevices. Unit weight is 0.45 lb, the lightest in the MegaFlow range. A lanyard is included for wrist attachment during outdoor or overhead use.
Work systematically: CPU cooler fan first, then the heatsink fins behind it, then case intake fans, then exhaust fans, then the GPU fans. For the GPU, blow from the back of the card through the heatsink fins. That direction pushes dust out the way it came in, instead of forcing it deeper into the cooler.
Watch where you’re aiming. Don’t blast dust directly at the motherboard’s power delivery components. Don’t aim into the PSU (the dust inside a PSU should be cleaned with the PSU removed and disassembled, which is beyond this guide). Don’t blow into RAM slots from the side (use the brush there instead).
Step 4: Brush the stubborn spots and wipe surfaces
The duster handles bulk dust. The brush handles the rest. Use the small brush to sweep between heatsink fins where the duster couldn’t reach, around the M.2 slots, in the corners of the case where dust packs into the seams, and along the edges of the motherboard near the I/O shield.
For the glass side panel, use a microfiber cloth dampened (not soaked) with a 50/50 mix of distilled water and isopropyl alcohol. Wipe in straight lines, not circles, and finish with a dry corner of the cloth. The result should be streak-free and ready for another 6 months of grime accumulation.
If you’ve got RGB strips inside the case, wipe those gently with the same damp cloth. Dust on RGB diffusers cuts perceived brightness by 20-30% and makes the whole setup look dingy.
Step 5: Reassemble and verify airflow
Put the dry dust filters back exactly where they came from. Direction matters on some filters (the magnetic side faces the case, the screen side faces out). Snap the side panel back on and tighten the thumbscrews finger-tight. Don’t crank them down with a screwdriver. Glass panels crack under uneven pressure.
Reconnect all cables. Flip the PSU switch on. Power up. Listen carefully for the first 30 seconds. Fans should spin up cleanly without grinding or ticking. If you hear a new noise that wasn’t there before, power down and check that nothing got knocked loose during cleaning (loose cable in a fan blade is the usual culprit).
Boot into Windows, open HWInfo or HWMonitor, and let the system idle for 5 minutes. Note CPU and GPU idle temps. They should be 4-8C lower than before the cleaning if you had any meaningful dust buildup. Then run a stress run (Cinebench R23 for CPU, FurMark for GPU) for 10 minutes and check load temps. Properly cleaned systems should see a 5-15C drop in load temps compared to a dusty baseline.
Common mistakes
Three errors come up over and over. First, people skip the fan-holding step and let the duster spin fans freely. Don’t do this. Even a single 30-second blast at 4000+ RPM beyond rated speed shortens bearing life measurably. Hold the blade.
Second, people use canned air upside down. The propellant inside the can comes out as a freezing liquid when the can’s inverted, and that liquid will pool on whatever component it lands on. Wait for it to evaporate, sure, but if it lands on a hot capacitor mid-run, thermal shock can crack the component. Electric dusters don’t have this issue.
Third, people don’t clean the dust filters often enough. The whole point of filters is to make interior cleaning rare. If you rinse the filters every 4-6 weeks, you can stretch interior deep-cleans to once a year. If you ignore the filters, you’ll be doing this 4 times a year and your components will run hotter the whole time.
Common questions
How often should I clean my PC?
Filter rinse every 4-6 weeks. Full interior dust-out every 6 months in a typical home, or every 3 months if you’ve got pets or smoke in the house. If your temps creep up between scheduled cleanings, that’s the canary. Don’t wait for the calendar.
Do I need to repaste the CPU while I’m in there?
Only if it’s been more than 3 years since the last repaste or your load temps are running above 85C on a midrange CPU. Modern thermal paste lasts 4-6 years easily. Repasting too often introduces risk (you can crack the IHS, you can over-tighten the cooler, you can introduce voids). Leave it alone unless temps tell you to act.
Can I vacuum the inside of my PC?
No. Vacuums generate massive static charge as air moves through the hose, and that static can discharge into your components when the nozzle gets close. Use a duster designed for electronics. If you must remove bulk dust before the duster session, hold a regular vacuum nozzle 6 inches away from the case (never inside) to catch dust that the duster blows out.
What if I have liquid cooling?
AIOs follow the same cleaning routine as air coolers. Blow dust out of the radiator fins from the fan side (the cleaner side, which forces buildup back out through the dirty side). Custom loops are a different conversation, but if you’ve got one, you already know how to maintain it. The exterior radiator dust still gets handled the same way.