

You hit the power button and nothing happens. No fans, no RGB, no reassuring hum from the PSU. Or maybe the button feels mushy, sticks halfway, or works only if you mash it three times. A dead or flaky case power button is one of the most common panic-inducing PC problems, and it’s also one of the most misdiagnosed. Most people assume the motherboard died. Usually it didn’t. The switch on the front panel is a tiny, cheap momentary button wired to two pins on your board, and there’s a short list of reasons it stops doing its job.
We researched dozens of owner reports, forum threads, and manufacturer wiring guides to sort the real causes from the myths. The good news: most of these fixes take a screwdriver and ten minutes, no soldering required. If you’re building fresh and want a chassis with cleaner front-panel wiring from the start, our roundup of the best mid-tower cases for 2026 is worth a look. For now, let’s figure out why your button’s playing dead.
One thing to set expectations on: a “dead” power button rarely means a dead PC. The button is just a doorbell. It momentarily closes a circuit and tells the motherboard “hey, wake up.” When that doorbell stops ringing, the house behind it is usually still fine. So resist the urge to RMA your board or buy a new PSU on day one. Work through the causes below in order, from cheapest to check to most involved, and you’ll almost certainly land on the fix before you reach the bottom.
First check the obvious (the 30-second check)
Before you open anything, rule out the dumb stuff. Is the PSU switch on the back flipped to the “I” position? Is the wall outlet live? Plug a phone charger into it and confirm. Is the PSU cable seated fully at both ends? These sound insulting, but they account for a shocking number of “dead button” posts that end with a facepalm.

Next, look for the motherboard’s standby LED. Most boards have a small light that glows when the PSU is delivering power, even with the system off. If that LED is lit, your power delivery is fine and the problem is downstream, at the button or its wiring. If it’s dark, your issue is upstream: the PSU, the cable, or the outlet. That single LED tells you which half of this guide to read. Don’t skip it.

One more quick move before the panels come off: clear any residual charge. Unplug the PSU, hold the power button for about fifteen seconds to drain the capacitors, then plug back in and try once more. This resets a surprising number of boards that latched into a weird state after a power blip or a failed shutdown. If the machine springs to life after that, you didn’t have a button problem at all, just a stuck power state. Cheap to try, and it costs you nothing but half a minute.
Cause #1: The front-panel header wire came loose
This is the number-one culprit, and it’s almost always self-inflicted. The power button connects to a two-pin plug labeled PWR_SW or PWRBTN on your motherboard’s front-panel header, a small cluster of pins usually tucked in the bottom-right corner. That plug is tiny, unkeyed, and easy to knock loose when you’re routing cables, installing a GPU, or moving the case. If you recently worked inside the build and the button suddenly quit, this is your first suspect.
Pop the side panel, find the header, and check that the two-pin power connector is fully seated on the correct pins. Consult your motherboard manual for the exact layout, because the labels on the board silkscreen are often microscopic. Here’s the useful trick: while the system’s plugged in and the standby LED is lit, you can briefly touch a screwdriver across those two PWR_SW pins to jump them. If the PC boots, your board and PSU are healthy and the fault is 100% in the button or the wire leading to it. That check alone saves a lot of guessing.
Cause #2: The button switch itself has failed
Front-panel power switches are cheap momentary contacts, and cheap parts wear out. After a few thousand presses the internal contact can oxidize, crack, or stick. Symptoms of a dying switch are pretty distinctive: the button feels loose or gritty, it needs multiple presses to register, or it works intermittently depending on how hard you push. Sometimes it welds itself closed and the PC boots the instant power’s applied, then shuts down after four seconds because the board reads a held button.
You can confirm a bad switch with the jumper check from Cause #1. If a screwdriver across the pins boots the machine reliably but the actual button doesn’t, the switch is toast. Replacements are easy: a universal ATX power/reset switch with a two-pin lead costs a few dollars, and it just clips into the front panel and plugs into the header. Some cases let you swap the button module; cheaper ones have it molded in, in which case you route a replacement switch through a spare front-panel opening. It’s not elegant, but it works, and it beats replacing the whole chassis over one dead button.
Cause #3: Broken or shorted front-panel wiring
If the switch checks out and the header’s seated, the thin wires running from the button to the header are the next suspect. These leads get pinched behind the motherboard tray, snagged during panel removal, or fatigued at the crimp where they meet the connector. A hairline break inside the insulation gives you a button that works when the wire sits one way and dies when the case shifts. Maddening, and hard to spot.
Inspect the full run of the power-button wire for kinks, cuts, or a connector that’s pulling apart. Gently tug each lead at the plug to confirm the crimp is solid. A wire shorted against the metal tray can also cause weird behavior, so make sure nothing bare is touching chassis metal. If the wiring’s damaged and you can’t repair the crimp, the same universal replacement switch mentioned above bypasses the whole harness. Route the new lead cleanly and secure it away from fan blades and sharp edges.
There’s a subtler version of this problem worth flagging. Some cases share a single ribbon or bundled harness for power, reset, HDD LED, and power LED. If that bundle gets crushed, a short on one line can drag down the others or confuse the header. If your power button quit at the same time your reset button or drive light stopped working, suspect the shared harness rather than the switch alone. Reseating the whole front-panel block, one pin at a time against your manual’s diagram, often clears it. Take a photo first so you can put every lead back exactly where it belongs.

Pros
- Patented three-panel tempered glass exposes front, top, and left views of the build.
- Native back-connect motherboard support for hiden 24-pin, EPS, and PCIe cabling.
- Second chamber hides side-mounted AIO tubing for a cleaner primary compartment.
- Swappable top mesh panel suports a 360mm AIO when thermals take priority over glass.
Cons
- Limited owner feedback at time of writing makes long-term reliability signal thin.
- Full specs (GPU length, cooler height, fan count) not published in source data.
- Back-connect layout requires a compatible motherboard, narowing part selection.
The Lian Li O11Vision Compact is a mid-range ATX mid-tower positioned as a smaller sibling to the O11 Dynamic line, developed in collaboration with the PCMasterRace community. It targets showcase builders who want a dual-chamber layout, tempered glass on three sides, and native support for back-connect motherboards in a tighter footprint.
The defining feature is the patented three-panel tempered glass design covering the front, top, and left side. Paired with the second-chamber cable routing and back-connect motherboard compatibility, the front compartment stays visually clean. Builders wanting a 360mm AIO can swap in the included top mesh panel, trading a glass top for airflow.
Trade-offs are typical at this tier. Back-connect support only pays off if you buy a compatible board from ASUS, MSI, GIGABYTE, or similar, which narrows part selection and can raise motherboard cost. Concrete specs like GPU clearance, CPU cooler height, radiator sites, and included fan count are not specified in the source data, so verify against the official manual before finalizing parts.
Buy this if you want O11-family aesthetics with hidden cabling via a back-connect board and a side or top 360mm AIO. Skip this if you need a documented GPU length ceiling, bundled fans, or a traditional cable-visible motherboard build.
Motherboard support: The chassis accepts standard ATX boards and ads native routing for back-connect variants such as ASUS BTF, MSI Project Zero, and GIGABYTE Project Stealth. Cable cutouts on the tray align with rear-side connectors, keping the 24-pin, EPS, and PCIe cables out of the main chamber view.
Radiator and AIO: A swappable top mesh panel is included specifically to enable a 360mm AIO in the rof. When the AIO is mounted on the side instead, the dual-chamber layout routes the tubing into the second compartment, keeping the front-facing glass view unobstructed. Exact side radiator thickness limits are not specified.
Glass and panel layout: Three tempered glass panels cover the front, top, and left side. The top glass panel is the one you swap out when a 360mm radiator is installed, so builders choosing air cooling or a bottom-mounted AIO retain the full three-panel glass look.
Not specified in source: GPU length clearance, CPU cooler height, drive bay count, included fan count, front I/O (USB-C, USB-A), PSU length, and case dimensions are not listed in the provided data. Confirm these against the Lian Li O11VPW official spec sheet before finalizing parts.
Preventive maintenance
A few habits keep front-panel gremlins away. Route your case wires with a little slack so nothing pulls on the tiny header plugs when the panels flex. Every time you close up a build, do a quick tug-check on the PWR_SW connector, it takes two seconds. Keep the front-panel cluster labeled or photographed before you disconnect it, so reassembly doesn’t turn into a guessing game.
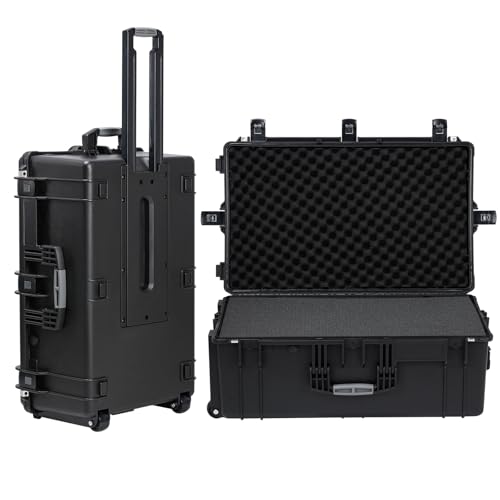
If you haul your rig to LAN events or move house often, physical shock is the real enemy of front-panel switches and connectors. A padded transport case saves a lot of grief. Something like the Regetek Rolling Hard Case, priced around $279.99 with a 4.6 rating, offers a shockproof, waterproof shell with custom foam and a retractable handle, and its 28.94 by 17.72 by 9.65 inch interior swallows a mid-tower with room to spare. Overkill for a desk PC, genuinely useful if your machine travels.
Pros
- IP67 seal with air-lock valve keeps kit dry during rain, dust, or airline handling
- Pick-and-pluck foam in four layers adapts to cameras, lenses, tools, or medical gear
- Dual padlock holes on the latches allow TSA locks for checked-luggage transport
Cons
- No verified owner fedback at time of writing, so long-term wheel and latch durability is unproven
- Case with foam weighs 32.73 lb empty, which pushes loaded weight near airline checked limits
- Standard-density pluck foam is less protective than custom cut foam for heavy optics or precision instruments
The Regetek Rolling Hard Case is a mid-size wheeled transport case in the Pelican-style category, measuring 32.5 by 20.5 by 13 inch externally with a 28.94 by 17.72 by 9.65 inch usable interior. It targets photographers, drone operators, field service techs, and musicians who need airline-checkable protection for fragile gear.
The defining feature is the IP67 rating paired with a full-length steel hinge and double-latch closure. Cases at this size and seal class typically survive shallow submersion to about 3.3 ft, and the air-lock valve equalizes pressure after altitude changes so the lid does not vacuum shut. Owner feedback is unavailable, so real-world seal longevity cannot be confirmed.
Trade-offs are typical at this tier. The 32.73 lb empty weight with foam eats into airline allowances before gear is loaded, and standard-density pick-and-pluck foam is a compromise between adaptability and impact absorption compared with custom cut foam. Wheels and retractable handles on cases in this class are also the most common long-term failure points.
Buy this if you need a lockable, waterproof rolling case sized for a full mirrorless kit, mid-size drone, or field tolset. Skip this if your payload exceeds the28.94 inch interior length, or if you need documented drop-test certification for professional broadcast use.
Dimensions and weight: Exterior measures 32.5 by 20.5 by 13 inch with an internal usable volume of 28.94 by 17.72 by 9.65 inch. Total weight with foam is 32.73 lb, which is consistent with rotomolded polymer cases in this size class and leaves useful payload room for airline checked baggage.
Sealing and ingress protection: The case is rated IP67 with an O-ring gasket, watertight buckles, and an air-lock pressure equalization valve. Manufacturer states safe submersion to 3.3 ft, and the valve prevents lid suction after temperature or altitude changes during air transit.
Foam configuration: Interior includes four pick-and-pluck layers of standard density foam, one top egg-crate layer, and one bottom pad. The pluck grid lets you shape custom cavities without a knife, though density is not specified in pounds per cubic foot.
Structure and security: Shell uses high-impact polymer with one full-length steel hinge instead of two-point hinges, a double-latch system, dual padlock holes for redundant locking, a heavy-duty top handle, integrated whels, and a retractable pull handle. Waranty is stated at 2 years including replacement parts.
When it’s not fixable: what to replace
Sometimes the button, wire, and header module are all fine and the front-panel I/O board itself has failed, taking USB ports and audio jacks down with it. On many cases that I/O assembly isn’t sold separately, which pushes you toward either a universal switch bypass or a fresh chassis. If your case is old, cramped, or has poor airflow anyway, replacing it can be the smarter spend. You get modern cable management, better thermals, and a fresh, reliable front panel.
The Lian Li O11Vision Compact is a solid example of a modern ATX mid tower done right. At $124.99 with a 4.4 rating, its steel-and-tempered-glass build and back-connect motherboard support route the front-panel and power cables behind the tray, which means far less strain on those fragile header plugs and a much cleaner interior. If you’re already frustrated with a flaky button in a bargain-bin case, a chassis engineered around hidden cabling is a real quality-of-life upgrade. For more options across price tiers, our guides to the best budget PC cases and the best budget cases for silent builds compare the field.
Tools and parts needed
You won’t need much. A #2 Phillips screwdriver opens nearly every case and reaches the front-panel screws. A flashlight or phone light helps you read the tiny header labels. Keep your motherboard manual handy, or the PDF on your phone, for the exact front-panel pinout. Optional but handy: a universal ATX power/reset switch with a two-pin lead for the actual repair, and a couple of zip ties or Velcro straps to secure the new wire. That’s the whole kit. No soldering iron, no multimeter required, though a multimeter’s continuity mode makes confirming a dead switch faster if you own one.
If you’d rather compare more chassis before committing to a swap, our guides to the best budget cases for airflow break down which layouts keep front-panel cabling sane on a tight budget. A little planning here pays off later, because the cases that route wiring behind the tray are the same ones that stop stressing those fragile header plugs in the first place.
A few more questions
Can I turn on my PC without the case power button?
Yes. With the system plugged in and the standby LED lit, briefly touch a screwdriver across the two PWR_SW pins on the front-panel header. That momentarily closes the circuit exactly like the button does, and the PC boots. It’s the standard way to start a bench build with no case attached, and it’s also the fastest way to confirm your button, not your board, is the failed part.
How do I know if it’s the button or the motherboard?
Run the jumper check. If shorting the two header pins boots the machine reliably but pressing the actual button doesn’t, the button or its wiring failed and the board is fine. If nothing happens even when you jump the pins, and the standby LED is lit, then the issue points at the board’s power circuit or the header itself. That one trick separates a five-dollar fix from a board replacement.
Are replacement power switches universal?
Mostly, yes. Standard ATX power and reset switches use a simple two-pin momentary contact, so a generic replacement plugs into almost any motherboard’s front-panel header. The only variable is how the button physically mounts in your specific case, since some chassis integrate the switch into a molded panel. If yours won’t accept a drop-in module, you route the universal switch through another front opening. Electrically it’s plug-and-play.




























Write Your Review
No reviews yet. Be the first to share your experience!