

You hit the power button, the PC lights up, but the fan on your CPU cooler just sits there dead still. Maybe it twitches once and stops. Maybe it never moves at all. Either way, your stomach drops, because a CPU with no active cooling can overheat in seconds and either throttle to a crawl or shut itself off to avoid damage. The good news is that a non-spinning cooler fan is usually a cheap, fixable problem, not a dead chip. We researched the most common causes and the order to check them in, so you can stop guessing. If your cooler turns out to be genuinely dead and you’re shopping for a replacement, our guides to the best CPU coolers of 2026 and the best budget CPU coolers can point you at a solid upgrade.
First check the obvious (the 30-second check)
Before you tear anything apart, confirm the fan is truly not spinning versus spinning too slowly to notice. Open the case, shine a light on it, and power on. Many modern motherboards run a zero-RPM mode that keeps the fan off until the CPU crosses a temperature threshold, often 50 to 60 degrees Celsius. If your fan is idle at desktop but ramps up under load, that’s normal behavior, not a fault. Watch it for a minute while you open a few programs.

If it stays dead even when the CPU heats up, look for the simple stuff first. Is a stray cable, zip tie, or bit of packaging foam jamming the blades? Did a wire slip into the fan? Give the blade a gentle nudge with a plastic tool while powered off. If it spins freely by hand but won’t run on its own, the mechanical side is fine and you’ve got an electrical or configuration issue. That narrows things down fast.
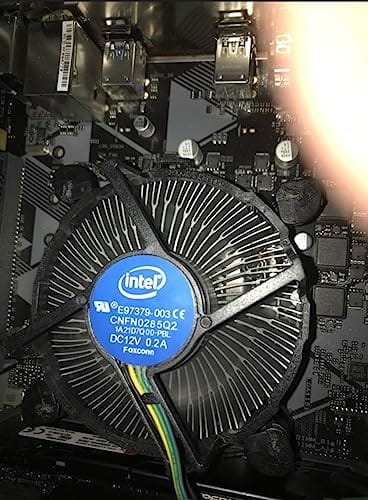
While you have the case open, do a quick sanity pass on the rest of the system too. Confirm the power supply cables feeding the motherboard are fully seated, because a loose 8-pin CPU power connector can cause odd boot behavior that looks like a cooling fault. Note whether other case fans are spinning. If every fan in the machine is dead, the problem is likely upstream at the power supply or a blown fuse, not the cooler itself. If only the CPU fan is out while the rest hum along, you’ve confirmed the issue is isolated to that fan or its header. Small observations like these save you from replacing the wrong part.
Cause #1: The fan header is wrong or loose
This is the number one culprit, and it’s embarrassingly common. The cooler fan must plug into the header labeled CPU_FAN on the motherboard, not CHA_FAN, SYS_FAN, or an AIO_PUMP header. Plug it into the wrong one and the fan may get no signal, or the board may not spin it up at all. Reseat the connector and make sure it’s pushed down fully. A 4-pin fan can be pressed onto a 3-pin header and still work, but confirm the plastic guide notch lines up so the pins match.
Loose or partially seated connectors cause intermittent no-spin behavior too. If the fan works sometimes and not others, that’s a classic sign of a connector that isn’t fully clicked in. While you’re in there, inspect the cable for pinched or frayed spots near the header and along the tubing if it’s a liquid cooler. Reroute it away from anything hot or sharp. Owner reports show a surprising number of dead-fan panics end right here, with a firmly reseated CPU_FAN plug. If you’re using a fan splitter or an RGB hub, bypass it and plug the fan straight into the board to rule the adapter out. Cheap splitters fail more often than the fans they feed, and swapping to a direct connection takes ten seconds.
Cause #2: A BIOS fan curve set the speed to zero
Your motherboard’s BIOS controls how fast the fan spins based on temperature. If someone set an aggressive silent profile, or a firmware update reset the curve, the fan can be told to stay at zero RPM until the CPU gets hot, or worse, told to stay off entirely. Reboot, enter the BIOS, and find the fan control section, often under a name like Q-Fan, Smart Fan, or Fan Xpert depending on the brand.
Set the CPU fan to a standard or full-speed profile and watch the RPM readout. If it jumps to 800 or 1,000 RPM immediately, you’ve found it. Also check the fan mode. A fan set to DC mode when it needs PWM, or the reverse, can misbehave. Setting it to Auto usually lets the board figure out the right control method. Save, exit, and confirm the fan spins at the desktop. This costs nothing and fixes a shocking share of cases where the hardware was fine all along.
One more BIOS gotcha worth knowing: some boards let you set a low-temperature warning or a fan-fail alarm on the CPU header. If that alarm was disabled and the fan quietly died, you’d never get a heads-up until temperatures spiked. While you’re in the fan menu, turn the CPU fan warning on. It won’t spin a dead fan, but it turns the next failure into a beep at boot instead of a surprise shutdown mid-game. It’s a two-second setting that pays for itself the first time a bearing gives out.
Cause #3: A dead fan, seized bearing, or dried-out cooler
If the header is right and the BIOS is telling it to spin but the fan still won’t move, the fan itself may be dead. Bearings wear out, especially on stock coolers that have run for five or more years. A seized bearing feels rough or won’t turn freely when you flick the blade by hand. Dust packed into the hub adds drag and can stall a tired motor. Blow it out with compressed air and try again. If it’s still dead, the fan or the whole cooler needs replacing.
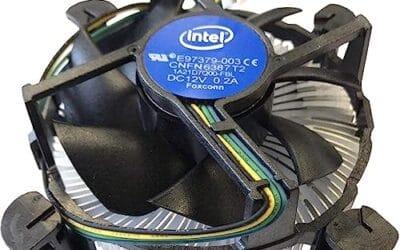
For an Intel desktop that shipped with the bundled heatsink, a like-for-like stock replacement is cheap and quick. The Intel E97379-003 cooler fits LGA 1150, 1155, and 1156 sockets, uses an aluminum heatsink with a 3.5-inch fan and a standard 4-pin connector, and runs about $15.99 at a 4.1-star rating. It’s an easy drop-in for older i3, i5, and i7 builds that just need a working fan again without spending on a tower cooler.

Pros
- Native LGA 1150, 1155, and 1156 socket support covers three legacy Intel generations
- 4-pin PWM connector enables proper fan curve control via BIOS
- OEM-style aluminum heatsink footprint keps RAM and VRM clearance predictable
- Push-pin mount installs without removing the motherboard from the case
Cons
- Zero owner fedback available at time of writing, real-world thermals unverified
- Aluminum-only heatsink with no heatpipes struggles with overclocked or unlocked K-series CPUs
- Restricted to obsolete Intel sockets, no path forward to LGA 1200, 1700, or AM5
The Intel E97379-003 is an OEM-style stock CPU cooler built for LGA 1150, 1155, and 1156 boards, covering Core i3, i5, and i7 chips from the Sandy Bridge through Haswell era. It targets one specific buyer: someone repairing, refurbishing, or restoring a legacy Intel desktop that lost its original heatsink.
The defining feature is compatibility, not performance. A 3.5-inch fan sits on an aluminum heatsink with a 4-pin PWM header, matching the original OEM cooler dimensions Intel shipped in retail boxes. Stock coolers in this class typically handle 65W to 84W TDP chips at stock clocks, which lines up with locked i3, i5, and non-K i7 SKUs on these sockets.
Trade-offs are typical for a boxed-style cooler. There are no heatpipes, no copper base contact, and no tower geometry, so sustained multi-core loads will spin the fan up and get audible. Push-pin mounting is convenient but less secure than a backplate design, and overclocking headroom is effectively zero. Owner feedback is not available at time of writing.
Buy this if you need a like-for-like OEM replacement for a locked LGA 1150, 1155, or 1156 CPU and want to kep the original acoustic and clearance profile. Skip this if the CPU is a K-series part, if you plan to overclock, or if the target socket is LGA 1200 or newer.
Socket coverage: Native mounting for LGA 150, 1155, and 1156 only. That spans 2nd, 3rd, and 4th generation Core i3, i5, and i7 desktop chips. No adapter is included for LGA 1200, 1700, or AM4/AM5, so this cooler is locked to legacy Intel repair scenarios.
Heatsink and fan: Aluminum radial-fin heatsink with a 3.5-inch axial fan on a 4-pin PWM connector. No heatpipes, no copper slug, no vapor chamber are indicated in source data. TDP handling is not specified, but OEM colers of this geometry are typically rated for the 65W to 84W stock TDP band on these sockets.
Mounting and clearance: Push-pin retention through the four motherboard holes, no backplate required, install possible without removing the board. Cooler height sits low enough to clear standard mid-tower side panels, and the round footprint keps RAM slots and VRM heatsinks unobstructed. Exact height in mm is not specified.
Acoustics and headroom: Noise level in dBA is not specified. Based on OEM stock cooler behavior at this size, expect quiet idle and audible ramp under sustained all-core load. Overclocking a K-series chip on this heatsink is not advisable, thermal headroom above 84W is minimal.
One thing people forget: if you pull the cooler off to swap the fan or reseat it, you must clean off the old thermal paste and apply fresh paste before remounting. Reusing crusty, dried paste is a fast track to high temps even with a perfectly good fan. A quality paste like Thermal Grizzly Duronaut, a 6-gram tube at $24.99 rated 4.4 stars, ships with cleaning wipes, six wet and six dry, so you can strip the old gunk and lay down a clean layer in one go. Skimping here undoes all your other work.

Pros
- Non-conductive chemistry safer for novices repasting near exposed CPU or GPU capacitors.
- 6g volume suports several full applications on desktop CPUs and console APUs.
- Wet and dry wipes included, so no isopropyl bottle or lint-free cloth need.
Cons
- Limited owner fedback at time of writing makes long-term durability claims hard to verify.
- Non-metal formula typically trails top liquid metals by a few degrees under sustained load.
- Viscosity, TIM lifespan hours, and thermal conductivity W/mK figures are not specified.
Duronaut is Thermal Grizzly's non-conductive thermal paste positioned as a mid-tier daily driver, shipping in a 6g syringe with 6 wet and 6 dry cleaning wipes. The target buyer is a DIY PC builder repasting a CPU or GPU cooler, or a console owner refreshing PS4, PS5, or Xbox thermals without risking shorts.
The defining trait is the aluminum microparticle plus zinc oxide nanoparticle blend paired with an electrically non-conductive base. Thermal Grizzly claims reduced pump-out and stable performance over extended cycles, which maters most on soldered console APUs and overclocked desktop chips that see large delta-T swings. Exact W/mK conductivity is not specified in the source.
Trade-offs are typical for non-conductive pastes at this tier. Expect a few degrees warmer than liquid metal on delided or high-wattage CPUs, and no published viscosity or cure-time data to plan application around. Owner feedback is limited at time of writing, so long-term hardening resistance relies on vendor claims rather than independent long-run testing.
Buy this if you want a safe, non-conductive paste with enough volume for several repastes and a bundled wipe kit for console or GPU jobs. Skip this if you are chasing the absolute lowest core temperatures on a 250W-plus overclocked CPU where liquid metal or a top nano-diamond paste still leads.
Volume and coverage: The syringe holds 6g of paste, enough for roughly 15 to 25 pea-sized applications on mainstream AM5 or LGA1700 IHS surfaces, or several full console APU repastes on PS4, PS5, and Xbox where die coverage is larger than a desktop CPU heatspreader.
Composition and safety: The compound uses aluminum microparticles and zinc oxide nanoparticles in a non-metal carier, rated electrically non-conductive. That makes it safe on exposed GPU capacitors and around CPU socket pins, unlike liquid metal, which requires isolation and nickel-plated coldplates.
Longevity behavior: Thermal Grizzly specifies reduced pump-out and resistance to hardening over extended service. Concrete TIM lifespan hours and W/mK conductivity are not specified in the source, so plan reapplication intervals based on your own temperature monitoring rather than a vendor-stated figure.
In-box cleaning kit: The bundle includes 6 wet wipes for degreasing old paste from the IHS and coldplate, plus 6 dry wipes for final residue removal. Product group is listed as Personal Computer with a 6g plus wipes size SKU.
Preventive maintenance
Most dead-fan situations trace back to neglect. Dust is the enemy. Every few months, power down, open the case, and blow the cooler, fins, and fan hub clean with compressed air. Hold the blades still while you spray so you don’t over-spin the motor and generate a reverse voltage that can damage it. Check that cables stay clear of the blades and that the CPU_FAN connector is snug. If you built the rig yourself, reapply thermal paste every two to three years to keep contact fresh.
Airflow inside the case matters too. A fan that runs hotter works harder and wears its bearing out faster, so keeping intake filters clean and cable clutter out of the way extends the life of every fan in the build. It’s worth glancing at your BIOS fan curve once in a while as well. A curve that never lets the fan ramp keeps the CPU hotter than it needs to be, and constant heat soak ages the bearing lubricant. A moderate curve that spins the fan up gently under load is kinder to the hardware than either extreme.
When it’s not fixable, what to replace
Sometimes the fan or the cooler is simply done. If the bearing is seized, the motor is dead, or a liquid cooler’s pump has failed and gone silent, replacement is the answer. For a stock air cooler, a bundled unit like the Intel E97379-003 gets an older build breathing again for under $20. If you were already flirting with higher temps or wanted quieter operation, this is a natural moment to step up to a proper tower cooler instead. Enthusiasts chasing headroom often go bigger, which is where our roundup of the best budget CPU coolers for overclocking comes in handy. Whatever you install, don’t forget fresh thermal paste on the new mount.
Tools and parts needed
You won’t need much. A Phillips screwdriver, a can of compressed air, isopropyl alcohol or the cleaning wipes that come with a paste kit, and a fresh tube of thermal paste cover nearly every fix here. A plastic pry tool helps nudge blades and seat connectors without scratching the board. If you’re replacing the cooler outright, have the new unit and its mounting hardware ready before you pull the old one, so your CPU isn’t sitting bare and exposed to heat while you hunt for screws.
A few extras make the job smoother. A small flashlight or headlamp helps you read the tiny CPU_FAN label silkscreened on the board, and a magnetic parts tray keeps screws from rolling under the motherboard. If your case is cramped, laying it on its side gives you a straight-down angle on the cooler mount, which matters when you’re lining up spring-loaded screws in a cross pattern. None of this is expensive, and having it staged before you start turns a frustrating half-hour into a ten-minute swap. Work slowly, keep the fan cable clear of the blades when you route it, and double-check the header one last time before you close the panel.
Common questions
Can my CPU be damaged if the fan didn’t spin?
Modern CPUs have thermal protection that throttles or shuts the system down before damage occurs, so a brief no-spin event rarely kills a chip. The danger is running it hot for long stretches, which shortens its life. If your PC shut itself off, that safety feature likely did its job. Fix the fan before you power back up for extended use.
Is it normal for the CPU fan to be off at idle?
Yes, on many current motherboards. Zero-RPM or silent modes keep the fan off until the CPU crosses a set temperature, usually around 50 to 60 degrees Celsius. If your fan kicks on under load and stays off at a cool desktop, that’s working as intended, not a fault. You can disable that mode in the BIOS if you’d rather the fan always spin.
Why does the fan spin for a second at boot then stop?
That brief startup twitch is the motherboard powering all fans momentarily during POST. If it then stops, the board is either running a zero-RPM curve or isn’t sending a run signal to that header. Check your BIOS fan settings and confirm the fan is on the CPU_FAN header. A quick spin at boot at least tells you the fan and its bearing aren’t fully seized.






























Write Your Review
No reviews yet. Be the first to share your experience!