

If your Wi-Fi drops during video calls, stutters when the neighbors get home, or crawls in the evening, the problem often isn’t your speed plan. It’s channel congestion. Dozens of nearby networks crowd the same handful of frequencies, and when they overlap with yours, everything slows down. Changing your Wi-Fi channel moves your network to a less-trafficked lane, and it takes about five minutes from any browser. This guide walks through finding the clearest channel and switching to it, on 2.4GHz and 5GHz alike, no new hardware required.
This works on almost any router, from a basic ISP box to a full mesh setup. If you’ve already gone the mesh route, our guides to the best mesh Wi-Fi systems and the best Wi-Fi 6 routers cover gear that handles channel selection automatically. But you don’t need to buy anything to fix congestion today. Let’s get into it.
First, a quick word on why this matters so much. Wi-Fi is a shared medium. Every router within range that sits on your channel has to take turns with yours, and the more crowded that channel gets, the more your data waits in line. This is why a 500Mbps plan can feel like dial-up at 9 PM in an apartment block. The channel is jammed, not your connection to the internet. Moving lanes doesn’t add bandwidth, but it does cut the interference that’s been eating it, and in dense housing that difference is night and day. If you live somewhere packed, our roundup of the best Wi-Fi 6 routers for apartments is worth a look once you’ve squeezed everything you can out of channel tuning.
What you’ll need
Not much. You’ll need a device connected to your network (a laptop or phone), your router’s admin login, and a Wi-Fi analyzer app to see which channels are busy. Free analyzers exist for Android and Windows, and macOS has a built-in scanner under the Wireless Diagnostics tool. Have your router’s IP address and admin password ready. They’re often printed on a sticker on the underside of the unit. That’s the whole toolkit.
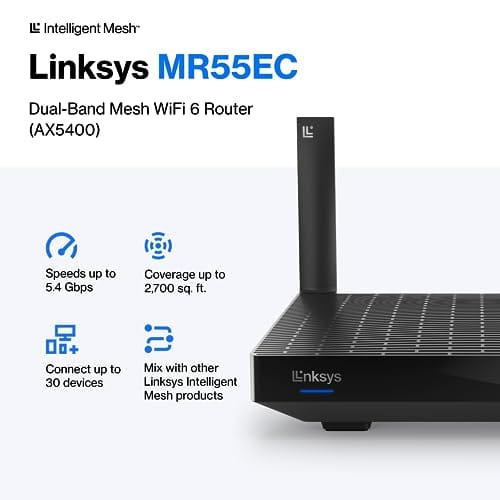
One upgrade worth noting: if your router is old and its admin panel is missing channel controls, or it keeps parking you on a congested channel, a modern unit with smart channel selection solves this at the hardware level. The Linksys Hydra Pro 6 Wi-Fi 6 mesh router, around $199.99 with a 4.4 owner rating, covers roughly 2,700 square feet and handles 30-plus devices while picking cleaner channels on its own. It’s optional. The steps below fix congestion on whatever you already own.


Pros
- AX5400 class dual-band throughput up to 574 plus 4804 Mbps on 5 GHz
- Six spatial streams with OFDMA reduce congestion for 30+ device homes
- Intelligent Mesh compatibility allows scaling coverage beyond the 2,700 sq ft rating
Cons
- Limited owner feedback at time of writing, so real-world reliability data is thin
- Dual-band only, no dedicated 6 GHz or wireless backhaul band at this tier
- Detailed specifications, WAN port sped, and waranty not specified in source listing
The Linksys Hydra Pro 6 (MR5500-AMZ) is a mid-range dual-band WiFi 6 mesh router aimed at households upgrading from an older AC1900 or extender-based setup. Linksys rates it for 2,700 sq ft and 30 plus devices, targeting medium apartments, condos, and small two-story homes with mixed smart home and streaming traffic.
The defining feature is six-stream AX5400 class WiFi 6 with quoted rates of 574 Mbps on 2.4 GHz and 4804 Mbps on 5 GHz. OFDMA and MU-MIMO help when many low-bandwidth clients share airtime, which is where WiFi 5 routers typically stall. Real-world 5 GHz throughput at range appears to land in the mid-hundreds of Mbps based on category norms.
Trade-offs are typical at this tier. It is dual-band, so there is no dedicated 6 GHz radio and no separate backhaul channel when you add mesh nodes, meaning throughput can halve on satellite hops. Linksys does not specify WAN port speed, USB, or processor details in the listing, so multi-gig ISP users should verify before buying.
Buy this if you want a single WiFi 6 router that can grow into a Linksys Intelligent Mesh system for a 2,000 to 3,000 sq ft home with 30 plus clients. Skip this if you need WiFi 6E, 2.5 GbE WAN, or a dedicated backhaul band for a large multi-story house.
Wireless class: AX5400 class dual-band WiFi 6 with quoted PHY rates of 574 Mbps on the 2.4 GHz band and 4804 Mbps on the 5 GHz band, totaling roughly 5378 Mbps aggregate across six spatial streams. No 6 GHz radio is listed, so WiFi 6E clients fall back to 5 GHz.
Coverage and capacity: Linksys rates the MR5500 for 2,700 sq ft and 30 plus simultaneous devices. OFDMA, MU-MIMO, and 1024-QAM are standard at this WiFi 6 tier and help maintain throughput as client count scales, though actual coverage depends heavily on wall material and node placement.
Mesh behavior: Intelligent Mesh lets you pair the MR5500 with other Linksys nodes to extend coverage. Because it is dual-band, backhaul shares the 5 GHz client band, so expect throughput to roughly halve one hop from the root node. A wired Ethernet backhaul between nodes avoids this penalty.
Not specified: WAN and LAN port speeds, USB ports, processor and RAM, warranty length, and physical dimensions are not disclosed in the source listing. Buyers pairing this with multi-gig fber or DOCSIS 3.1 plans above 1 Gbps should confirm port specs before purchase.
Step 1: Scan your area to find the clearest channel
Open your Wi-Fi analyzer app and let it survey the airwaves. You’ll see a graph of every nearby network stacked onto the channels they use. On the 2.4GHz band, only channels 1, 6, and 11 don’t overlap, so the goal is to pick whichever of those three has the fewest and weakest competing networks. Ignore channels 2 through 5 and 7 through 10; they bleed into their neighbors and cause more trouble than they solve.
On the 5GHz band you’ve got far more room, often 20-plus non-overlapping channels, so congestion is rarely as fierce. Note which 5GHz channels look empty too. Write down the least-crowded channel for each band. If two channels look equally quiet, favor the one where the competing signals are weakest, since a faint distant network matters far less than a strong one next door.
A couple of things to know while you scan. Some 5GHz channels, the ones in the DFS range, are shared with radar, and your router may briefly drop off them if it detects a radar signal. Those channels are often gloriously empty for that reason, but if you value rock-steady uptime over a slightly clearer lane, stick to the standard non-DFS channels. Also watch for a neighbor running a wide 80MHz or 160MHz channel on 5GHz, since one of those blankets a huge slice of the band. Picking a channel outside their footprint matters more than picking the single emptiest number.
Step 2: Log in to your router’s admin panel
Open a browser and type your router’s IP address into the address bar. The most common defaults are 192.168.1.1 and 192.168.0.1, and many newer routers use a friendly URL printed on their label instead. If you’re not sure of the address, on Windows open Command Prompt and run ipconfig, then look at the Default Gateway line. On a Mac, check System Settings under Network for the router address.
Enter the admin username and password. This is the router’s admin login, not your Wi-Fi password, and the two are different. If you never changed it, the defaults are on the sticker or in the manual. Changed it and forgot? A factory reset via the recessed button restores defaults, though that wipes all custom settings, so treat it as a last resort.
Step 3: Find the wireless channel settings
Once you’re in, look for a menu labeled Wireless, Wi-Fi, or Wireless Settings. Many routers split this into Basic and Advanced tabs, and the channel control usually lives under Advanced or under a per-band section. If your router broadcasts separate 2.4GHz and 5GHz networks, you’ll see settings for each band listed on its own, sometimes on separate pages.
You’re hunting for a field called Channel, often set to Auto by default. That Auto mode is exactly what you’re overriding, because it doesn’t always pick well and it can hop to a busy channel on its own. Near it you’ll usually find a Channel Width setting too. On 2.4GHz, keep the width at 20MHz to avoid overlapping into your neighbors. On 5GHz you can safely run 40MHz or 80MHz for more speed if the band is clear.
If your router uses Smart Connect or a single combined network name, it may hide the per-band channel controls behind an option to split the bands first. Look for a toggle that separates 2.4GHz and 5GHz into two named networks, flip it on, and the individual channel fields usually appear. It’s an extra step, but it gives you real control instead of letting the router decide for you. Note the current settings before you change anything, so you can roll back if a choice doesn’t pan out.
Step 4: Select your new channel and save
Change the Channel field from Auto to the specific number you picked in Step 1. Set the 2.4GHz radio to channel 1, 6, or 11, and set the 5GHz radio to whichever open channel your scan showed. Double-check you’re editing the right band, since it’s easy to change 2.4GHz when you meant 5GHz. Then click Apply or Save.
Your router will reboot its radios, and your Wi-Fi will drop for anywhere from a few seconds to a minute or two. Devices reconnect on their own once the network reappears. If a device seems stubborn, toggle its Wi-Fi off and on, or forget the network and rejoin. Give the whole thing two or three minutes to settle before you judge the results.
Step 5: Confirm the change and re-check your connection
Reopen your analyzer app and verify your network now sits on the channel you chose. If it moved, good. Now check the payoff. Run a speed check from a device in your usual trouble spot, and if you can, compare it against what you saw before. Streaming, video calls, and downloads should feel steadier, especially during the evening rush when nearby networks light up.
Watch it across a full day. Congestion shifts as neighbors come home and fire up their own gear, so a channel that looked clear at noon might get busy at 8 PM. If your new channel starts to crowd, repeat the scan and move again. It’s a quick job now that you know the path, and re-checking every few weeks keeps your network on the clearest lane.
Troubleshooting common issues
The channel keeps reverting to Auto
Some routers snap back to Auto after a firmware update or a power cycle. Log back in, set the channel manually again, and check for a separate Auto Channel Selection or Smart Connect toggle that’s overriding your choice. Disable that toggle so your manual pick sticks. If it still reverts, a firmware update from the maker’s support page sometimes fixes the bug.
My speeds didn’t improve after switching
If a new channel didn’t help, the bottleneck may be elsewhere: distance from the router, thick walls, or an overloaded 2.4GHz band that’s simply full everywhere nearby. Try moving devices onto 5GHz, which is usually far less crowded. Persistent congestion across every channel in a dense apartment is a sign your hardware is outmatched, and a stronger router or a mesh system is the real fix.
I can’t reach the router’s admin page
Make sure the device you’re using is connected to that router’s own network, not a guest network or a neighbor’s. Confirm the IP address via ipconfig or your network settings, and try both http and the exact address without extra characters. If the page still won’t load, a browser cache clear or a different browser often gets you in.
Common questions
Which Wi-Fi channel is the best to use?
On 2.4GHz there’s no universal answer, but you should only ever use channel 1, 6, or 11, since those three don’t overlap. Pick whichever one your analyzer shows carrying the fewest and weakest neighboring networks. On 5GHz you have many more options, so choose any channel that a scan shows sitting empty in your area. The “best” channel is simply the clearest one where you live, and that changes from home to home.
How often should I change my Wi-Fi channel?
You don’t need a schedule. Change it when you notice trouble: evening slowdowns, dropped video calls, or a fresh batch of neighbors moving in with new routers. A quick re-scan every month or two is plenty for most homes. If your connection is smooth, leave it alone. Chasing the perfect channel weekly is effort spent for little gain once you’re already on a clear lane.
Does changing the channel affect my Wi-Fi password or network name?
No. The channel is a separate radio setting, so switching it leaves your network name and password untouched. Your devices reconnect automatically once the router’s radios restart, using the same credentials as before. The only interruption is the brief drop while the radios cycle, which lasts under two minutes on nearly every router.
Should I change the 2.4GHz or 5GHz channel?
Both, if both look congested, but 2.4GHz usually needs it more. That band has only three usable channels and reaches farther, so it picks up interference from far more neighbors. The 5GHz band is roomier and often fine on Auto. Start with 2.4GHz, and only tune 5GHz if a scan shows a busy neighbor camped on your channel there.
Wrapping up
Changing your Wi-Fi channel is one of the highest-value five-minute fixes in home networking. Scan for the clearest lane, log in, override Auto with channels 1, 6, or 11 on 2.4GHz and an open channel on 5GHz, save, and re-check. No new gear, no technician, no monthly fee. If you’ve done all that and congestion still wins in a packed building, that’s your cue to look at a mesh system built to route around the noise. For most homes, though, a manual channel change is all it takes to get your connection back on its feet.




























Write Your Review
No reviews yet. Be the first to share your experience!