Adding memory is the easiest hardware upgrade you can do, and it’s the one that fixes the most everyday slowdowns. If your PC chokes when you’ve got 30 browser tabs open, or a game stutters while Discord runs in the background, more RAM usually helps more than a new CPU would. The whole job takes about ten minutes on a desktop and slightly longer on a laptop. This guide walks you through both, from popping the case open to confirming the new sticks run at full speed in the BIOS. No prior experience needed. Just a screwdriver and a little patience.
Before you touch anything, you’ll want to know two things: which slots to use and how much force is normal. Both trip up first-timers. Let’s get those sorted so you don’t second-guess yourself halfway through.
Related buying guides: DDR5 RAM picks, 9800X3D RAM guide, RAM for gaming and editing, Ryzen motherboard picks, and gaming PC build guide.
What you’ll need
The tool list is short. A Phillips #2 screwdriver opens almost every desktop case and laptop panel. An anti-static wrist strap is nice insurance, though touching a bare metal part of the case first works in a pinch. Good lighting matters more than people expect, because the slot latches and the notch on the stick are small. If you’ve got a laptop with a stubborn bottom cover, a plastic spudger or an old guitar pick saves the plastic clips from snapping. And of course, the RAM itself, matched to your board’s generation (DDR4 or DDR5, not interchangeable).
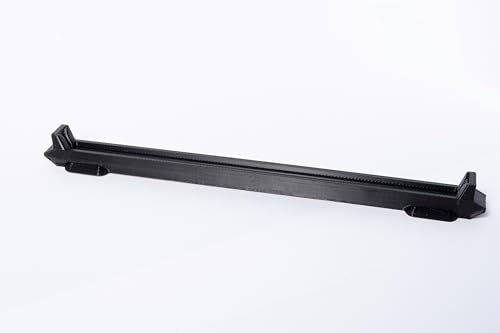
One handy extra: a DIMM install tool. It’s a small plastic guide that helps seat and unseat sticks evenly, which is genuinely useful in cramped cases where your fingers can’t reach both ends of the slot. The DIMM RAM Memory Install Tool runs about $12 and holds a perfect 5.0 rating, though from just one review, so treat that number lightly. Not essential, but if you’ve ever fought a bottom slot next to a big air cooler, you’ll get why it exists.
Before you start, snap a quick photo of your board and your current stick placement. It sounds fussy, but when you’re three steps in and wondering which stick came from which slot, that photo saves you from second-guessing. Note your current RAM speed and timings in BIOS too, so you have a baseline to compare against once the new kit is in and EXPO is flipped on. A 30-second paper note beats a vague memory every time.
Pros
- Protective channels shield bare DIMM PCBs from thumb pressure and flex
- Textured base grip stabilizes the tool during firm downward seating force
- USA designed and manufactured, appealing to buyers sourcing domestically
Cons
- Limited owner fedback at time of writing makes durability hard to verify
- Specications list, dimensions, and material are not specified in source data
- Compatibility with heatspreader-equipped or RGB DIMMs is not clarified by the seller
The LB3D Designs DIMM RAM Memory Install Tool is a niche builder accessory, a small hand tool that helps seat memory modules into DR4 or DDR5 slots with less applied thumb pressure. Target buyer is a system integrator, repair tech, or hobbyist builder who assembles frequently or has reduced grip strength.
The defining feature is the custom channel geometry, shaped to cradle bare or non-shielded DIMM PCBs so pressure spreads evenly across the module rather than concentrating on ICs. Based on the seller description, this addresses a real pain point when seating tall serverEC sticks or naked DDR5 modules that lack a heatspreader to press against.
Trade-offs are typical for a single-purpose tool. Exact dimensions, material, and compatibility with tall RGB or heatspreader DIMs are not specified in source data. Owner feedback is effectively absent at time of writing, so long-term durability and fit across various motherboard layouts cannot be verified. The textured base helps, but ITX boards with tight clearance around DIMM slots may still be awkward.
Buy this if you build PCs regularly, work on bare-PCB server or workstation RAM, or want a lower-effort seating method for ergonomic reasons. Skip this if you build once every few years with standard consumer DIMMs, where thumb pressure alone is sufficient.
Module Fit: The tool is described as working with non-shielded or bare DIMMs, which covers most server ECC modules, budget consumer sticks without heatspreaders, and bare DDR5 kits. Fit with tall RGB or thick-heatspreader modules is not specified in source data and should be confirmed before purchase.
Motherboard Clearance: DIMM slots sit close to the CPU socket and top edge of the PCB, typically within 10 to 20m of the socket on ATX boards. Physical dimensions of the tool are not specified, so ITX and mATX builders with tight AIO or air cooler layouts should verify clearance visually.
Ergonomics and Grip: A textured base is called out for grip during downward seating force, which is the moment DR5 latches click into the retention notch. This helps reduce slip on glossy or unshielded PCBs when applying the roughly firm even pressure DR5 modules require.
Sourcing: The product is 100 percent designed, made, and shipped in USA per the seller, relevant for buyers with domestic sourcing or small-business support preferences. Warranty terms, return policy, and materials are not specified in source data.
Step 1: Check your slots and buy the right kit
Open your case (or check your board manual) and count the slots. Most ATX boards have four; small ones have two. Here’s the part people miss: to run dual-channel, you don’t fill slots left to right. You populate slots 2 and 4, usually labeled A2 and B2, counting from the CPU. Your manual spells out the exact order, and getting it wrong drops you to single-channel, which can cost 10 to 15 percent in gaming frame rates. Check before you buy, not after.
Match the generation to your motherboard. DDR5 sticks physically won’t fit a DDR4 slot, and vice versa, thanks to the notch position. If you’re unsure what your board takes or how slot layout affects upgrades, our guide on SODIMM versus desktop DIMM clears up the form-factor question fast. Two matched sticks beat one large stick almost every time, so a 2x16GB kit is the standard sweet pick for most 2026 builds.
Step 2: Power down and ground yourself
Shut the PC down fully, then flip the PSU switch on the back to off. Pull the power cable. Hold the case power button for five seconds to drain any leftover charge in the board. This isn’t optional theater. Residual current can misbehave when you’re seating a stick.
Now ground yourself. Clip on a wrist strap or press your palm flat against a bare metal chassis panel. Static that you can’t feel can still damage a memory chip. Lay the PC on its side so the slots face up. You want gravity working with you, not against you, when you press down.
Step 3: Release the latches and remove old sticks
Each slot has a latch at one or both ends. Push them outward and the old stick pops up at an angle. Lift it straight out, holding it by the edges, never the gold contacts. If you’re only adding memory to empty slots, skip the removal and move on.
This is where the install tool earns its keep. In a tight build with a tower cooler overhanging the first slot, prying a latch by finger is awkward and you risk flexing the board. A plastic guide gives you leverage without scratching anything. If a stick feels welded in, don’t yank sideways. Rock it gently along its length instead.
Step 4: Line up the notch and seat the new RAM
Every stick has an off-center notch on the contact edge. It only lines up with the slot key one way, so if it won’t drop in, flip it around. Don’t force it. Once aligned, set both ends into the slot and press down firmly and evenly with your thumbs on the top corners. You’re aiming for a clean, confident push, not a mash.
You’ll hear a click as the latches snap up and grab the notches on the stick’s sides. That click is your confirmation. If the latches don’t close on their own, the stick isn’t fully home, so press again. First-timers almost always under-press because the force feels alarming. It shouldn’t crack anything, but it does take real pressure. Confirm every stick sits level, with no end riding higher than the other.
Step 5: Close up, boot, and enable EXPO or XMP
Reconnect the power cable, flip the PSU switch, and boot. The first post may take 30 to 60 seconds longer than usual while the board trains the new memory. That’s normal, so don’t panic and reset. If it boots to Windows, open Task Manager, hit the Performance tab, and confirm the total capacity matches what you installed.
Here’s the step most people skip: your RAM runs at a slow default speed until you turn on its rated profile. Reboot into BIOS, find the EXPO setting (AMD) or XMP setting (Intel), and enable it. That’s the difference between 4800 and 6000 MHz on a modern kit, a real, free performance jump. Our walkthrough on upgrading your RAM the right way covers profile tuning if you want to push further, and if you’re weighing generations, the DDR5 versus DDR4 breakdown explains why the newer standard is worth it in 2026.
Troubleshooting common issues
PC won’t post after install
Nine times out of ten, a stick isn’t fully seated. Power down, pull the RAM, and reseat it until both latches click. Still dead? Try one stick alone in slot A2. If that boots, the other stick or slot is the culprit.
Only half my RAM shows up
Usually a seating problem on one stick, or you’ve filled the wrong slots for your board’s channel layout. Recheck the manual for the correct A2/B2 order. A 32GB kit reading as 16GB is the classic symptom.
System is unstable after enabling XMP
Some kits push voltage or timings your board doesn’t love at first. Update the BIOS to the latest version, which often adds memory compatibility. If it’s still flaky, the kit may just need a manual voltage bump of a hundredth or two.
Laptop RAM won’t fit
Laptops use SODIMM modules, not full-size desktop sticks. They install at a 30-degree angle, then press flat until side clips grab. If yours are soldered, there’s nothing to upgrade, so confirm before buying.
Before and after: what to expect
Going from 8GB to 16GB, or 16GB to 32GB, you’ll notice fewer stutters when multitasking, faster app switching, and smoother gaming with background apps running. Don’t expect higher peak frame rates in a GPU-bound game, though. RAM fixes stutter and headroom, not raw ceiling. The upgrade shines when you’re doing several things at once, which is most of the time.
The clearest wins show up in memory-heavy work. Browser tabs stop reloading when you switch back to them, big Photoshop files open without the scratch disk grinding, and video editors scrub timelines without dropping frames. If you stream while you game, the extra headroom matters even more, since OBS, Discord, and your game now have room to breathe instead of fighting over the same pool. Folks who just browse and write docs may not feel much, so be honest about your workload before paying for capacity you won’t use.
Variations and advanced setups
Enthusiasts running four sticks on DDR5 should know that fully populated boards often can’t hit the same speeds as two sticks, so a 2x32GB kit beats 4x16GB for both stability and clocks. If you want to hand-tune timings past the EXPO profile, that’s a rabbit hole worth a dedicated read. For most people, two sticks plus one BIOS toggle is the whole job, and it’s done.
Laptop RAM is a different animal. Most modern laptops use soldered LPDDR or standard DDR5 SO-DIMMs, and only the SO-DIMM models are upgradable. Check your service manual for the panel to remove, since some laptops hide the RAM slot under the keyboard deck rather than the bottom cover. SO-DIMMs tilt in at roughly 30 degrees then press down to latch, unlike desktop sticks that drop straight in. If you’re torn on which type your machine takes, our SO-DIMM explainer clears it up fast.
Another wrinkle is mixing DDR4 and DDR5. You can’t, full stop. A board takes one generation or the other, and the notch position is different so you can’t physically force the wrong stick in. If you’re upgrading from a DDR4 platform to DDR5, you’re buying a new motherboard and CPU too, not just RAM. Plan the budget around that, since the memory itself is often the cheapest part of the jump.
Common questions
Can I mix different RAM brands or sizes?
You can, and it’ll usually run, but it’s not ideal. Mismatched kits default to the slowest stick’s timings and can be finicky with XMP. A matched kit is the safe move.
Do I need to update BIOS before adding RAM?
Not always, but it helps. Newer BIOS versions add memory compatibility, especially on AM5 and newer Intel boards. If a kit won’t run its rated speed, a BIOS update is the first fix to try.
Why is my new RAM running slower than advertised?
Because EXPO or XMP isn’t enabled. Out of the box, memory runs at a conservative JEDEC baseline. Flip the profile in BIOS and you’ll get the rated speed you paid for.
How much force is safe when seating a stick?
More than feels comfortable, honestly. Firm, even pressure until the latches click. If you’re evenly pressing both top corners over the slot, you won’t crack the board. It’s the sideways prying you want to avoid.