

You picked out a gorgeous graphics card, hit buy, and then your build stalls at the worst possible moment. The card won’t fit. The fans smack into a front radiator, or the tip presses against the side panel, or the last inch just hangs off the end of the motherboard tray with nowhere to go. That gap between the longest card your case allows and the card you actually bought has a name: GPU clearance.
It’s one of the most common reasons a first build gets returned, and it’s completely avoidable with two measurements. We researched how case makers list this spec, where builders trip up, and how to check it before you spend a dime. If you’re still choosing a chassis, our best mid-tower case guide flags clearance for every pick, and the same idea shows up in our airflow case roundup too.
The short answer
GPU clearance is the maximum graphics-card length a PC case can physically hold, usually listed in millimeters. A case rated for 380mm of GPU clearance will fit any card shorter than 380mm and reject anything longer. It’s a hard limit set by the distance from the rear expansion slots to whatever sits at the front of the case, whether that’s the drive cage, a front-mounted radiator, or the front panel itself.
Modern cards keep getting longer and thicker, so this number went from a footnote to a make-or-break spec. A well-designed mid tower gives you room to spare, like the Lian Li chassis below, which is built around large modern GPUs and back-connect motherboards.

Pros
- Patented three-panel tempered glass exposes front, top, and left views of the build.
- Native back-connect motherboard support for hiden 24-pin, EPS, and PCIe cabling.
- Second chamber hides side-mounted AIO tubing for a cleaner primary compartment.
- Swappable top mesh panel suports a 360mm AIO when thermals take priority over glass.
Cons
- Limited owner feedback at time of writing makes long-term reliability signal thin.
- Full specs (GPU length, cooler height, fan count) not published in source data.
- Back-connect layout requires a compatible motherboard, narowing part selection.
The Lian Li O11Vision Compact is a mid-range ATX mid-tower positioned as a smaller sibling to the O11 Dynamic line, developed in collaboration with the PCMasterRace community. It targets showcase builders who want a dual-chamber layout, tempered glass on three sides, and native support for back-connect motherboards in a tighter footprint.
The defining feature is the patented three-panel tempered glass design covering the front, top, and left side. Paired with the second-chamber cable routing and back-connect motherboard compatibility, the front compartment stays visually clean. Builders wanting a 360mm AIO can swap in the included top mesh panel, trading a glass top for airflow.
Trade-offs are typical at this tier. Back-connect support only pays off if you buy a compatible board from ASUS, MSI, GIGABYTE, or similar, which narrows part selection and can raise motherboard cost. Concrete specs like GPU clearance, CPU cooler height, radiator sites, and included fan count are not specified in the source data, so verify against the official manual before finalizing parts.
Buy this if you want O11-family aesthetics with hidden cabling via a back-connect board and a side or top 360mm AIO. Skip this if you need a documented GPU length ceiling, bundled fans, or a traditional cable-visible motherboard build.
Motherboard support: The chassis accepts standard ATX boards and ads native routing for back-connect variants such as ASUS BTF, MSI Project Zero, and GIGABYTE Project Stealth. Cable cutouts on the tray align with rear-side connectors, keping the 24-pin, EPS, and PCIe cables out of the main chamber view.
Radiator and AIO: A swappable top mesh panel is included specifically to enable a 360mm AIO in the rof. When the AIO is mounted on the side instead, the dual-chamber layout routes the tubing into the second compartment, keeping the front-facing glass view unobstructed. Exact side radiator thickness limits are not specified.
Glass and panel layout: Three tempered glass panels cover the front, top, and left side. The top glass panel is the one you swap out when a 360mm radiator is installed, so builders choosing air cooling or a bottom-mounted AIO retain the full three-panel glass look.
Not specified in source: GPU length clearance, CPU cooler height, drive bay count, included fan count, front I/O (USB-C, USB-A), PSU length, and case dimensions are not listed in the provided data. Confirm these against the Lian Li O11VPW official spec sheet before finalizing parts.
The longer explanation
Clearance isn’t a single dimension, it’s really three. Length is the headline number, the front-to-back room for the card. Thickness matters too, measured in expansion slots, since a chunky triple-fan cooler can eat three or even four slots and block whatever sits below it. And height, or the gap between the card and the side panel, decides whether your power connectors and cables actually clear the glass when you close it up.
The tricky part is that a case’s advertised GPU length often assumes nothing else is installed up front. Mount a radiator on the front and you might lose 30 to 60mm instantly. Leave the hard-drive cage in and you lose more. That’s why two builders with the same case can have very different real-world clearance. The listed number is a best case, and your configuration only shrinks it.
How we got here
Rewind fifteen years and graphics cards were compact, single-fan, single-slot affairs. Clearance was rarely an issue because cards were short and cases were roomy by comparison. Then GPUs got hungrier, coolers grew, and dual and triple-fan designs became the norm. Cards pushed past 300mm, then 330mm, and today’s flagships flirt with 360mm and beyond while spreading across three or four slots.
Case makers had to respond. They started publishing precise clearance figures, added removable drive cages, and built layouts that free up the front for longer cards. The rise of back-connect motherboards, where cables route behind the tray, also helped by clearing cable clutter that used to crowd the card. It’s the same design pressure that shapes our showcase build case picks, where a big card has to look clean behind glass.
Why it works this way
The rear of the case is fixed. The expansion slots line up with the motherboard’s PCIe slots, and those positions don’t move. So every millimeter of clearance comes from what you do or don’t put in front of the card. Remove the drive cage and clearance grows. Add a thick front radiator and it shrinks. The case is a box of trade-offs, and GPU length competes with cooling and storage for the same front real estate.
Thickness follows similar logic. Each expansion slot is a fixed 20.32mm of spacing, so a card labeled 3-slot needs three of those gaps clear beneath it. If you planned to use the slot right below the GPU for a capture card or a sound card, a thick cooler can bury it. Knowing the slot count before you buy saves you from a dead PCIe slot you can’t reach.
Weight plays into it as well, even though no spec sheet prints a clearance figure for it. A modern flagship can tip past 1.5kg, and all of that mass hangs off the PCIe slot and the rear bracket. A card that technically clears the front of the case can still bow downward over months until it kisses a cable or a component below. That’s why the real question isn’t only will it fit, but will it fit and stay put. Clearance gets you in the door, and mechanical support keeps the card healthy once it’s living inside.
When you’d want to check this
Check clearance before you buy either the case or the card, whichever comes second. Grab the GPU’s length from the maker’s spec page and the case’s rated GPU clearance from its spec sheet, then leave yourself 10 to 20mm of buffer for power cables that stick out the end. If you plan a front radiator, subtract its thickness plus fan depth first. This five-minute check is cheaper than a return label. Silent builders should be extra careful, since sound-dampening cases often trade a little clearance for thicker panels, something we call out in our silent build case guide.
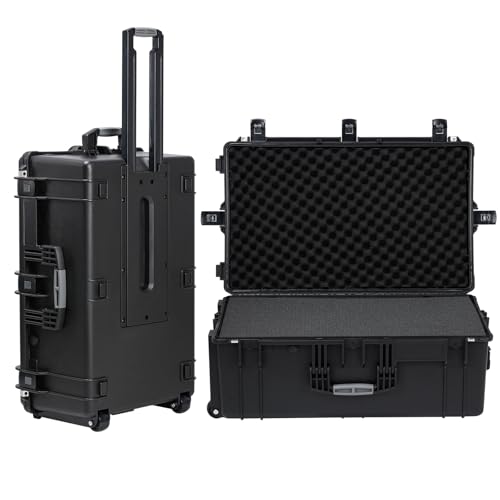
There’s also the shipping and moving angle people forget. If you’re hauling a finished rig to a LAN event or across a move, the card is the most fragile part hanging inside. A padded rolling hard case with foam, like the Regetek unit below, protects the whole build in transit so a long card doesn’t flex its PCIe slot loose on a bumpy drive.
Pros
- IP67 seal with air-lock valve keeps kit dry during rain, dust, or airline handling
- Pick-and-pluck foam in four layers adapts to cameras, lenses, tools, or medical gear
- Dual padlock holes on the latches allow TSA locks for checked-luggage transport
Cons
- No verified owner fedback at time of writing, so long-term wheel and latch durability is unproven
- Case with foam weighs 32.73 lb empty, which pushes loaded weight near airline checked limits
- Standard-density pluck foam is less protective than custom cut foam for heavy optics or precision instruments
The Regetek Rolling Hard Case is a mid-size wheeled transport case in the Pelican-style category, measuring 32.5 by 20.5 by 13 inch externally with a 28.94 by 17.72 by 9.65 inch usable interior. It targets photographers, drone operators, field service techs, and musicians who need airline-checkable protection for fragile gear.
The defining feature is the IP67 rating paired with a full-length steel hinge and double-latch closure. Cases at this size and seal class typically survive shallow submersion to about 3.3 ft, and the air-lock valve equalizes pressure after altitude changes so the lid does not vacuum shut. Owner feedback is unavailable, so real-world seal longevity cannot be confirmed.
Trade-offs are typical at this tier. The 32.73 lb empty weight with foam eats into airline allowances before gear is loaded, and standard-density pick-and-pluck foam is a compromise between adaptability and impact absorption compared with custom cut foam. Wheels and retractable handles on cases in this class are also the most common long-term failure points.
Buy this if you need a lockable, waterproof rolling case sized for a full mirrorless kit, mid-size drone, or field tolset. Skip this if your payload exceeds the28.94 inch interior length, or if you need documented drop-test certification for professional broadcast use.
Dimensions and weight: Exterior measures 32.5 by 20.5 by 13 inch with an internal usable volume of 28.94 by 17.72 by 9.65 inch. Total weight with foam is 32.73 lb, which is consistent with rotomolded polymer cases in this size class and leaves useful payload room for airline checked baggage.
Sealing and ingress protection: The case is rated IP67 with an O-ring gasket, watertight buckles, and an air-lock pressure equalization valve. Manufacturer states safe submersion to 3.3 ft, and the valve prevents lid suction after temperature or altitude changes during air transit.
Foam configuration: Interior includes four pick-and-pluck layers of standard density foam, one top egg-crate layer, and one bottom pad. The pluck grid lets you shape custom cavities without a knife, though density is not specified in pounds per cubic foot.
Structure and security: Shell uses high-impact polymer with one full-length steel hinge instead of two-point hinges, a double-latch system, dual padlock holes for redundant locking, a heavy-duty top handle, integrated whels, and a retractable pull handle. Waranty is stated at 2 years including replacement parts.
What to look for in a case spec
Read three lines on the spec sheet. Max GPU length in millimeters is the headline. GPU slot support, listed as something like 4-slot, tells you the thickness ceiling. And any note about clearance with a front radiator installed, which the better makers publish separately. If a case only gives one number with no caveats, assume that’s the empty-front figure and plan conservatively.
Beyond the numbers, look at the layout. Removable drive cages, an open front chamber, and back-connect motherboard support all buy you real breathing room. A case that supports a graphics-card bracket or anti-sag support is a bonus for heavy cards. When you’re weighing value, our budget case guide shows you don’t have to spend big to get generous clearance, you just have to read the spec.
It helps to think about clearance as a budget you spend, not a fixed wall. Every front-mounted part draws from the same pool. A slim front radiator costs less of it than a thick one. Keeping the drive cage costs a chunk. A vertical mount can cost side-panel room. Map out what you actually plan to install, subtract each item from the rated figure, and the number you’re left with is your true clearance. Do that math on paper first and the physical build almost always drops together on the first try, no returns, no swapping panels, no last-minute trip back to the store.
Common misconceptions
The first myth is that a big case always fits a big card. Not true. Some large-looking cases waste space on drive bays and leave less GPU room than a compact chassis built around the card. Always trust the millimeter figure, not the outside size. The second myth is that clearance only means length. Thickness and side-panel gap sink just as many builds, especially with today’s fat triple-fan coolers.
One last one. Builders assume the vertical GPU mount solves everything. It doesn’t. Mounting a card vertically can actually reduce clearance to the glass and choke airflow if the panel sits too close. It looks great, but check the vertical clearance separately, because it’s often tighter than the standard horizontal spec.
Frequently asked
How much GPU clearance do I need?
Measure your chosen card, then add 15 to 20mm for power cables and a little wiggle room. Most current mid and high-end cards land between 300mm and 360mm, so a case rated around 380mm or more gives comfortable headroom for almost anything on the market today.
Does a front radiator reduce GPU clearance?
Yes, and often more than people expect. A front-mounted radiator plus its fans can eat 50 to 65mm of length. Always subtract that from the case’s rated clearance before you commit, or you’ll find the card and the radiator fighting for the same space.
What does 3-slot or 4-slot GPU mean?
It’s the card’s thickness measured in expansion-slot widths, each one 20.32mm. A 3-slot card occupies three slots of vertical space, which can block the PCIe slots beneath it. Check your case’s GPU slot support and your motherboard layout so you don’t lose a slot you needed.
Can I fit a long GPU in a small case?
Sometimes. Compact cases built specifically for large cards can surprise you, while some big cases waste room on drive bays. Never judge by outside size. Pull the exact GPU clearance figure for that specific case and compare it to your card’s length.
Is GPU sag related to clearance?
They’re linked. A long, heavy card that just barely fits is also the most likely to sag over time, stressing the PCIe slot. Plenty of cases and cards now include an anti-sag bracket. If yours doesn’t, a support stand is cheap insurance for a pricey card.





























Write Your Review
No reviews yet. Be the first to share your experience!