

Changing keyboard switches is straightforward if your board has hot-swap sockets, and it’s still doable on a soldered board if you have the right tools and patience. The goal is to remove the current switches without cracking keycaps, bending pins, or damaging the PCB, then install compatible replacements and confirm every key registers cleanly. If you’re still choosing a board before you start, our guides to mechanical gaming keyboards and compact 65 percent keyboards can help you understand layouts, switch styles, and why hot-swap support matters.
What you’ll need
For a hot-swap keyboard, you’ll need a wire keycap puller, a metal switch puller, a small tray for caps and screws, a soft brush, and compatible replacement switches. Five-pin MX-style switches fit many modern boards, but some plates only accept three-pin switches unless you clip the two plastic legs. For a soldered board, add a temperature-controlled soldering iron, solder wick or a solder pump, flux, lead-free or leaded solder that matches your comfort level, eye protection, and a ventilated work area.
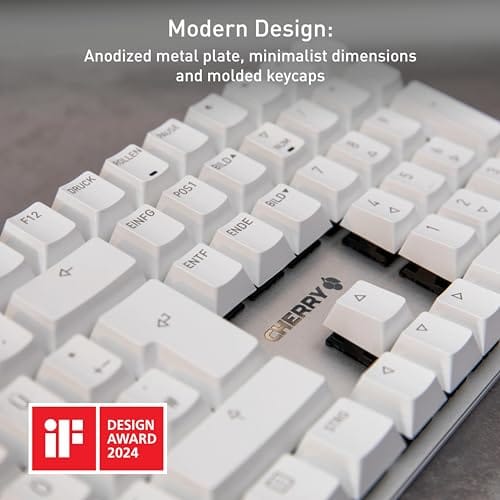
The provided Cherry KC 200 MX product is a renewed full mechanical office keyboard, not a switch-changing tool or a bag of replacement switches. Its listing describes a $56.31 Cherry keyboard with MX2A Silent Red switches, a modern design, and a metal plate frame, with a 4 rating. That can be useful as a reference for what a finished MX-style keyboard looks like, but it shouldn’t be treated as a puller, soldering accessory, socket repair part, or switch kit.
Before you buy anything, write down the keyboard model, layout size, switch family, and socket type. You’ll also want a clean, well-lit desk because tiny pins are easy to miss. A folded towel under the board helps protect the case and keeps removed switches from bouncing away. Keep a phone photo handy while you work so every cap and stabilizer returns to the right spot without guessing later.
Step 1: Confirm whether your keyboard is hot-swap
Unplug the keyboard first. If it’s wireless, switch it off and remove the cable as well. Pull one easy keycap, such as Esc or a corner letter key, and look around the switch housing. A hot-swap board usually lets the switch come out from the top after you squeeze the upper and lower tabs with a switch puller. A soldered board won’t release because the metal pins are fixed to pads on the underside of the PCB.
Check the product page, manual, or PCB markings if you’re unsure. Many hot-swap boards advertise three-pin or five-pin socket support. Optical, low-profile, Hall effect, and proprietary laptop-style mechanisms are different from standard MX-style mechanical switches, so don’t force a switch just because the stem shape looks familiar. Quick check. Big savings. A forced pull can tear a socket loose or crack the plate.
Step 2: Remove keycaps and map the layout
Take a clear photo of the keyboard before you remove anything. That photo is your map for row height, modifier placement, and unusual keys. Use a wire keycap puller, place the loops around opposite sides of the cap, and pull straight up with steady pressure. Don’t lever the cap sideways, especially on longer keys like Shift, Enter, Backspace, and the spacebar.
Put keycaps into rows on your desk or in small bowls. Keep stabilizer keys separate because they may have extra inserts or wire contact points. If a cap resists, pause and wiggle gently. Some factory caps sit very tight on MX stems, and yanking can pull the switch open or bend a stabilizer wire. While the caps are off, brush loose dust away from the plate so debris doesn’t fall into an open socket later.
Step 3: Pull the old switches carefully
For a hot-swap board, place the switch puller on the north and south clips of the switch housing. Squeeze just enough to depress both tabs, then pull straight up. If the switch doesn’t move, release, reseat the puller, and try again with even pressure. Don’t twist hard. Hot-swap sockets are usually soldered to the back of the PCB, and sideways force is how sockets get loosened.
Work in small sections instead of stripping the whole board at once. Ten to fifteen switches at a time is easier to track, and you’ll notice if a plate cutout is tighter than the others. Inspect each removed switch for bent pins, cracked top housings, or broken clips. If several switches have bent pins, your pull angle may be off. Slow down. Straight up matters more than strength.
On a soldered keyboard, remove the case screws, separate the plate and PCB assembly if the design allows it, and heat one joint at a time from the back of the PCB. Around 320C to 350C is common for many soldering stations, but the right setting depends on solder type and tip size. Add a little flux, liquefy the joint, and clear solder with wick or a pump before pulling the switch from the plate side.
Step 4: Prepare and install the new switches
Before installation, compare the new switches with the old ones. Count the pins, check the center post, and confirm the LED slot orientation. If your PCB supports three-pin switches only, five-pin switches can fit only after the two extra plastic locating legs are clipped cleanly. If your board uses north-facing LEDs, watch for interference with thick Cherry-profile keycaps on certain switch housings.
For hot-swap installation, align both metal pins with the socket holes and press the switch straight down until the plate clips snap in. It shouldn’t require heavy force. If it feels blocked, remove it and inspect the pins. A bent pin can fold under the switch and miss the socket completely, which gives you a dead key even though the switch looks seated.
For soldered installation, seat all switches flat in the plate first. Confirm every switch is flush and square before soldering. Heat the pad and pin together, feed a small amount of solder, and stop once the joint forms a shiny cone. You don’t need a blob. One or two seconds of heat per joint is usually enough with a clean tip; lingering too long can lift a pad.
Step 5: Reassemble and verify every key
Reconnect the keyboard before replacing all keycaps. Open your operating system’s keyboard viewer or a browser-based key checker, then press every switch once. Use the exact physical layout, including function row keys, arrows, navigation keys, and modifiers. If a key doesn’t register, unplug the board before you touch the switch again.
Once every switch registers, reinstall keycaps by matching your earlier photo. Press caps straight down until they seat firmly. For stabilized keys, make sure both stabilizer stems engage before pressing the center. A spacebar that feels mushy, ticks loudly, or sits crooked usually means one stabilizer side missed its insert. Fix that now rather than living with a bad feel for weeks.
Troubleshooting common issues
A key doesn’t register after the swap
Unplug the keyboard, pull that switch, and inspect both metal pins. If one pin is folded flat, straighten it gently with tweezers and reinstall the switch. If the pins look fine, shine a light into the socket and check whether the socket has shifted away from the PCB. A loose hot-swap socket usually needs solder repair, not another switch.
A switch will not come out
Make sure the puller is pressing the switch clips, not the plate edges. Some plates hold switches tightly, especially metal plates with close tolerances. Squeeze the tabs, pull straight up, and alternate light pressure from the top and bottom. If it’s soldered, stop pulling until the solder is fully cleared from both pins.
The new switch feels scratchy or louder than expected
Switch feel depends on stem design, spring weight, factory lubricant, case material, plate material, and keycap profile. A silent switch in a metal plate can still sound firm if the case is hollow. If only one key feels rough, remove the switch and check for a bent leaf, warped housing, or debris in the stem channel.
Stabilized keys feel worse after reinstalling caps
Long keys are more sensitive than standard 1u keys. Remove the keycap, confirm both stabilizer stems move together, and reseat the cap evenly. If the wire popped out, you’ll need to clip it back into the stabilizer housing before the key will feel normal again. Don’t keep pressing a crooked spacebar; it can damage the inserts.
Before / after expected outcomes
Before the swap, you may have chatter, inconsistent feel, too much noise, or a switch weight that doesn’t suit your typing. After a clean swap, each key should register once per press, sit level in the plate, and feel consistent across the board. You won’t magically change the keyboard’s case acoustics or stabilizer quality with switches alone, but you’ll change the actuation feel, spring weight, and much of the typing character.
Variations / advanced setups
Advanced builders may lube switches, film loose housings, spring-swap for a specific force, or mix switch types by zone. For example, you might use lighter linear switches on letters and firmer tactile switches on modifiers. Keep changes reversible until you’re confident. If you share the keyboard or use it for work, avoid extreme spring weights or unusual switch mixes that make normal typing harder.

Pros
- MX2A Silent Red linears actuate quietly, good fit for open-plan offices
- Metal plate frame keeps chassis stiff and reduces caseping under typing
- Cherry Gold-Crosspoint contacts rated for 50 million keystrokes on this variant
- Full-size layout with dedicated numpad suits data entry and spreadshet work
Cons
- Renewed unit with no owner fedback loged yet, cosmetic and wear condition varies
- Silent Red linears lack tactile bump, typists who prefer fedback should pick Brown
- Source data omits connectivity, cable type, polling rate, and dimensions
The Cherry KC 200 MX is a full-size office-focused mechanical keyboard sold here as a Renewed unit in Bronze with MX2A Silent Red linear switches. It targets office typists, developers, and finance or admin users who want Cherry switch fel and a metal plate frame without the RGB and gamer styling of enthusiast boards.
The defining feature is the MX2A Silent Red switch, Cherry's updated linear with dampened stems aimed at reducing bottom-out and return noise. Cherry rates this variant for 50 million keystrokes. Based on the linear profile, expect smooth actuation with no tactile bump, which suits fast touch typists and users on frequent video calls.
Trade-offs are typical at this tier and Renewed status. Silent Red linears are polarizing, users coming from Browns or Blues will miss the tactile feedback, and the source does not specify polling rate, connection type, cable, keycap material, or dimensions. As a Renewed listing, cosmetic condition and remaining switch life depend on the refurbisher rather than a factory-fresh baseline.
Buy this if you want a quiet full-size Cherry mechanical for office or shared-space use and value the metal plate build over RGB features. Skip this if you prefer tactile or clicky switches, need confirmed wireless or USB-C connectivity, or want a waranty profile equivalent to new stock.
Switches: Cherry MX2A Silent Red, linear with integrated dampeners, made in Germany with Gold-Crosspoint contacts. Rated for 50 million keystrokes on this variant, versus 100 million on MX2A Brown. Linear travel with no tactile bump favors light, fast keypresses over deliberate typing fedback.
Build: Metal plate frame under the switches, which stiffens the deck and cuts flex compared with plastic-only office boards. Cherry positions the KC 200 MX as a slim modern design, though exact case height, weight, and keycap material are not specified in the source data.
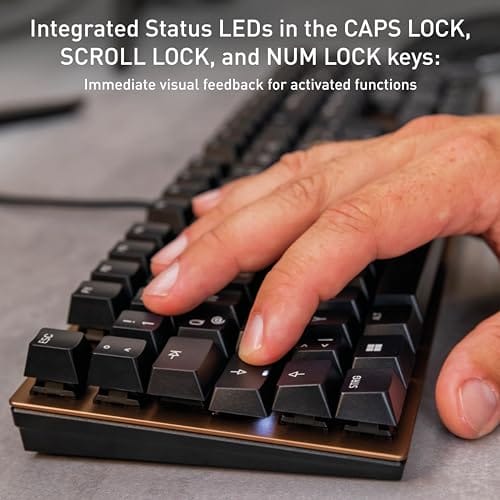
Layout and indicators: Full-size layout retains the dedicated numpad and function row, which maters for spreadsheet,ERP, and accounting workflows. White LED status indicators are built into Caps Lock, Scroll Lock, and Num Lock keys, avoiding a separate indicator strip and keeping the top edge clean.
Gaming fit: Silent Red linears work for casual gaming and MMO or productivity crossover use given their light linear fel, but the source does not list polling rate, N-key rollover, or onboard profiles, so competitive esports buyers should confirm specs before committing.
Keep the removed switches sorted in a small tray while you work. If one key was chattering, weak, or scratchy, label that switch instead of mixing it back into the pile. That tiny habit makes cleanup easier and keeps a simple keyboard job from turning into a hunt for one bad part.
Common questions
Can I change switches on any mechanical keyboard?
No. Hot-swap mechanical keyboards are designed for top-side switch removal, while soldered boards require desoldering. Optical, low-profile, and magnetic switch boards may need their own switch families. Always confirm compatibility before buying replacements.
Do I need to solder to change keyboard switches?
Not if your keyboard has hot-swap sockets. You’ll only need a keycap puller and switch puller for most hot-swap boards. If the switches are soldered to the PCB, then yes, you’ll need soldering tools and enough practice to avoid lifting pads.
Are five-pin switches better than three-pin switches?
Five-pin switches have two extra plastic legs that help alignment on PCB-mount builds. They aren’t automatically smoother or faster. A plate-mount board may use three-pin switches, and many five-pin switches can be clipped to fit if the electrical pins and stem type match.
Should I buy a full Cherry keyboard just to change switches?
Usually, no. The Cherry KC 200 MX listing describes a complete renewed keyboard with MX2A Silent Red switches, not a switch puller or replacement switch pack. Consider it only if you want that keyboard as a keyboard; for this job, buy the specific tools and compatible switches your current board needs.






























Write Your Review
No reviews yet. Be the first to share your experience!