

When the front panel USB ports stop working, the rest of the PC can feel perfectly normal. Rear motherboard ports still see your keyboard, mouse, headset dongle, or flash drive, but the case ports do nothing, disconnect at random, or only charge a phone slowly. That’s frustrating because the fault can live in three places: the case cable, the motherboard header, or Windows power behavior. We researched the common failure points so you can narrow it down without tearing the whole build apart. If you’re choosing a new enclosure later, our guides to the best mid-tower case and best PC case for airflow are useful context, but this guide starts with the case already on your desk. Quick wins first.
First check the obvious (the 30-second check)
Start with the simple split: plug the same USB device into a rear motherboard port. If it works there, the device and Windows driver are probably fine. Then try a second known-good device in the front port, preferably something low-power like a wired mouse or small USB flash drive. If neither device is detected up front, don’t assume the motherboard is dead yet. Front panel USB depends on an internal cable that can be loose, misaligned, pinched behind the tray, or plugged into the wrong header.

Shut the PC down, flip the power supply switch off, and hold the case power button for 5 seconds to drain standby power. Remove the side panel and trace the front USB cable from the case I/O area to the motherboard. USB 3.x front-panel connectors are usually wide 19-pin or 20-pin plugs, while USB-C front-panel connectors use a smaller, reversible-looking Type-E header. USB 2.0 front ports often use a 9-pin plug with one blocked pin. Don’t pull on the wires. Grip the plastic connector, reseat it straight, and listen for a firm click or feel for full seating. Small detail. Big difference.

Cause #1: The internal front-panel USB cable is loose or misseated
The most common cause is boring: the internal cable isn’t fully seated. A wide USB 3.x front-panel plug can look connected while one side is raised by 1 or 2 mm. That tiny tilt can kill both front USB-A ports or make one port work only when the cable is pushed a certain way. The header pins are also thin, so a plug forced in at an angle can bend a pin just enough to break one data lane while leaving power present. That’s why a phone may charge, but a keyboard or storage device won’t appear.
Reseat the connector with the motherboard manual open if you have it. Match the blocked pin or keyed notch, then press evenly from both ends of the plastic housing. For USB-C, confirm your case cable is connected to the motherboard’s Type-E front-panel USB-C header, not a similar-looking internal connector nearby. Some budget boards simply don’t have the required Type-E header, even if the case has a USB-C port. In that situation the port can’t work without an adapter card or a different board. Don’t force it. Bent pins turn a 5-minute fix into a board-level problem.
If your current case’s front I/O harness is damaged or the layout has become a constant headache, a replacement case can be the cleaner fix. The Lian Li O11 Vision Compact is a $124.99 ATX mid tower with white steel, tempered glass, and back-connect support, and it carries a 4.4 rating in the available product data. It’s still a whole-case solution, not a tiny cable repair, but it’s relevant when the front I/O module or case wiring is the part that’s actually failed.

Pros
- Patented three-panel tempered glass exposes front, top, and left views of the build.
- Native back-connect motherboard support for hiden 24-pin, EPS, and PCIe cabling.
- Second chamber hides side-mounted AIO tubing for a cleaner primary compartment.
- Swappable top mesh panel suports a 360mm AIO when thermals take priority over glass.
Cons
- Limited owner feedback at time of writing makes long-term reliability signal thin.
- Full specs (GPU length, cooler height, fan count) not published in source data.
- Back-connect layout requires a compatible motherboard, narowing part selection.
The Lian Li O11Vision Compact is a mid-range ATX mid-tower positioned as a smaller sibling to the O11 Dynamic line, developed in collaboration with the PCMasterRace community. It targets showcase builders who want a dual-chamber layout, tempered glass on three sides, and native support for back-connect motherboards in a tighter footprint.
The defining feature is the patented three-panel tempered glass design covering the front, top, and left side. Paired with the second-chamber cable routing and back-connect motherboard compatibility, the front compartment stays visually clean. Builders wanting a 360mm AIO can swap in the included top mesh panel, trading a glass top for airflow.
Trade-offs are typical at this tier. Back-connect support only pays off if you buy a compatible board from ASUS, MSI, GIGABYTE, or similar, which narrows part selection and can raise motherboard cost. Concrete specs like GPU clearance, CPU cooler height, radiator sites, and included fan count are not specified in the source data, so verify against the official manual before finalizing parts.
Buy this if you want O11-family aesthetics with hidden cabling via a back-connect board and a side or top 360mm AIO. Skip this if you need a documented GPU length ceiling, bundled fans, or a traditional cable-visible motherboard build.
Motherboard support: The chassis accepts standard ATX boards and ads native routing for back-connect variants such as ASUS BTF, MSI Project Zero, and GIGABYTE Project Stealth. Cable cutouts on the tray align with rear-side connectors, keping the 24-pin, EPS, and PCIe cables out of the main chamber view.
Radiator and AIO: A swappable top mesh panel is included specifically to enable a 360mm AIO in the rof. When the AIO is mounted on the side instead, the dual-chamber layout routes the tubing into the second compartment, keeping the front-facing glass view unobstructed. Exact side radiator thickness limits are not specified.
Glass and panel layout: Three tempered glass panels cover the front, top, and left side. The top glass panel is the one you swap out when a 360mm radiator is installed, so builders choosing air cooling or a bottom-mounted AIO retain the full three-panel glass look.
Not specified in source: GPU length clearance, CPU cooler height, drive bay count, included fan count, front I/O (USB-C, USB-A), PSU length, and case dimensions are not listed in the provided data. Confirm these against the Lian Li O11VPW official spec sheet before finalizing parts.
Cause #2: The motherboard header or port type doesn’t match the case
Front USB problems also happen when the case and motherboard don’t speak the same physical language. A case might provide two front USB-A ports through a 19-pin USB 3.x connector, plus a USB-C port through a Type-E connector. An older or cheaper motherboard may only have USB 2.0 and one USB 3.x internal header. The result is a dangling cable inside the case, a front port that never worked from day one, or an adapter chain that reduces speed and reliability. If you’ve recently moved parts into a new chassis, this is the first compatibility check to make.
Look up the exact motherboard model and count its internal USB headers. You want labels such as F_USB, USB_12, JUSB, USB3_12, or F_U32C, depending on the vendor. A 9-pin USB 2.0 header won’t properly run a USB 3.x front-panel cable without an adapter, and even then you’ll be limited to USB 2.0 speeds. A USB-C case port usually needs the internal Type-E header for the cleanest setup. Adapters exist, but they’re not magic. If the board lacks the header, the front port isn’t broken; it’s unsupported by that build. That’s an important distinction.
Header math trips up a lot of people during upgrades. A single 19-pin USB 3.x header carries two ports, so a case with four front USB-A ports may need two headers, and many mainstream boards only ship one. When the second cable has nowhere to go, half the front ports stay dead no matter what you try. Read your board’s block diagram, note which headers share bandwidth with rear ports, and decide which front ports matter most. If you rely on fast storage transfers up front, prioritize the USB 3.x header for that port and leave a low-priority accessory on USB 2.0. It’s a compromise, but it’s an honest one when the hardware simply doesn’t have enough connectors.
Cause #3: Power management or driver behavior is cutting the port off
If the front USB port works after a reboot, then drops a headset, capture card, external SSD, or RGB controller after sleep, look at Windows power management. Windows can turn off USB hubs to save power, and some boards are more aggressive with front-panel ports because they’re hanging off an internal hub path. Open Device Manager, expand Universal Serial Bus controllers, and check the properties for USB Root Hub and Generic USB Hub entries. Under Power Management, uncheck “Allow the computer to turn off this device to save power” where that tab appears.
Also check your BIOS or UEFI for USB power and legacy USB settings. You don’t need to change everything at once. Change one setting, boot, and evaluate the symptom with the same device. If an external drive disappears under load, try a shorter cable and avoid passive front-panel extensions. Front case wiring adds length before your device’s cable even starts, and high-draw devices are less forgiving. Rear motherboard ports are usually the better home for external SSDs, VR sensors, DACs, and capture devices. Front ports are convenient, but they aren’t always the strongest electrical path.
Preventive maintenance
Front USB ports fail faster when they get used like handles. Avoid yanking flash drives sideways, don’t leave a long adapter hanging from the port, and keep dust out of the front I/O area. A can of air can clear lint, but use short bursts and keep the nozzle back from the connector. If the case sits on carpet, move it onto a stand or desk shelf so the front panel isn’t collecting debris. During any rebuild, route the front USB cable with a soft bend radius instead of folding it flat behind the motherboard tray. Cables remember abuse. Not forever, but long enough to cause intermittent disconnects months later.
When it’s not fixable: what to replace
If the connector is seated correctly, the header matches, Windows power settings are sane, and the front port still fails with multiple known-good devices, you’re down to hardware replacement. The cheapest fix is a replacement front I/O module from the case maker, if it’s sold separately. Some brands offer a front-panel board, USB cable harness, or complete top I/O assembly for popular cases. You’ll need the exact case model, color, and revision. Close enough isn’t good enough here because screw locations, cable lengths, and plastic clips change between revisions.
If the case maker doesn’t sell the I/O assembly, decide whether a PCIe USB expansion card, external powered hub, or full case swap makes more sense. A PCIe card can add rear USB ports and sometimes an internal Type-E header, which helps if your issue is motherboard header availability rather than broken case wiring. A powered hub is the easiest workaround for desk accessories. A new case makes sense when the front I/O is physically cracked, the ports are loose in the shell, or you’re already unhappy with airflow, noise, or cable space. Our budget PC case guide covers lower-cost options if replacement is more sensible than chasing discontinued spare parts.
Tools and parts needed
You don’t need a full bench kit for most front USB fixes. A Phillips #2 screwdriver handles side panels and accessory brackets. A flashlight helps you inspect the motherboard header without leaning on the GPU. The motherboard manual tells you which header is which, and a phone photo before unplugging anything gives you a reference if cable routing gets confusing. For cleaning, use compressed air and a soft nylon brush, not metal picks. For replacement, you’ll need either the exact case I/O module, a compatible USB expansion card, a powered hub, or a different case. If you’re planning a broader rebuild, check front I/O placement alongside airflow and cable-management depth, especially on showcase builds like the ones in our budget showcase case roundup.
If you carry your rig to events, repair jobs, or a workbench across town, transport is its own kind of maintenance. Front I/O ports and connectors take a beating from bumps and vibration, and a loose header can shake free during a car ride. A padded transport solution helps here. The Regetek Rolling Hard Case is a $279.99 waterproof, shockproof case with foam, wheels, and a retractable handle, measuring 32.5 x 20.5 x 13 inches outside with a roughly 28.94 x 17.72 x 9.65 inch interior, and it holds a 4.6 rating in the available data. It’s overkill for a desktop that never moves, but it’s a genuine part of keeping fragile front-panel wiring intact if your build travels.
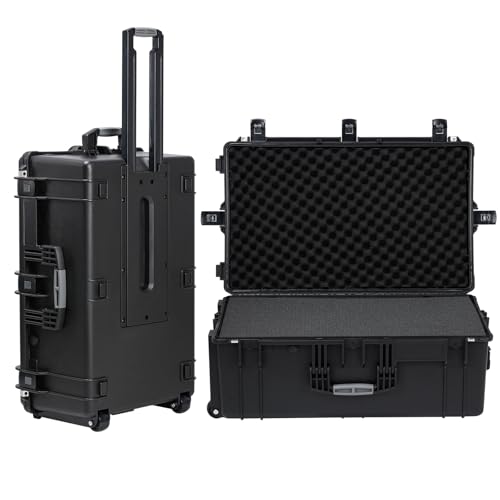
Pros
- IP67 seal with air-lock valve keeps kit dry during rain, dust, or airline handling
- Pick-and-pluck foam in four layers adapts to cameras, lenses, tools, or medical gear
- Dual padlock holes on the latches allow TSA locks for checked-luggage transport
Cons
- No verified owner fedback at time of writing, so long-term wheel and latch durability is unproven
- Case with foam weighs 32.73 lb empty, which pushes loaded weight near airline checked limits
- Standard-density pluck foam is less protective than custom cut foam for heavy optics or precision instruments
The Regetek Rolling Hard Case is a mid-size wheeled transport case in the Pelican-style category, measuring 32.5 by 20.5 by 13 inch externally with a 28.94 by 17.72 by 9.65 inch usable interior. It targets photographers, drone operators, field service techs, and musicians who need airline-checkable protection for fragile gear.
The defining feature is the IP67 rating paired with a full-length steel hinge and double-latch closure. Cases at this size and seal class typically survive shallow submersion to about 3.3 ft, and the air-lock valve equalizes pressure after altitude changes so the lid does not vacuum shut. Owner feedback is unavailable, so real-world seal longevity cannot be confirmed.
Trade-offs are typical at this tier. The 32.73 lb empty weight with foam eats into airline allowances before gear is loaded, and standard-density pick-and-pluck foam is a compromise between adaptability and impact absorption compared with custom cut foam. Wheels and retractable handles on cases in this class are also the most common long-term failure points.
Buy this if you need a lockable, waterproof rolling case sized for a full mirrorless kit, mid-size drone, or field tolset. Skip this if your payload exceeds the28.94 inch interior length, or if you need documented drop-test certification for professional broadcast use.
Dimensions and weight: Exterior measures 32.5 by 20.5 by 13 inch with an internal usable volume of 28.94 by 17.72 by 9.65 inch. Total weight with foam is 32.73 lb, which is consistent with rotomolded polymer cases in this size class and leaves useful payload room for airline checked baggage.
Sealing and ingress protection: The case is rated IP67 with an O-ring gasket, watertight buckles, and an air-lock pressure equalization valve. Manufacturer states safe submersion to 3.3 ft, and the valve prevents lid suction after temperature or altitude changes during air transit.
Foam configuration: Interior includes four pick-and-pluck layers of standard density foam, one top egg-crate layer, and one bottom pad. The pluck grid lets you shape custom cavities without a knife, though density is not specified in pounds per cubic foot.
Structure and security: Shell uses high-impact polymer with one full-length steel hinge instead of two-point hinges, a double-latch system, dual padlock holes for redundant locking, a heavy-duty top handle, integrated whels, and a retractable pull handle. Waranty is stated at 2 years including replacement parts.
A few more questions
Why do my rear USB ports work but the front ones don’t?
Rear ports are soldered directly to the motherboard, while front ports rely on a case cable and internal header. That adds two more failure points: the case’s front I/O board and the internal connector. If rear ports work normally, focus on the case cable, header compatibility, and front I/O module before blaming Windows or the device.
Can a front USB port charge a phone but still be broken?
Yes. USB has power pins and data pins. If the power side still connects but the data pins are bent, dirty, or disconnected through the internal cable, a phone may charge while storage devices, controllers, and keyboards don’t appear. That’s why charging alone isn’t proof the port is healthy.
Is it safe to plug the front USB connector in while the PC is on?
No, shut the system down first. Flip the power supply switch off and drain standby power with the case button before touching internal USB headers. The pins are small, and a slipped connector can short the wrong contacts. It’s a quick shutdown, and it’s worth it.
Do I need a new motherboard if front USB-C doesn’t work?
Not always. First confirm the case’s USB-C cable is connected to a real Type-E header on the motherboard. If your board doesn’t have that header, the port may need a PCIe expansion card with an internal USB-C header, or you can leave it disconnected. Replace the motherboard only if you also need other upgrades or the internal header is confirmed damaged.































Write Your Review
No reviews yet. Be the first to share your experience!