

You sit down for a quiet evening, boot the PC, and within a minute the whole desk sounds like a hair dryer with a grudge. Loud case fans are one of the most common complaints from people who otherwise love their build, and the frustrating part is that the noise almost never means your machine is broken. It usually means one small thing is off. A clogged filter, a fan spinning at 100 percent for no reason, a bearing on its way out, or a blade tapping a stray cable.
We researched the usual suspects behind roaring case fans and lined them up from the cheapest fix to the last resort. Most of these take a screwdriver and ten minutes. If you’re already rethinking the chassis itself, our guides to the best airflow cases of 2026 and the best budget case for a silent build are worth a look, and the roundup of the best mid-tower cases covers roomier options that hide fan noise better. Let’s work through it.
First check the obvious (the 30-second check)
Before you open anything, listen. Is the noise a steady whoosh of moving air, or a mechanical clicking, grinding, or buzzing? Airflow noise means the fans are simply spinning fast. Mechanical noise means something is physically wrong with a fan or touching it. That single distinction saves you an hour.

Next, push gently on the side panel and the glass. If the pitch changes or the buzz drops, you’ve got panel resonance, not a dying fan. Then open your fan software (BIOS, Fan Control, or the motherboard app) and watch the RPM readout. A 120mm fan screaming at 1800 to 2200 RPM while your CPU sits at 40C is a tuning problem, not a hardware failure. Note the number. You’ll want it in a minute.

One more quick pass before you grab a screwdriver. Shine a phone light into the case and look for any cable, zip tie, or loose sticker drifting into a fan blade. A single wire tapping a spinning fan makes a shockingly loud clatter that people mistake for a broken bearing, and tucking it away with a twist tie fixes the whole thing in five seconds. While you’re at it, check that all your fans are actually spinning. A stalled fan on a shared header can make the others ramp to cover for it, which is noise caused by a fan that isn’t even moving.
Cause #1: Dust buildup choking the fans
Dust is the quiet killer of quiet PCs. A layer of felt on the blades unbalances them, and a clogged intake filter forces every fan to spin harder to pull the same air. The result is more RPM, more turbulence, and a machine that gets louder every month even though nothing in your config changed. If your PC lives on carpet or shares a room with a shedding pet, this is almost certainly part of the story.
Power down, unplug, and pop the filters. Most modern cases have magnetic front and bottom filters you can rinse under a tap and dry. Hit the blades with short bursts of compressed air, holding each fan still with a finger so it doesn’t over-spin and stress the bearing. Clean the radiator or heatsink fins too, since those clog just as fast. Owner reports show a full dust clean-out alone can drop fan speeds by several hundred RPM once airflow is restored, which is the difference between annoying and unnoticeable.
Don’t forget the parts you can’t see at a glance. The rear exhaust grille, the top mesh, and the PSU shroud vents all collect a felt of dust that quietly strangles airflow. A cotton swab clears the corners a filter misses, and a quick wipe of the tempered glass on the inside face keeps the whole build looking as quiet as it now sounds. Set a reminder to repeat this on a schedule instead of waiting for the noise to come back, because by the time you hear it, the fans have already been working overtime for weeks.
Cause #2: A fan curve that runs everything flat out
This is the big one, and it’s free to fix. Plenty of motherboards ship with a default profile that ramps fans aggressively or, worse, ignores PWM control and runs a fan at full voltage the entire time. If your 30-second check showed high RPM at low temperatures, your curve is the culprit. Cases don’t come loud from the factory. They come loud from lazy defaults.
Get into your BIOS fan settings or grab a free tool like Fan Control. Set a gentle curve: idle around 30 to 40 percent duty up to roughly 50C, then a smooth climb toward 100 percent only past 75C or so. Make sure each header is set to PWM mode if your fans are 4-pin, since a 3-pin fan stuck on a PWM header sometimes defaults to full blast. Also confirm you didn’t accidentally tie your case fans to the CPU temperature spike sensor, which makes them lurch loud on every micro-load. A well-shaped curve is the single most effective noise fix most people never try.
Add a little hysteresis while you’re in there. That’s the delay setting that stops fans from surging up and down every time a background task blips the CPU. A few seconds of ramp-up and ramp-down smoothing turns those jarring speed changes into a steady, ignorable hum. If your board offers step-up and step-down time options, set them to two or three seconds each. The goal isn’t the lowest possible speed. It’s a curve that stays calm instead of one that constantly reacts to noise your ears would never have noticed otherwise.
Cause #3: A failing bearing or vibration you can feel
If the noise is a grind, a rattle, or a low buzz that doesn’t track with temperature, a bearing is wearing out. Sleeve-bearing fans that run hot for years eventually dry out and start clicking, especially at low RPM where the imbalance is most audible. You can usually pin the guilty fan by briefly stopping each one with a finger and hearing the noise vanish. A fan that whines when you spin it by hand is done.
Vibration is the sneakier version of this. A fan bolted metal-to-metal against a thin steel panel transmits its buzz straight into the chassis, turning the whole case into a speaker. Rubber anti-vibration mounts or soft silicone screws break that path and cost a couple of dollars. Loose mounting screws do the same thing, so snug down anything that rattles. If a bearing is genuinely gone, replace the fan rather than fighting it. A chassis with better native fan mounting and cleaner cable routing helps here too, and the Lian Li O11Vision Compact at $124.99 (4.4 stars) is a steel and tempered-glass ATX mid tower with back-connect support, so cables tuck behind the tray instead of hanging in the airflow and buzzing against blades.

Pros
- Patented three-panel tempered glass exposes front, top, and left views of the build.
- Native back-connect motherboard support for hiden 24-pin, EPS, and PCIe cabling.
- Second chamber hides side-mounted AIO tubing for a cleaner primary compartment.
- Swappable top mesh panel suports a 360mm AIO when thermals take priority over glass.
Cons
- Limited owner feedback at time of writing makes long-term reliability signal thin.
- Full specs (GPU length, cooler height, fan count) not published in source data.
- Back-connect layout requires a compatible motherboard, narowing part selection.
The Lian Li O11Vision Compact is a mid-range ATX mid-tower positioned as a smaller sibling to the O11 Dynamic line, developed in collaboration with the PCMasterRace community. It targets showcase builders who want a dual-chamber layout, tempered glass on three sides, and native support for back-connect motherboards in a tighter footprint.
The defining feature is the patented three-panel tempered glass design covering the front, top, and left side. Paired with the second-chamber cable routing and back-connect motherboard compatibility, the front compartment stays visually clean. Builders wanting a 360mm AIO can swap in the included top mesh panel, trading a glass top for airflow.
Trade-offs are typical at this tier. Back-connect support only pays off if you buy a compatible board from ASUS, MSI, GIGABYTE, or similar, which narrows part selection and can raise motherboard cost. Concrete specs like GPU clearance, CPU cooler height, radiator sites, and included fan count are not specified in the source data, so verify against the official manual before finalizing parts.
Buy this if you want O11-family aesthetics with hidden cabling via a back-connect board and a side or top 360mm AIO. Skip this if you need a documented GPU length ceiling, bundled fans, or a traditional cable-visible motherboard build.
Motherboard support: The chassis accepts standard ATX boards and ads native routing for back-connect variants such as ASUS BTF, MSI Project Zero, and GIGABYTE Project Stealth. Cable cutouts on the tray align with rear-side connectors, keping the 24-pin, EPS, and PCIe cables out of the main chamber view.
Radiator and AIO: A swappable top mesh panel is included specifically to enable a 360mm AIO in the rof. When the AIO is mounted on the side instead, the dual-chamber layout routes the tubing into the second compartment, keeping the front-facing glass view unobstructed. Exact side radiator thickness limits are not specified.
Glass and panel layout: Three tempered glass panels cover the front, top, and left side. The top glass panel is the one you swap out when a 360mm radiator is installed, so builders choosing air cooling or a bottom-mounted AIO retain the full three-panel glass look.
Not specified in source: GPU length clearance, CPU cooler height, drive bay count, included fan count, front I/O (USB-C, USB-A), PSU length, and case dimensions are not listed in the provided data. Confirm these against the Lian Li O11VPW official spec sheet before finalizing parts.
Preventive maintenance that keeps it quiet
Once you’ve fixed the noise, keeping it fixed is mostly habit. Rinse your intake filters every four to six weeks and blow out the interior every few months. Keep the PC off carpet and lifted a few inches so the bottom intake can breathe. Positive pressure, meaning slightly more intake than exhaust, pushes dust toward the filters instead of pulling it through every gap, which means less cleaning and steadier fan speeds over time.
If you haul your rig to LAN events or move often, transport is its own hazard. Bounced fans knock bearings out of true and jostle heatsinks loose, and both show up later as new noise. A padded case built for gear, like the Regetek Rolling Hard Case at $279.99 (4.6 stars) with cut foam, wheels, and a retractable handle across its 32.5 by 20.5 by 13 inch shell, keeps everything still in transit so you’re not re-diagnosing rattles after every trip.
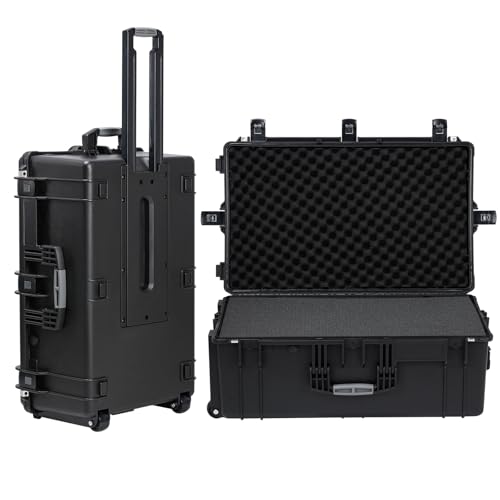
Pros
- IP67 seal with air-lock valve keeps kit dry during rain, dust, or airline handling
- Pick-and-pluck foam in four layers adapts to cameras, lenses, tools, or medical gear
- Dual padlock holes on the latches allow TSA locks for checked-luggage transport
Cons
- No verified owner fedback at time of writing, so long-term wheel and latch durability is unproven
- Case with foam weighs 32.73 lb empty, which pushes loaded weight near airline checked limits
- Standard-density pluck foam is less protective than custom cut foam for heavy optics or precision instruments
The Regetek Rolling Hard Case is a mid-size wheeled transport case in the Pelican-style category, measuring 32.5 by 20.5 by 13 inch externally with a 28.94 by 17.72 by 9.65 inch usable interior. It targets photographers, drone operators, field service techs, and musicians who need airline-checkable protection for fragile gear.
The defining feature is the IP67 rating paired with a full-length steel hinge and double-latch closure. Cases at this size and seal class typically survive shallow submersion to about 3.3 ft, and the air-lock valve equalizes pressure after altitude changes so the lid does not vacuum shut. Owner feedback is unavailable, so real-world seal longevity cannot be confirmed.
Trade-offs are typical at this tier. The 32.73 lb empty weight with foam eats into airline allowances before gear is loaded, and standard-density pick-and-pluck foam is a compromise between adaptability and impact absorption compared with custom cut foam. Wheels and retractable handles on cases in this class are also the most common long-term failure points.
Buy this if you need a lockable, waterproof rolling case sized for a full mirrorless kit, mid-size drone, or field tolset. Skip this if your payload exceeds the28.94 inch interior length, or if you need documented drop-test certification for professional broadcast use.
Dimensions and weight: Exterior measures 32.5 by 20.5 by 13 inch with an internal usable volume of 28.94 by 17.72 by 9.65 inch. Total weight with foam is 32.73 lb, which is consistent with rotomolded polymer cases in this size class and leaves useful payload room for airline checked baggage.
Sealing and ingress protection: The case is rated IP67 with an O-ring gasket, watertight buckles, and an air-lock pressure equalization valve. Manufacturer states safe submersion to 3.3 ft, and the valve prevents lid suction after temperature or altitude changes during air transit.
Foam configuration: Interior includes four pick-and-pluck layers of standard density foam, one top egg-crate layer, and one bottom pad. The pluck grid lets you shape custom cavities without a knife, though density is not specified in pounds per cubic foot.
Structure and security: Shell uses high-impact polymer with one full-length steel hinge instead of two-point hinges, a double-latch system, dual padlock holes for redundant locking, a heavy-duty top handle, integrated whels, and a retractable pull handle. Waranty is stated at 2 years including replacement parts.
When it’s not fixable: what to replace
Sometimes the fan itself is the problem and no amount of tuning saves it. Cheap bundled fans, especially the single exhaust that ships with budget cases, tend to be loud by design because they trade acoustics for cost. Swapping to quality 120mm or 140mm fans with fluid-dynamic bearings drops both the noise floor and the RPM needed to move the same air. Bigger fans spinning slower are quieter than small fans spinning fast, every time.
If the case itself fights you, with cramped fan slots, no filters, or panels that resonate, the chassis is worth replacing before you keep throwing fans at it. This is where an airflow-focused build pays off, and our best budget PC case picks for 2026 cover options that come with decent fans and proper filtration out of the box. A better case plus two good fans usually costs less than an afternoon of frustration.
When to call a pro vs DIY
Honestly, fan noise is one of the most DIY-friendly problems in a PC. Cleaning, curve tuning, and even a full fan swap need nothing more than a screwdriver and patience, so there’s rarely a reason to pay someone. The one time it’s worth a second opinion is when the noise comes with heat you can’t explain, like a fan roaring while temperatures still climb, since that can point to a failing pump on a liquid cooler or a heatsink that lost contact with the CPU. If a fresh curve and a clean build don’t calm things down and temps stay high, have a shop check the cooler mount before you assume the fans are at fault.
Tools and parts needed
Nothing exotic. A Phillips screwdriver, a can of compressed air, and a soft cloth handle the cleaning and the fan-curve reset. For the noise fixes, keep a few rubber anti-vibration fan mounts or silicone screws on hand, since they solve resonance for pocket change. If you’re replacing fans, a set of 120mm or 140mm fluid-dynamic-bearing units and, for RGB or multi-fan setups, a PWM fan hub round out the kit. That’s the whole shopping list. Most of it you already own.
A few more questions
Why are my case fans suddenly loud when they were quiet before?
A sudden change almost always points to dust or a fan curve reset. Dust accumulates gradually until airflow drops enough that fans ramp to compensate, and a BIOS update or driver reinstall can wipe your custom curve back to an aggressive default. Clean the filters first, then check that your fan profile survived. If the noise is mechanical rather than airflow, a bearing likely gave out.
Is it bad to run my case fans at full speed all the time?
It won’t damage anything, but it wears bearings faster and pulls in far more dust, so you’ll clean more often and the fans age sooner. Cooling-wise it’s overkill for most builds, since a tuned curve keeps temperatures fine at half the noise. There’s no real benefit to running flat out unless you’re pushing a heavy sustained load like rendering or a long gaming session in a hot room.
How many case fans do I actually need to stay quiet?
Two intake and one exhaust is plenty for most mid towers, and that setup runs quieter than a case crammed with six fans all spinning to overcome each other’s turbulence. Aim for slightly positive pressure and let larger, slower fans do the work. More fans only help if they let you drop each fan’s RPM, which is what actually cuts the noise.


































Write Your Review
No reviews yet. Be the first to share your experience!