

Your RAM is almost certainly running slower than the sticks are rated for. Out of the box, most DDR4 and DDR5 kits default to a conservative JEDEC speed, and all that extra headroom you paid for sits locked behind a single BIOS toggle. Overclocking your RAM, which for most people just means enabling the right memory profile and maybe tightening a few numbers, can shave frame-time stutter in games and speed up memory-heavy work like video editing and compiling. This walkthrough takes you from a cold BIOS screen to a stable, verified overclock, one step at a time, without frying anything or corrupting a single file. It’s easier than you’d think, and it’s free performance you already own.
What you’ll need
You don’t need special hardware, just a few free tools and some patience. Grab CPU-Z to read your current memory speed and timings. For stability, use a bootable memory checker on a USB stick for the deep overnight runs, plus an in-Windows validator like TM5 (with the anta777 config) or Karhu for quick hourly passes. Have your motherboard model handy so you can look up its QVL, the qualified vendor list of memory kits the board maker has vetted. Know your kit’s rated spec too, the speed, timings, and voltage printed on the label or the product page.
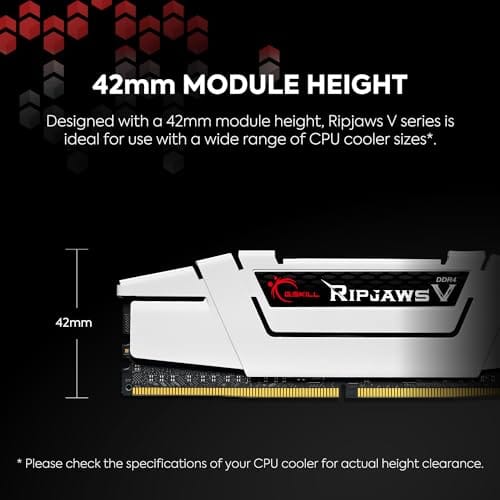
If you’re still choosing memory, our guides to the best 32GB RAM kits for 2026 and RAM for gaming and video editing cover kits with the kind of headroom worth chasing. A kit like the G.SKILL Ripjaws V DDR4 32GB (2x16GB), rated at 3600MT/s with CL18-22-22-42 timings at 1.35V, is a solid example of what a memory profile unlocks. At roughly $229.99 and a 4.6 rating, it’s built to hit that 3600 speed the moment you flip the profile on, and its timings leave real room for manual tuning later. That’s exactly the kind of kit this guide assumes you’re working with: rated well above JEDEC defaults, with a cushion on top.


Pros
- DDR4-3600 XMP at 1.35V is the Ryzen AM4 sweet spot, aligning FCLK 1:1 at 1800MHz for best latency.
- Matched 2x16GB kit is factory-tested as a pair, reducing dual-channel instability compared to mixing sticks.
- Compatible with both Intel XMP and AMD DOCP/A-XMP BIOS profiles without manual sub-timing adjustments.
- Ships with JEDEC SPD fallback so the system always boots safe at default clocks before XMP is enabled.
Cons
- CL18 primary latency is mid-range; DDR4-3600 CL16 kits exist for buyers prioritizing tighter timings.
- No ECC support, so workstation or Threadripper ECC builds need a different kit entirely.
The G.SKILL RipjawsV F4-3600C18D-32GVK is a mid-range DDR4 desktop kit targeting Intel and AMD mainstream platform builders who want 32GB capacity at DDR4-3600 without overpaying for CL14 or CL16 enthusiast kits. It ships as a matched 2x16GB dual-channel pair in the standard 288-pin U-DIMM form factor.
The defining spec here is the XMP profile: DDR4-3600 at CL18-22-22-42, 1.35V. On AMD AM4 Ryzen systems, 3600MHz is the well-documented sweet spot for achieving a 1:1 FCLK ratio at 1800MHz, which keeps infinity fabric latency in check and translates to measurable gains in lightly-threaded workloads and gaming frame times compared to DDR4-3200 or lower.
CL18 is a genuine trade-off at this speed. Competing DDR4-3600 kits with CL16 or CL14 exist and offer lower absolute latency, though they typically carry a price premium. Owners report stable XMP operation across a wide range of B450, X570, and Z490/Z590 boards, but reaching rated speed on some budget AM4 boards may require manual sub-timing adjustments or AGESA microcode updates.
Buy this if you are building or upgrading an AM4 Ryzen or Intel LGA1700 desktop and want reliable 32GB DDR4-3600 dual-channel performance without tuning. Skip this if you need CL16 or tighter for competitive latency, or if your board has a limited QVL and you have not verified compatibility via G.SKILL's configurator tool first.
Platform Support: This kit uses 288-pin DDR4 U-DIMM and is compatible with Intel LGA1700 (Z690/Z790) and AMD AM4 (B450/X470/B550/X570) platforms. AM5 uses DDR5 exclusively, so this kit is not compatible with Ryzen 7000/9000 series builds on AM5 boards.
XMP and DOCP Activation: Rated speed of DDR4-3600 CL18-22-22-42 at 1.35V requires enabling XMP (Intel) or DOCP/A-XMP (AMD) in BIOS. Default JEDEC SPD boots at DDR4-2133 or DDR4-2400. On AM4, DDR4-3600 aligns FCLK at 1800MHz for a 1:1 ratio, which is the recommended operating point for Ryzen 3000 and 5000 series CPUs.
Slot Population and Mixing: Install both sticks in the recommended dual-channel slots per your motherboard manual, typically A2 and B2 in a 4-slot board. G.SKILL explicitly warns against mixing this kit with other modules; doing so voids the matched-pair guarantee and risks instability at XMP speeds.
Cooler Clearance: Exact heatspreader height is not specified in the source data, but RipjawsV modules are noted for a lower profile than Trident Z or RGB variants, reducing conflicts with wide tower coolers. Verify clearance if using a low-clearance cooler on a tight ITX board.
Step 1: Enable XMP or EXPO in BIOS
This is the single most important step, and for many people it’s the only one they’ll ever need. Restart, tap Delete or F2 to enter BIOS, and switch to the Advanced or Extreme mode if your board opens in a simple view. Find the memory profile setting, labeled XMP on Intel boards and EXPO on AMD systems, and select Profile 1. That one toggle loads your kit’s rated speed, primary timings, and voltage all at once, applying the manufacturer’s validated overclock in a single click. Save with F10, reboot, and you’ve done what 90% of “overclocking your RAM” actually means in practice.
Boot into Windows and open CPU-Z. On the Memory tab, remember DDR is double data rate, so a 3600MT/s kit shows as 1800MHz here. That’s correct, not a bug. If the number matches your kit’s rating, the profile took hold. Cross-check the timings field against your label too, since a healthy profile applies the full CL string, not just the speed. If the PC won’t boot after enabling the profile, don’t worry: clear CMOS using the board’s jumper or by pulling the battery for a minute, and it’ll revert to safe defaults with zero harm done. Some boards also do two or three long POST retries before a memory profile settles, so give it a moment before assuming failure.
Step 2: Verify stability at the rated profile
Never trust an overclock just because it reached the desktop. Booting and being stable are two very different things, and unstable memory corrupts data silently long before it ever throws a visible crash. Run a full stability pass now, at the XMP or EXPO speed, before you touch anything manually. A clean result here gives you a known-good baseline to compare every later change against, which is the whole point of doing it in this order.
For a thorough check, boot the memory validator from your USB stick and let it run at least four full passes, ideally overnight while you sleep. For a faster in-Windows option, TM5 with the anta777 config or a solid hour of Karhu will surface most errors quickly. Zero errors means you’re stable. A single error means back off, because one error is one too many for memory. Many builders stop right here, perfectly content with a verified XMP profile, and honestly that’s a completely valid place to plant your flag and walk away.
Step 3: Tighten the primary timings
Want more? The next gains come from tightening timings rather than raising the clock, and games in particular love lower latency. Head back into BIOS and find the DRAM timing configuration page. Focus on the four primary timings first: CAS Latency (CL), tRCD, tRP, and tRAS. On that Ripjaws kit those sit at 18-22-22-42, so you’d try nudging CL from 18 down to 17, then tRCD and tRP down a step each, leaving tRAS alone at first. Even a single CL step lower is a measurable latency win at the same clock speed.
Change one or two values at a time, never all four at once, or you’ll never know which one broke things when it fails. Save, reboot, and if it posts and reaches Windows, you’re on the right track. If it fails to boot, clear CMOS and loosen that last change by one step. This is patient work, one small adjustment per cycle followed by a stability run, but tighter primaries on a good kit can meaningfully cut latency without adding a single volt. Keep notes on what worked, because you’ll want to know your last stable value the moment something errors out.
Step 4: Nudge the frequency (optional, advanced)
If you want to push past your kit’s rated speed, raise the memory frequency in small increments, one tier at a time, for example from 3600 to 3733 to 3800. Each jump usually needs a little more DRAM voltage, and this is where caution matters most. For DDR4, keep daily-driver voltage at or below roughly 1.45V, and treat 1.35V to 1.4V as the comfortable everyday zone. Push voltage in tiny 0.01V to 0.02V bumps, never big leaps, and give each bump its own stability pass before deciding it helped.
Watch your CPU’s memory controller too, since on both AMD and Intel the controller has to keep pace with the RAM. On AMD systems the FCLK-to-memory ratio matters a lot for stability, and going too far past the rated speed can force the board to loosen timings automatically, which quietly erases the gains you came for. There’s a real ceiling here that varies chip to chip. Chasing the last 100MHz often costs more stability than the benchmark bump is worth, so know when a clean 3733 beats a flaky 3800. Small steps, re-verify after every one.
Step 5: Re-verify and lock it in
Every time you change a timing, a voltage, or a frequency, you re-run stability. No exceptions, ever. An overclock that passed clean at the rated profile tells you absolutely nothing about the tighter timings you just dialed in. Run the bootable memory validator for several passes or a long TM5 session again, and if it’s clean, run it once more after a cold boot from fully powered off, because some instability only reveals itself cold when the sticks are at room temperature.
Once you’ve got multiple clean passes across warm and cold starts, you’re done. Note your final settings somewhere permanent, a phone photo of the BIOS timing page works fine, so you can restore them fast after a BIOS update or an accidental CMOS reset wipes them. Then verify in CPU-Z one last time that your speed and timings read exactly what you set. That’s it. A real, verified RAM overclock that you can trust with your data.
Troubleshooting common issues
The PC won’t boot after enabling XMP or EXPO
Don’t panic, and don’t assume the kit is dead. Clear CMOS with the board jumper or by removing the battery for a minute, and the system reverts to safe defaults. Reseat both sticks firmly, confirm they’re in the correct slots (usually A2 and B2, the second and fourth from the CPU), then try the profile again. Some boards also need a BIOS update before they’ll run a specific kit at its full rated speed.
It boots fine but crashes randomly in games or apps
That’s classic memory instability. Loosen your most recent change, whether a timing or a frequency bump, by one step and run the validator again. If you’d tightened CL, put it back up one notch. Random crashes with no blue screen and no pattern are very often RAM, so trust the stability checker over how the machine subjectively “feels” while you use it.
The stability check throws errors even at the rated profile
If even the plain XMP or EXPO profile errors out, the culprit may be the memory controller or insufficient SoC voltage rather than the sticks themselves. Try a modest bump to VDDCR SoC on AMD or system agent voltage on Intel, keeping it conservative, or drop the memory speed one tier below rated. A weaker controller sample sometimes just can’t hit advertised speeds, and that’s silicon luck, not user error.
Common questions
Is overclocking RAM safe for my hardware?
Enabling XMP or EXPO is very safe, since you’re applying a profile the memory maker validated. Manual tuning is also safe as long as you keep DDR4 voltage sensible (around 1.35V to 1.45V) and verify stability after each change. The real risk isn’t a fried stick, it’s silent data corruption from an unstable overclock, which is exactly why the stability step is non-negotiable.
How much performance will I actually gain?
It depends on your workload. Games that lean on the CPU can pick up several percent in 1% lows and average frames when you move from JEDEC defaults to a proper profile. Memory-heavy creative work benefits from bandwidth and lower latency too. The biggest single leap almost always comes from that first XMP or EXPO toggle, with manual tuning adding smaller, diminishing returns on top.
Does XMP or EXPO count as overclocking?
Technically yes. Any speed above the JEDEC baseline is an overclock, and that’s precisely what these profiles apply. The difference is that XMP and EXPO profiles are pre-validated by the manufacturer, so they’re about as close to plug-and-play as overclocking gets. It’s the reason enabling one is the very first thing every builder does with a new kit.
Can I damage my data if the overclock is unstable?
Yes, and this is the part people underestimate. Unstable memory can flip bits during writes without crashing, quietly corrupting files or a save you cared about. That’s why you validate at every stage instead of trusting a clean boot. A stable, verified overclock is safe for daily use; an unverified one is a gamble with your files.
Wrapping up
Overclocking your RAM comes down to a simple ladder: enable XMP or EXPO, verify stability, then optionally tighten timings and nudge frequency, re-verifying at every single step. Most people get the biggest leap from that first toggle alone, and there’s genuinely no shame in stopping there. If you do climb further, patience and a good stability checker are what separate a rock-solid daily overclock from silent corruption. Pair the effort with a quality kit, and even a build resting on our budget RAM picks for 2026 can punch well above its price. Now go unlock the speed you already paid for.






























Write Your Review
No reviews yet. Be the first to share your experience!