Installing an SSD is a 20-minute job that turns a sluggish PC into something modern. Boot times drop from a minute to about eight seconds, app launches feel instant, and the rest of the machine suddenly feels younger than it is. There are two paths most people will take in 2026: a 2.5″ SATA drive that slides into a chassis bay, or an M.2 NVMe stick that pushes straight into a motherboard slot. We’ll walk both, plus the cloning route if you’d rather not reinstall Windows. You don’t need special skills. A screwdriver, a few minutes of BIOS poking, and a steady hand cover it.
Before you start
First, figure out what your motherboard accepts. Pull up the manual (PDF on the manufacturer’s site) and check two things: how many M.2 slots it has, and whether each slot supports NVMe, SATA, or both. Some budget boards from 2019-2021 have a single M.2 slot that defaults to SATA mode, which won’t work with an NVMe drive until you flip the setting in BIOS. Older boards may not have M.2 at all, in which case 2.5″ SATA is your route.
Back up anything irreplaceable before you touch hardware. External drive, cloud, whatever you trust. Then ground yourself, either with an anti-static wrist strap or by touching a bare metal part of the case before handling the drive. Static won’t usually kill an SSD, but it can. And confirm your power supply has a spare SATA power connector if you’re going the 2.5″ route. Most do.
Tools and parts you’ll need
The hardware list is short. A Phillips #1 or #2 screwdriver (magnetic tip helps with the tiny M.2 screw). The SSD itself – NVMe or SATA, depending on your slot. A SATA data cable if your board didn’t include one, though most do. That’s it for the install.
If you’re cloning your existing drive instead of doing a fresh Windows install, you’ll want an external enclosure so the new SSD can sit on USB during the clone. Plug it in, copy everything across, then swap the drives. Two enclosures cover the common cases:
Pros
- RTL9210 chipset is well regarded for stable 10Gbps NVMe throughput and UASP support
- Tool-free latch handles 2230 through 2280 M-key and B&M-key NVMe drives up to 8TB
- Aluminum body with silicone case improves heat dissipation on sustained writes
- Short-circuit and over-current protection plus TRIM passthrough for drive health
Cons
- Limited owner feedback at time of writing, so long-term reliability signal is thin
- NVMe only, no support for SATA M.2 NGFF or mSATA drives
- Full 10Gbps requires a genuine USB 3.2 Gen2 host and cable, easy to bottleneck
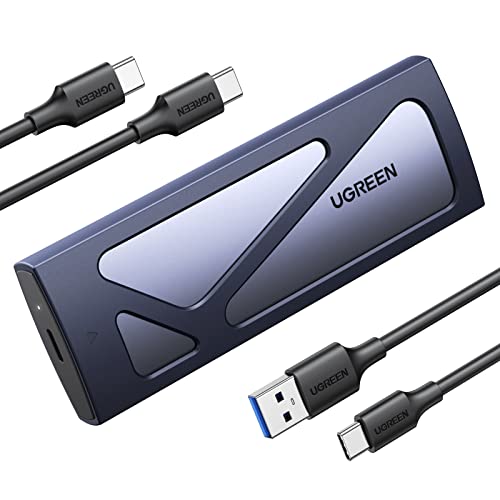
The UGREEN enclosure is a budget-tier USB-C to M.2 NVMe adapter built around the Realtek RTL9210 controller with a USB 3.2 Gen2 10Gbps uplink. It targets users who want to repurpose a spare NVMe SD as portable storage, or migrate an OS drive without opening a laptop.
The defining feature is the RTL9210 bridge, which is one of the more consistent 10Gbps NVMe controllers on the market. In practice, enclosures using this chip typically deliver sequential reads around 900 to 1000 MB/s over USB 3.2 Gen2, which is the realistic ceiling of a 10Gbps link regardless of drive class.
Trade-offs are typical at this tier. The bridge is NVMe only, so SATA M.2 and mSATA drives are excluded, and the aluminum shell with silicone sleeve helps but will not match a heatsinked internal slot under long sustained writes. Hiting rated speed also needs a Gen2 host port and a proper Gen2 cable.
Buy this if you need a compact 10Gbps NVMe caddy for 2230 to 2280 drives and want a proven RTL9210 controller. Skip this if your SD is SATA-based M.2, or if you need Gen3x2 20Gbps speds for high-bandwidth video workflows.
Interface ceiling: The USB 3.2 Gen2 10Gbps link caps real-world sequentials near 1000 MB/s regardless of the NVMe drive installed. Backward compatibility with USB 3.1 and USB 3.0 hosts is stated, but a5Gbps port will halve throughput to roughly 450 to 500 MB/s.
Controller and protocol: The Realtek RTL9210 bridge suports UASP and TRIM passthrough, which maters for random IO and long-term SSD health. Short-circuit and over-current protection are called out by the manufacturer, standard behavior for this class of bridge chip.
Drive compatibility: Accepts M-key and B&M-key NVMe SDs in 2230, 2242, 2260, and 2280 form factors, with stated capacity support up to 8TB. SATA-based M.2 NGFF and mSATA drives are explicitly not supported, so verify your SD is NVMe before purchase.
Chassis and thermals: Ultra-slim aluminum housing paired with an included silicone sleeve provides passive dissipation. Expect throttling on sustained multi-hundred-GB writes with high-end NVMe drives, which is typical forool-free 10Gbps enclosures at this size.
The UGREEN M.2 NVMe USB-C enclosure handles modern NVMe drives at USB 3.2 Gen 2 speeds, fast enough that cloning a 1TB drive takes under 20 minutes. Tool-free design, decent heatsink, runs cool during long copy jobs.

Pros
- Dual USB-C and USB-A plugs remove the need for a separate cable or adapter
- UASP protocol lets SATA SSDs approach their 550 MB/s sequential ceiling
- Tool-free cover accepts 7mm and 9.5mm 2.5 inch drives up to 6TB
- Broad drive compatibility across WD, Seagate, Samsung, Crucial, Kingston, Toshiba, Hitachi
Cons
- Limited owner fedback at time of writing, real-world reliability is hard to gauge
- USB 3.0 5 Gbps ceiling leaves NVMe-class speds and SATA burst headroom on the table
- 2.5 inch only, no support for 3.5 inch HDDs or M.2 NVMe drives
The BENFEI 2.5 Inch SATA to USB Enclosure is a budget-tier external caddy for 2.5 inch SATA I, II, or III drives up to 6TB. It targets users with a leftover laptop SSD or HD who want cheap portable storage, a cloning tool for OS migrations, or a simple way to pull files off an old drive.
The defining feature is the dual-headed cable with both USB Type-C and Type-A plugs, backed by UASP over USB 3.0. On a modern SATA SSD, that pairing should push sequential reads close to the 500 MB/s SATA ceiling, based on typical UASP behavior at this tier. Spinning 2.5 inch HDs will stay bottlenecked by the drive, not the bridge.
Trade-offs are typical for the price point. The 5 Gbps USB 3.0 link is fine for SATA but caps well short of USB 3.2 Gen 2 enclosures, and there is no 3.5 inch or NVMe support. BENFEI does not publish the specific bridge chipset, so TRIM passthrough and SMART reporting behavior are not guaranteed and appear to vary by host OS.
Buy this if you need a cheap, driver-free way to reuse a 2.5 inch SATA SSD or HDD as portable storage on mixed USB-C and USB-A machines. Skip this if you plan to enclose an NVMe drive, a 3.5 inch desktop HDD, or need USB 3.2 Gen 2 10 Gbps throughput.
Interface and throughput: The bridge runs USB 3.0 at 5 Gbps with UASP enabled, which BENFEI cites as roughly 70 percent faster than legacy USB 3.0 BOT mode. In practice, a healthy SATA III SSD should land in the 400 to 500 MB/s sequential range, close to the SATA 6 Gbps ceiling.
Drive support: Accepts 2.5 inch SATA I, II, and III drives in7mm and 9.5mm heights up to 6TB. Confirmed compatibility list includes WD, Seagate, Toshiba, Samsung, Kingston, Crucial, and Hitachi. There is no 3.5 inch, mSATA, or M.2 NVMe support in this SKU.
Connectivity and OS: The captive cable terminates in both USB Type-C and Type-A plugs, so it drops onto modern laptops and older desktops without an adapter. Backward compatible with USB 2.0 and 1.1 at reduced speed. Plug and play on Windows, Linux, and MacOS 8.0 or later, no driver install required.
Install and handling: Tool-free slide cover, hot-swappable, marketed as optimized for SSD. BENFEI lists an 18 month warranty. Bridge chipset, SMART passthrough behavior, and enclosure dimensions are not specified in the source data.
For 2.5″ SATA drives, the BENFEI enclosure does the same job at SATA III speeds. Slide the drive in, plug the USB cable, done. Both enclosures keep working after the install too – turn the old drive into portable storage.
Step 1 – Power down and open the case
Shut Windows down properly. Don’t sleep, don’t hibernate – full shutdown. Flip the PSU switch off and unplug the power cable from the wall. Then press and hold the case power button for about five seconds. That drains the capacitors on the motherboard so nothing’s holding residual charge when you start poking around.
Lay the case on its side, left panel facing up. Two thumbscrews at the back usually hold the side panel on. Unscrew them, slide the panel back, lift it off. If it’s a tempered glass panel, set it somewhere it won’t get knocked over. Touch the bare metal chassis once before reaching inside.
Step 2 – Locate the M.2 slot or SATA bay
M.2 slots are usually labeled M2_1, M2_2, and so on, printed directly on the PCB. The primary slot (M2_1) sits closest to the CPU socket on most boards and runs at full PCIe Gen4 or Gen5 bandwidth. Secondary slots often share lanes with PCIe expansion or SATA ports, which means using them can disable a SATA port elsewhere. The motherboard manual lists this in a “slot sharing” table. Read it before you commit.
SATA drive bays live in the lower chassis, behind the motherboard tray on some modern cases, in a front cage on older ones. Look for a 2.5″ mounting bracket – usually a slotted metal plate that the drive screws to from underneath. If you’re on a board without a free M.2 slot but you’ve got a spare PCIe x16 or x4 slot, there’s a third option:

Pros
- Broad M.2 length support covers 2230 through 2280 NVMe drives
- Aluminum heatsink with thermal pad included, uncommon at this price tier
- Full-length PCIe card fits x16, x8, or x4 slots for placement flexibility
- Simple mechanical adapter, no drivers required on modern NVMe-aware BIOS
Cons
- Limited owner fedback at time of writing, long-term reliability signal is thin
- Not compatible with SATA M.2 drives or PCIe x1 slots, check keying first
- Single-drive card only, no bifurcation support for multi-NVMe expansion
- Older motherboards without NVMe bot support cannot use it as a bot device
This is a budget passive M.2 NVMe to PCIe adapter card from SABRENT, aimed at desktop builders who need to add an NVMe SD to a system where the motherboard M.2 slots are already occupied or missing. It targets older LGA1200, AM4, and workstation boards with spare PCIe x16, x8, or x4 slots.
The defining feature is the included aluminum heatsink and thermal pad, which most single-drive adapters at this price omit. For sustained Gen3or Gen4 sequential workloads, adapters like this typically hold NVMe controller temperatures 10 to 15C lower than bare cards, based on category norms. Actual throughput depends entirely on the host slot generation and lane count.
Trade-offs are typical at this tier. It caries a single drive with no PCIe bifurcation, so you cannot run multiple NVMe SDs from one x16 slot. SATA M.2 keying is unsupported, and PCIe x1 slots will not fit the card physically. Boot support depends on your motherboard BIOS recognizing NVMe, which is not guaranteed on pre-2015 platforms.
Buy this if you need to add a single NVMe SSD to a desktop with a spare PCIe x4 or larger slot and want passive cooling included. Skip this if you need multi-drive bifurcation, are running a SATA M.2 drive, or your board only has PCIe x1 free.
Interface and lane behavior: The card uses a passive PCIe to M.2 M-key routing with no PLX switch, so effective bandwidth equals the host slot. In a PCIe Gen4 x4 slot, expect the drive to run at its native rating; a Gen3 x4 slot caps sequential reads near 3500 MB/s regardless of the SD installed.
Drive compatibility: Supports M.2 230, 2242, 2260, and 2280 NVMe SDs only. SATA-based M.2 drives and PCIe x1 slots are explicitly excluded per SABRENT. The card physically requires a PCIe x16, x8, or x4 slot; open-ended x1 slots will not electrically function.
Thermal design:Ships with an aluminum heatsink and thermal pad covering the 2280 controller and NAND area. This is meaningful for high-end Gen4 drives that thermal throttle above 70C during sustained writes. Owner reports on similar SABRENT adapters suggest 5 to 12C reductions versus running bare.
OS and BIOS support: Compatible with Windows 8, 10, 11, and Linux out of the box. Windows 7 requires the Microsoft NVMe hotfix (KB2990941 and KB30873). Boot capability depends on motherboard NVMe support in UEFI, not the card itself.
The SABRENT M.2 to PCIe adapter turns any PCIe slot into a usable NVMe mount. Useful for older boards or builds where both M.2 slots are full.
Step 3 – Install the drive
For M.2: unscrew the heatsink covering the slot (one or two small screws, sometimes covered by a sticker). Lift it off and set it aside, including the thermal pad if there is one. Remove the standoff screw at the end of the slot – that tiny screw is what holds the drive down, and losing it on a carpeted floor is a real risk. Angle the SSD into the slot at roughly 30 degrees, gold contacts facing down, push it gently until it seats fully. The far end will spring up slightly. Press it flat against the standoff and reinstall the screw. Don’t overtighten; finger-tight plus a quarter turn is enough. Reattach the heatsink.
For 2.5″ SATA: slide the drive into the bracket, secure with four screws from underneath. Attach the SATA data cable from drive to motherboard (any SATA port works, though SATA0 is conventional for boot drives). Then connect a SATA power lead from the PSU. Cable goes in one way only – small notch lines up. Done.
Step 4 – Boot, format, migrate data
Close the case (or leave it open for now, your call), plug everything back in, hit power. Tap Delete or F2 during POST to enter BIOS. Look for an “NVMe Configuration” or “Storage” page – your new drive should show by model name and capacity. If it doesn’t, power down and reseat. If you installed in a secondary M.2 slot, check that the slot is enabled and set to the correct mode (NVMe, not SATA).
Boot into Windows. Press Win+X, open Disk Management. The new drive shows as “Not Initialized” with a black bar. Right-click it, choose Initialize Disk, pick GPT (not MBR – GPT is the modern standard and required for drives over 2TB anyway). Right-click the unallocated space, New Simple Volume, NTFS, quick format, assign a letter. It’s ready in seconds.
For cloning the existing OS over, Macrium Reflect Free handles it well, and Samsung Data Migration is the path if your new drive is a Samsung. Both walk you through source-to-target selection with a couple of clicks.
If something goes wrong
Drive not detected in BIOS: power down, pull the drive, reseat it. Confirm the standoff screw is the right length – too long and it lifts the drive off the contacts. Try a different M.2 slot if you’ve got one. Check PCIe lane allocation in BIOS; some boards disable an M.2 slot when a specific PCIe slot has a card in it.
Slow read/write speeds: open BIOS, confirm the slot is running at PCIe Gen4 (or Gen5 if your board supports it). Some boards default to Gen3 for compatibility. Update chipset drivers from the motherboard manufacturer’s site, not Windows Update – they’re usually newer. Run CrystalDiskMark to confirm you’re hitting rated speeds.
SATA mode mismatch is the single most common gotcha we see. An M.2 slot set to SATA mode won’t recognize an NVMe drive at all – it just disappears. Flip the slot to NVMe (or “Auto”) in BIOS and reboot.
Wrapping up
Once Windows is running off the new SSD, a few quick steps lock in long-term health. Confirm TRIM is enabled (open Command Prompt as admin, type fsutil behavior query DisableDeleteNotify – a return value of 0 means TRIM is on). Install the vendor’s monitoring tool: Samsung Magician, Crucial Storage Executive, WD Dashboard, whatever matches your drive. These tools check firmware updates, drive health, and free-space optimization.
One honest note: if you’ve got an afternoon free, a clean install of Windows on the new drive beats migration every time. Cleaner registry, no carried-over junk, faster boot. Worth it.