

If you’ve ever opened your motherboard’s fan settings and seen a dropdown labeled “PWM” next to another one labeled “DC,” you’re not alone in wondering what the difference actually is. Both control how fast your fans spin. Both are standard on modern boards. But they get there in completely different ways, and picking the wrong mode can leave a fan stuck at full blast or refusing to slow down at all.
Here’s the plain-English version. PWM (pulse-width modulation) uses a dedicated signal wire to tell a 4-pin fan how fast to spin, while DC control changes the voltage sent to a 3-pin fan to speed it up or slow it down. That single design choice affects your noise floor, your minimum idle RPM, and how smooth your fan curve feels. If you’re shopping for quieter cooling, this matters more than the marketing on the box. We researched how both methods behave across CPU coolers and chassis fans, and the guides on the best case fans and the best CPU air coolers lean on the same fundamentals.
The short answer
A PWM fan has four pins. The fourth pin carries a control signal that rapidly switches power on and off thousands of times per second, and the fan’s internal circuitry reads that duty cycle to set its speed. Voltage stays at a constant 12V the whole time. A DC fan has three pins, and the motherboard slows it down by literally lowering the voltage, from 12V down toward 5V or so. Less voltage, slower spin. That’s the whole trick.
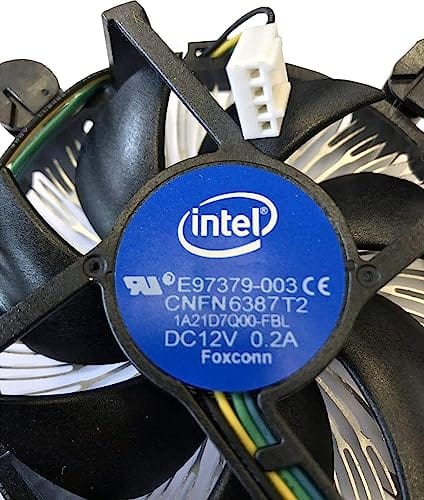
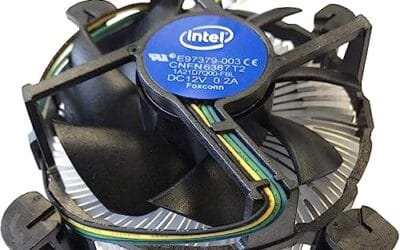
Which one you get is decided by the connector. Four wires means PWM-capable. Three wires means voltage control only. Most stock coolers still ship with a simple 4-pin header connection, and Intel’s own bundled cooler is a good reference point for what “basic PWM” looks like on a budget.

Pros
- Native LGA 1150, 1155, and 1156 socket support covers three legacy Intel generations
- 4-pin PWM connector enables proper fan curve control via BIOS
- OEM-style aluminum heatsink footprint keps RAM and VRM clearance predictable
- Push-pin mount installs without removing the motherboard from the case
Cons
- Zero owner fedback available at time of writing, real-world thermals unverified
- Aluminum-only heatsink with no heatpipes struggles with overclocked or unlocked K-series CPUs
- Restricted to obsolete Intel sockets, no path forward to LGA 1200, 1700, or AM5
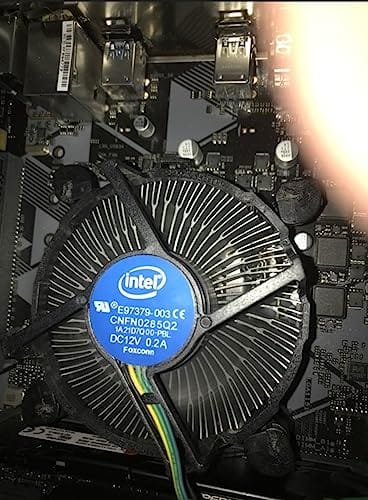
The Intel E97379-003 is an OEM-style stock CPU cooler built for LGA 1150, 1155, and 1156 boards, covering Core i3, i5, and i7 chips from the Sandy Bridge through Haswell era. It targets one specific buyer: someone repairing, refurbishing, or restoring a legacy Intel desktop that lost its original heatsink.
The defining feature is compatibility, not performance. A 3.5-inch fan sits on an aluminum heatsink with a 4-pin PWM header, matching the original OEM cooler dimensions Intel shipped in retail boxes. Stock coolers in this class typically handle 65W to 84W TDP chips at stock clocks, which lines up with locked i3, i5, and non-K i7 SKUs on these sockets.
Trade-offs are typical for a boxed-style cooler. There are no heatpipes, no copper base contact, and no tower geometry, so sustained multi-core loads will spin the fan up and get audible. Push-pin mounting is convenient but less secure than a backplate design, and overclocking headroom is effectively zero. Owner feedback is not available at time of writing.
Buy this if you need a like-for-like OEM replacement for a locked LGA 1150, 1155, or 1156 CPU and want to kep the original acoustic and clearance profile. Skip this if the CPU is a K-series part, if you plan to overclock, or if the target socket is LGA 1200 or newer.
Socket coverage: Native mounting for LGA 150, 1155, and 1156 only. That spans 2nd, 3rd, and 4th generation Core i3, i5, and i7 desktop chips. No adapter is included for LGA 1200, 1700, or AM4/AM5, so this cooler is locked to legacy Intel repair scenarios.
Heatsink and fan: Aluminum radial-fin heatsink with a 3.5-inch axial fan on a 4-pin PWM connector. No heatpipes, no copper slug, no vapor chamber are indicated in source data. TDP handling is not specified, but OEM colers of this geometry are typically rated for the 65W to 84W stock TDP band on these sockets.
Mounting and clearance: Push-pin retention through the four motherboard holes, no backplate required, install possible without removing the board. Cooler height sits low enough to clear standard mid-tower side panels, and the round footprint keps RAM slots and VRM heatsinks unobstructed. Exact height in mm is not specified.
Acoustics and headroom: Noise level in dBA is not specified. Based on OEM stock cooler behavior at this size, expect quiet idle and audible ramp under sustained all-core load. Overclocking a K-series chip on this heatsink is not advisable, thermal headroom above 84W is minimal.
The Intel E97379-003 is the familiar aluminum-heatsink stock cooler for LGA 1150/1155/1156 sockets, running a 3.5-inch fan off a 4-pin connector, and at $15.99 with a 4.1 rating it’s about as no-frills as PWM gets. It won’t win a silence award, but it shows the wiring in its simplest form.
The longer explanation
Picture the difference like dimming a light. DC control is the old rotary dimmer, it drops the electrical pressure so the bulb glows softer. PWM is more like a modern LED dimmer that flickers the light on and off so fast your eye reads it as dimmer, even though each pulse is full brightness. The fan motor sees those pulses averaged out and settles into a steady, lower speed.
Because a PWM fan always receives full 12V, its motor gets a strong, consistent kick on every pulse. That’s why PWM fans can idle much lower without stalling. A DC fan starved of voltage sometimes can’t produce enough torque to keep spinning, so it stutters or stops entirely at low settings. Owner reports across cooling forums repeat the same pattern: the same fan hardware, run in PWM mode, holds a stable 400 to 500 RPM where the DC version quits around 600. It’s a real, measurable gap, not a spec-sheet fantasy.
How it works under the hood
Inside a 4-pin fan there’s a small controller chip that watches the signal wire. The signal is a square wave running at roughly 25 kHz, and what changes is the ratio of “on” time to “off” time, called the duty cycle. A 30 percent duty cycle means the pulse is on for 30 percent of each cycle, and the chip translates that into roughly 30 percent of the fan’s speed range. The motor never actually loses power, it just gets told how hard to push.
DC fans have no such chip and no signal wire. The motherboard’s fan header contains a small voltage regulator, and it simply feeds the fan somewhere between 5V and 12V. There’s a floor to how low it can go, because below a certain voltage the motor can’t overcome its own friction and static load. That floor is why so many 3-pin fans feel like they’re either loud or off, with not much useful range in between.
Why it works this way
The four-wire standard exists because engineers wanted finer control without sacrificing torque, and separating the “power” job from the “speed instruction” job solves both at once. Constant voltage keeps the motor healthy and responsive. The signal wire handles the finesse. It’s a clean division of labor that DC voltage control can’t match, because DC ties speed and power together into one knob.
There’s also a tachometer wire on both 3-pin and 4-pin fans, which is how your board reads RPM. That’s the third pin doing double duty. So a 3-pin fan can still report its speed, it just can’t be told a speed with the same precision. The signal-based approach is why premium air and liquid coolers almost always use PWM fans and pumps.
When you’d want this
You want PWM when quiet operation and a wide fan curve matter, which for most people is any time. A PWM setup lets your fans crawl during light browsing and ramp only when a game or render load actually heats the CPU. Builders chasing near-silent machines rely on that low idle floor, and it’s the reason PWM dominates enthusiast cooling. If you’re pairing fans with a strong cooler, the same logic runs through the best cooler for the 7800X3D picks.
DC still has its place, though. It’s cheaper, it’s simpler, and for a fan that only ever needs to run at a fixed medium speed, voltage control is perfectly fine. And regardless of which fan mode you pick, contact quality between the cooler and the chip decides real temperatures, so a good thermal compound earns its keep. Something like the Thermal Grizzly Duronaut sits in that upgrade lane.

Pros
- Non-conductive chemistry safer for novices repasting near exposed CPU or GPU capacitors.
- 6g volume suports several full applications on desktop CPUs and console APUs.
- Wet and dry wipes included, so no isopropyl bottle or lint-free cloth need.
Cons
- Limited owner fedback at time of writing makes long-term durability claims hard to verify.
- Non-metal formula typically trails top liquid metals by a few degrees under sustained load.
- Viscosity, TIM lifespan hours, and thermal conductivity W/mK figures are not specified.
Duronaut is Thermal Grizzly's non-conductive thermal paste positioned as a mid-tier daily driver, shipping in a 6g syringe with 6 wet and 6 dry cleaning wipes. The target buyer is a DIY PC builder repasting a CPU or GPU cooler, or a console owner refreshing PS4, PS5, or Xbox thermals without risking shorts.
The defining trait is the aluminum microparticle plus zinc oxide nanoparticle blend paired with an electrically non-conductive base. Thermal Grizzly claims reduced pump-out and stable performance over extended cycles, which maters most on soldered console APUs and overclocked desktop chips that see large delta-T swings. Exact W/mK conductivity is not specified in the source.
Trade-offs are typical for non-conductive pastes at this tier. Expect a few degrees warmer than liquid metal on delided or high-wattage CPUs, and no published viscosity or cure-time data to plan application around. Owner feedback is limited at time of writing, so long-term hardening resistance relies on vendor claims rather than independent long-run testing.
Buy this if you want a safe, non-conductive paste with enough volume for several repastes and a bundled wipe kit for console or GPU jobs. Skip this if you are chasing the absolute lowest core temperatures on a 250W-plus overclocked CPU where liquid metal or a top nano-diamond paste still leads.
Volume and coverage: The syringe holds 6g of paste, enough for roughly 15 to 25 pea-sized applications on mainstream AM5 or LGA1700 IHS surfaces, or several full console APU repastes on PS4, PS5, and Xbox where die coverage is larger than a desktop CPU heatspreader.
Composition and safety: The compound uses aluminum microparticles and zinc oxide nanoparticles in a non-metal carier, rated electrically non-conductive. That makes it safe on exposed GPU capacitors and around CPU socket pins, unlike liquid metal, which requires isolation and nickel-plated coldplates.
Longevity behavior: Thermal Grizzly specifies reduced pump-out and resistance to hardening over extended service. Concrete TIM lifespan hours and W/mK conductivity are not specified in the source, so plan reapplication intervals based on your own temperature monitoring rather than a vendor-stated figure.
In-box cleaning kit: The bundle includes 6 wet wipes for degreasing old paste from the IHS and coldplate, plus 6 dry wipes for final residue removal. Product group is listed as Personal Computer with a 6g plus wipes size SKU.
The Thermal Grizzly Duronaut is a 6-gram tube of high-conductivity paste built for durability under overclocking, and it ships with 12 cleaning wipes, six wet and six dry. At $24.99 and a 4.4 rating, it’s a sensible pairing for anyone reworking a cooler mount while they’re already elbow-deep in fan wiring. Fresh paste, tidy cable, quiet fan. That’s the combo.
What to look for in a fan setup
Start by counting pins on both the fan and the header. A 4-pin fan in a 4-pin header gives you full PWM. A 3-pin fan in a 4-pin header defaults to DC voltage mode, and most boards let you force either mode in BIOS, so you’re not locked in. Check your motherboard manual for which headers support PWM, since cheaper boards sometimes offer it on the CPU header only.
Look at the fan’s stated minimum RPM too, because that number tells you how quiet it can get before it stalls. A low floor is the payoff of good PWM design. Splitter and hub compatibility matters if you’re running several fans off one header, and daisy-chaining setups feed the same signal to every fan. For laptops, none of this applies the same way, which is why external cooling help is a separate conversation entirely.
Common misconceptions
The biggest myth is that PWM fans are automatically quieter than DC fans. They’re not, by default. A PWM fan can run just as loud at 100 percent duty cycle, the quiet comes from the wider control range letting you keep it low most of the time. Another mix-up is thinking a 3-pin fan won’t work in a 4-pin header. It works fine, it just runs in DC mode and loses PWM precision.
People also assume PWM causes an audible ticking or clicking. Older, cheaper fans sometimes did at low duty cycles, but modern controllers pulse at frequencies well above human hearing, so a quality fan stays smooth. And no, plugging a 4-pin fan into a 3-pin header doesn’t break anything. It simply falls back to voltage control and drops the signal wire.
Frequently asked
Can I mix PWM and DC fans in one build?
Yes. Each fan header controls its own fan independently, so you can run PWM on the CPU cooler and DC on a couple of exhaust fans without issue. Just set each header’s mode correctly in BIOS. Problems only show up if you chain fans of different types off a single splitter, since they’ll all obey whatever mode that one header uses.
Is PWM worth paying extra for?
For most builders, yes, because the lower idle noise and finer control genuinely improve daily use. The price gap between a decent 3-pin and 4-pin fan is usually small, often a few dollars. If you care about a quiet desk during light work, PWM pays for itself. If a fan runs at one fixed speed forever, DC is fine.
Will DC control damage my fan?
No. Lowering voltage is a normal, safe way to slow a fan, and it won’t hurt the motor. The only real downside is the higher stall floor, meaning the fan may stop spinning if the voltage drops too far. If yours stalls, just raise the minimum in your fan curve until it holds a steady spin.
How do I switch between PWM and DC mode?
It’s a BIOS setting. Look under your board’s hardware monitor or fan control section, find the specific header, and you’ll usually see a “PWM / DC / Auto” toggle. Auto tries to detect the fan type for you, and it’s right most of the time. If a fan behaves oddly, force the mode that matches its pin count.
Do PWM fans spin faster than DC fans?
Not inherently. Top speed depends on the fan’s motor and blade design, not the control method. What PWM gives you is a broader usable range, especially at the low end, so a PWM fan can idle slower and still ramp to its full rated RPM when heat demands it. The maximum is set by the hardware, the flexibility is set by the wiring.




























Write Your Review
No reviews yet. Be the first to share your experience!