You hit the power button. Fans spin. Lights come on. The screen stays dead, and you never reach the BIOS splash. Frustrating, sure, but the cause is rarely the motherboard itself. Walk through these 8 fixes in order before you spend money on a replacement.
First check the obvious
Look at the basics before you crack open the case. Is the monitor on the right input? HDMI 1 versus DisplayPort 2 catches more people than anyone admits. Try every input.
Is the cable plugged into the GPU or the motherboard? If your build has a dedicated graphics card, the monitor must connect to the GPU outputs, not the motherboard outputs near the I/O shield. Motherboard video only works with iGPU CPUs.
Check the front panel power LED and listen for beeps. Modern boards have debug LEDs labeled CPU, DRAM, VGA, and BOOT. Note which LED stays lit. That tells you exactly where the boot process is stuck.
Cause 1: RAM not seated
DRAM problems are the single most common cause of no-POST. The board freezes during memory training and never hands off to the BIOS. The debug LED labeled DRAM will be on.
Fix: power down, unplug the PSU, hold the case power button for 10 seconds to drain caps. Pop both DIMMs out. Reseat one stick at a time in slot A2 (usually the second slot from the CPU). Press hard until both side clips snap closed. Try to boot.
If A2 alone doesn’t work, try B2 with the same stick. If neither slot posts, swap to the other DIMM. You’re isolating which stick and which slot are bad. AM5 boards in particular can take 60-90 seconds to complete memory training on first boot with new RAM. Be patient before you assume failure.
Cause 2: CPU power cable missing or partial
The 8-pin (or 8+4-pin) EPS connector at the top of the motherboard powers the CPU. It’s easy to miss. The system will spin up fans on 24-pin power alone, but it won’t post without CPU power.
Look for an 8-pin connector near the rear I/O, usually labeled CPU_PWR or EPS. Some boards need both the 8-pin and the supplementary 4-pin filled for high-wattage chips. The 4-pin alone, or the 8-pin half-seated, gives the same symptom as no cable.
Confirm the cable is from the PSU’s CPU output, not a PCIe cable repurposed. The pinouts differ. A PCIe cable in the EPS socket can damage the board.

Pros
- TPM bypass pre-configured, allowing Windows 11 installs on hardware that fails Microsoft's official compatibility check.
- Dual UEFI and Legacy support covers machines from roughly 2008 onward without additional configuration.
- Password reset tool is a practical addition for locked-out systems where OS access is impossible.
- WiFi and LAN network drive utilities included, removing the need to locate separate recovery tools post-install.
Cons
- No product key included and seller does not clarify ISO source, so license legality is buyer's responsibility to verify.
- Windows activation requires a valid existing license or separate purchase, a common point of confusion based on owner reports.
- Backup utility scope and partition tool feature set are not specified, making it hard to assess reliability before purchase.
This is a pre-loaded 32GB USB 3.2 flash drive intended as a Windows 11 and Windows 10 reinstall and recovery tool. It sits in the budget utility tier, targeting non-technical home users, small office support staff, and anyone managing older hardware that fails Microsoft's TPM 2.0 and Secure Boot requirements for Windows 11.
The defining feature is the pre-configured TPM bypass, which allows Windows 11 64-bit Pro, Home, and Education installation on hardware Microsoft officially excludes. The drive also bundles a password reset utility, WiFi and LAN network drive tools, hard drive partitioning, and a backup function, covering several common repair scenarios without needing a separate live environment.
The honest trade-off here is license transparency. The seller does not specify the ISO source or confirm the Windows build version at time of writing, and no product key is included. Owner reports indicate activation confusion is the most frequent complaint. The drive also cannot perform Windows Automatic Repair, which limits its use in certain blue screen scenarios. Data completeness from the seller is medium at best.
Buy this if you regularly service older machines that need a clean Windows reinstall and you already hold valid licenses. Skip this if you need a legally verifiable OEM or retail ISO source, or if your primary use case is in-place repair via Automatic Repair, which this drive explicitly does not support.
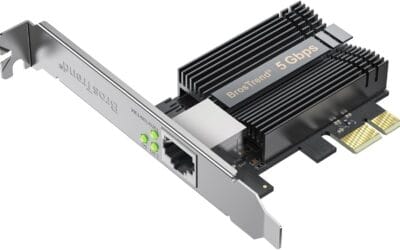
Interface and Capacity: USB 3.2 interface on a 32GB drive. USB 3.2 Gen 1 delivers up to 5 Gbps theoretical throughput, sufficient for Windows setup file transfer speeds. Actual write speed to the target drive depends on the host system's USB controller, not specified by seller.
OS Coverage: Supports Windows 11 and Windows 10 in 64-bit only, across Pro, Home, and Education editions. TPM 2.0 bypass is pre-applied, allowing installation on hardware that does not meet Microsoft's Windows 11 minimum spec. No product key is included; a valid license is required separately for activation.
Boot Compatibility: Supports both UEFI and Legacy BIOS boot environments. Seller recommends selecting the UEFI USB option in the boot menu where available, which is standard practice for faster and more stable Windows installs on post-2012 hardware.
Bundled Utilities: Includes password reset, WiFi and LAN network drive mapping, hard drive partitioning, backup and recovery, and hardware testing tools. Explicit version numbers and feature depth for these utilities are not specified by the seller, so capability limits are unknown prior to use.
Cause 3: CMOS corrupted or wrong settings stuck
If you previously got into BIOS and changed something aggressive (XMP/EXPO at marginal timings, an overclock, a CPU voltage offset), the board may now refuse to post on those settings. The fix is a CMOS reset.
Three ways to clear CMOS, from easiest to most invasive. First, find the Clear CMOS button on the rear I/O panel of higher-end boards. Press and hold for 5 seconds with the PSU switch off. Second, short the two CLR_CMOS pins on the motherboard with a screwdriver for 10 seconds. Third, pull the CR2032 coin battery, wait 5 minutes, reinstall.
Power on. The board should boot to default settings and reach BIOS. You’ll need to redo XMP and any custom changes once you confirm it’s stable.
Cause 4: GPU not seated or PCIe slot dead
A GPU that’s drooped out of the PCIe slot looks fine from the side but isn’t making contact. The VGA debug LED stays lit.
Unplug the PCIe power cables, push the release latch on the PCIe slot, lift the card out, and reseat it with firm even pressure until the latch clicks. Reconnect 12VHPWR or 8-pin power, push that connector all the way home until you hear it click. The infamous 12VHPWR melt issues started with partial seating.
If reseating doesn’t help and your CPU has integrated graphics, pull the GPU entirely, plug the monitor into the motherboard, and see if you reach BIOS. That isolates whether the GPU, the PCIe slot, or something else is the blocker.
Cause 5: BIOS doesn’t support the CPU
New CPUs on older board revisions need a BIOS update before they’ll post. A Ryzen 9000 chip on an X670 board manufactured before mid-2024, or a Core Ultra on an early Z890, may sit dead until you flash.
Most modern boards have a BIOS Flashback or Q-Flash Plus button. Format a USB stick to FAT32, drop the BIOS file on it (renamed per your board’s instructions, often something like CREATIVE.CAP), plug it into the labeled USB port, and press the Flashback button with the PSU connected but the system off. A blinking LED runs for 3-5 minutes. When it stops, the BIOS is updated. Boot the system.
If your board doesn’t have Flashback, you’ll need a compatible older CPU to get into BIOS first. Sometimes a local PC shop will flash the board for $20-30.
When to replace
After every fix above, if the board still won’t post with bare-minimum hardware (CPU, one RAM stick, no GPU on iGPU systems), something on the board itself is bad. Look for physical signs: burn marks on the VRM, swollen capacitors, debris in the CPU socket, bent pins. A magnifying glass on the socket pins finds problems your eye misses.
Before you RMA, swap in a known-working PSU if you have one. A failing PSU can deliver enough power to spin fans but not enough clean 12V to boot. PSUs that pass a paperclip start can still fail under real load.
If everything checks out and you’ve eliminated the CPU, RAM, GPU, and PSU as causes, the board is the suspect. Most motherboards carry 3-year warranties from ASUS, MSI, Gigabyte, and ASRock. Keep your invoice and start the RMA.
Common questions
How long should I wait on first boot before assuming a problem?
On AM5 with DDR5, give it up to 5 minutes for the first memory train. The DRAM LED will be on during this, which is normal. After successful first boot, subsequent boots take 15-30 seconds. Intel platforms train faster, usually under 60 seconds.
My debug LED isn’t lit at all but the system won’t post. What now?
That points to power delivery, not the boot sequence. Check that the 24-pin and 8-pin EPS are both fully seated. Confirm the PSU switch is on and the wall outlet is live. If fans don’t spin either, the PSU may be in protection mode, which clears after unplugging for 60 seconds.
Can a bad CPU cause this?
Yes, but it’s rare on a CPU that worked before. Bent socket pins from a clumsy install are the more common variant. Pull the cooler, lift the CPU, and inspect the socket under good light. Bent pins on LGA boards can sometimes be straightened with a fine needle if you’re patient. AM5 sockets have pins on the board too, so handle carefully.
Do I need to update BIOS even if my CPU is supported?
Not always. If the system worked before and just stopped, BIOS is unlikely to be the issue. If you’re building fresh with a recently released CPU, check the board’s QVL and BIOS history. The newest chips often need a BIOS that shipped weeks or months after the board itself.