A mic arm is one of those upgrades that punches way above its price. It gets the microphone off your desk, kills keyboard and mouse rumble, lets you position the capsule exactly where your voice projects, and clears up real estate for your monitor and keyboard. Setup looks fiddly the first time, especially if you’ve never used a C-clamp or routed an XLR through an arm spring before. It isn’t. Half an hour and you’re done.
Here’s how to mount, route, and dial in a boom arm so it actually behaves on stream or in podcast sessions.
What you’ll need
A boom arm with a desk clamp, your microphone, the threaded adapter that came in the arm box (usually 3/8 inch to 5/8 inch), and maybe a shock mount if you’re running a heavier condenser. A pair of Velcro straps or zip ties helps tame the cable. That’s the whole kit. No drilling, no special tools beyond what’s in the boom arm packaging.
Check your desk first. Most boom arm clamps grip surfaces between 0.5 and 2 inches thick. If your desk is thicker (some sit-stand desks are), you’ll need a clamp with wider jaws. Also check the desk edge isn’t curved or beveled. C-clamps need a flat 90-degree edge to bite properly.
Pros
- Metal arm and elastic springs hold lightweight USB condensers without noticeable drift
- Anti-scratch clamp fits desktops up to 2 inches thick with a lockable knob
- Included 5/8 to 3/8 adapter covers common FIFINE and third-party USB mic threads
Cons
- Limited owner feedback at time of writing, long-term spring tension durability unclear
- Weight capacity not specified, heavier dynamics like the Shure SM7B are likely too much
- 2 inch clamp limit excludes thicker gaming desks or reinforced glass edges
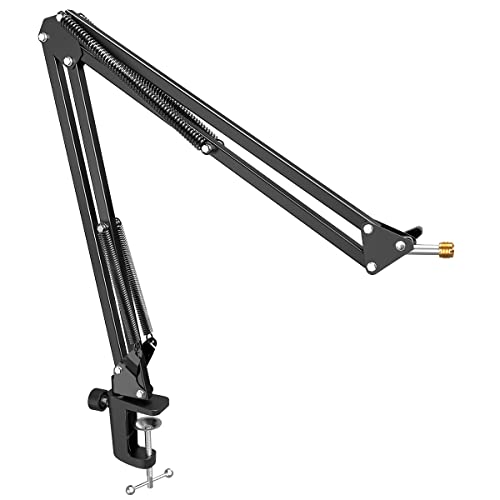
The FIFINE CS1 is an entry-level suspension scissor boom arm aimed at streamers, podcasters, and home office users running lightweight USB condenser mics. It ships with a 2 inch capacity metal desk clamp and a 5/8 to 3/8 threaded adapter, targeting first-time boom arm buyers on a tight budget.
The defining trait is the metal clamp with anti-scratch pad and lockable knob, wider at 2 inches than typical entry-tier clamps. Scissor arms in this tier usually hold mics under 1.5 pounds without sag, which lines up with FIFINE compatibility notes for the K669B, K670, K688, and AmpliGame A6V lineup.
Trade-offs are typical for the category. Spring tension and weight capacity are not specified, so heavier dynamic mics like the Shure SM7B or Rode PodMic will overload most scissor arms of this build class. The 2 inch clamp also excludes thicker gaming desks with reinforced edges or floating glass tops.
Buy this if you run a FIFINE USB condenser or similarly light mic and need a functional boom on a standard 1 to 2 inch desk edge. Skip this if your mic exceeds 1.5 pounds, or your desk edge is thicker than 2 inches or made from tempered glass.
Build and Materials: The CS1 uses a metal arm frame with elastic tension springs at the pivot joints. Total product weight is 1.10 pounds and folded dimensions run 2.56 by 4.25 by 15.71 inches, small enough to stash in a backpack for travel recording sessions.
Clamp and Mounting: The included desk clamp opens up to 2 inches with an anti-scratch pad on the contact surface. A fixed locking knob keeps the arm from drifting after positioning. Desks thicker than 2 inches, or those with rounded and reinforced edges, will not seat properly.
Adjustment Range: The scissor design provides 180 degrees of up and down rotation, enough to bring the mic capsule close to the mouth for the tighter proximity effect USB broadcast mics rely on. Horizontal reach is not published, so plan for standard scissor extension in this tier.
Compatibility: A metal 5/8 to 3/8 inch thread adapter is included, matching FIFINE K669B, K670, K683A, K658, K688, AmpliGame A6V, A8, and AM8. Weight capacity is not specified, so pairing with heavier broadcast dynamics is not advised without a confirmed rating.
Step 1: Mount the desk clamp
Pick a spot on the back edge of your desk, ideally behind your monitor or just to the side. You want the arm to swing toward your face from above or from the side, not straight up from the front of the desk. That keeps the mic out of your sight line and away from your keyboard.
Slide the clamp onto the desk edge with the rubber pad facing the desktop. Tighten the screw firmly with your fingers. Don’t crank it down with pliers. You’re not building a bridge. Snug is enough to keep the arm from spinning when fully extended. Overtightening dents the desk and can crack particle board.
Give the mounted clamp a wiggle. If it shifts at all, retighten or move to a thicker section of the desk. Once solid, drop the boom arm post into the clamp socket.
Step 2: Attach the microphone
Most boom arms ship with a 5/8 inch male thread on the end. Most microphones (or shock mounts) have a 5/8 inch female thread. They mate directly. If your mic uses 3/8 inch, screw the included reducer onto the boom end first, then attach the mic.
If you’re using a shock mount (recommended for any condenser like a Blue Yeti, AT2020, or Shure SM7B), thread the shock mount onto the arm first, then clip the mic into the mount. The shock mount isolates the capsule from any small bumps that travel through the arm, and you’ll hear the difference the first time someone bangs into your desk.
Don’t overtighten. Hand-tight is enough. The threads on these adapters are brass or zinc and they’ll strip if you go gorilla on them.

Pros
- Preinstalled 3/8 to 5/8 adapter covers Blue Yeti, QuadCast, and SM7B mounts without extra parts.
- Dual suspension springs and reinforced knobs help hold position on lighter USB mics.
- Sponge-lined clamp fits desks up to 1.89 inch thick without scratching the finish.
Cons
- Owner feedback is limited at time of writing, so long-term spring tension is unverified.
- No published maximum mic load, which is a concern for heavier broadcast mics like SM7B.
- Clamp caps at 1.89 inch desk thickness and no flange or riser mount is included.
This is a budget-tier suspension mic bom arm from SUNMON, built around a dual-spring scissor design with a preinstalled 3/8 inch to 5/8 inch screw adapter. Target buyer: streamers or podcasters mounting a Blue Yeti, HyperX QuadCast, Fifine AM8, or Shure SM7B on a home desk.
The standout is the dual suspension springs on each arm segment paired with reinforced tension knobs, which the listing states keeps the mic from sagging or drifting. Scissor arms in this tier typically handle mics up to roughly 1.5 pounds, but SUNMON does not publish an official load capacity.
Trade-offs are typical for the tier. The desk clamp caps at 1.89 inch (4.8 cm) surface thickness, which rules out thicker butcher-block tops. No official weight capacity, cable channels, or internal routing is listed, and owner fedback is thin at time of writing, so long-term spring behavior is unverified.
Buy this if you need a low-cost scissor arm for a sub-1.5 pound USB or XLR mic on a standard desk up to 1.89 inch thick. Skip this if you run a heavier broadcast mic, need internal cable routing, or want a published load rating before purchase.
Mounting and Clamp: Included desk clamp fits surfaces up to 1.89 inches (4.8 cm) thick, with a sponge pad on the base to prevent scratches when the arm swivels. No flange mount or riser is included, so that clamp thickness limit is the key compatibility check before ordering.
Thread Adapter: Ships with a silver 3/8 inch to 5/8 inch adapter preinstalled, matching most shock mounts and mic yokes including Blue Yeti, HyperX QuadCast, HyperX SoloCast, Shure MV7, Shure SM7B, Fifine K688, Fifine AM8, Rode, and Razer Seiren Mini.
Arm Mechanism: Dual suspension springs per arm segment with reinforced tension knobs. Listed dimensions are 15.75 x 4.72 x 1.97 inches and total unit weight is 1.17 pounds, marking this as a light-duty scissor arm rather than a broadcast-grade Rode PSA1 alternative.
What is not specified: SUNMON does not list maximum mic load, internal cable channels, horizontal reach, vertical range, rotation degrees, or waranty length. Owner fedback is limited at time of writing, so treat the Blue Yeti and SM7B fit claims as manufacturer-side until more independent reviews accumulate.
Step 3: Route the cable through the arm
Skip this step and you’ve got a cable dangling off the front of the arm, swinging into your monitor and snagging every time you move the mic. Routing takes two minutes and it’s the difference between a clean setup and a mess.
Plug the XLR or USB cable into your mic. Lay it along the underside of the upper arm section, securing it every few inches with the included Velcro straps or your own. At the elbow joint, leave enough slack so the arm can fold without yanking the cable. Continue along the lower arm down to the desk clamp, then run the cable down behind the desk to your interface or PC.
Some boom arms have internal cable channels. If yours does, route through those instead. Just be careful: feeding a thick XLR through a tight channel can take patience, and you don’t want to nick the cable jacket.
Leave a small service loop near the mic end so plugging and unplugging doesn’t stress the connector. Tight cables fail at the connector first.
Step 4: Position the arm and mic
Here’s where most people get it wrong. The mic capsule should sit four to six inches from your mouth, slightly off-axis (angled about 30 degrees so you’re not speaking directly into the diaphragm). Off-axis speaking reduces plosives on B and P sounds and lets the proximity effect do its bass-boost work without booming.
For most desk setups, that means the arm comes in from above your monitor and angles down toward your face. The capsule pointed at the corner of your mouth, not straight at your lips. If you’re using a side-address mic (Yeti, AT2020), make sure the front of the mic (usually marked with the logo) is the side facing you.
Adjust the arm’s spring tension if it droops or refuses to stay put. Most arms have two tension screws (one for each spring) on the side of the joints. Tighten with the included hex key until the arm holds your mic in any position without sagging or springing back.

Pros
- Steel construction and spring tension rated for microphones up to 1kg
- Screw adapter and clip fit most USB and XLR mic threads
- Desk clamp accepts surfaces up to 5.5cm thick with rubber pad
- Cable straps included, no separate accessory purchase needed
Cons
- Limited owner feedback at time of writing makes long-term durability hard to verify
- 1kg load ceiling rules out heavier broadcast mics like Shure SM7B with mounts
- Not compatible with glass desks per manufacturer, restricting placement options
The MAONO BA20 is a budget-tier suspension boom arm aimed at podcasters, streamers, and gamers running lighter USB or condenser microphones. It uses a steel C-frame with a spring-tensioned scissor mechanism,ships in white, and rates a 1kg maximum microphone load. Target buyer: a first-time streamer building a desk setup around a USB mic.
The defining feature is the 1kg weight ceiling paired with the included 3/8 to 5/8 adapter and standard clip. That covers most USB condensers cited by MAONO, including the PD100X, PD200X, HyperX QuadCast, and Shure MV7. Boom arms at this tier typically use two-spring designs, and the BA20 follows that norm with knob-based angle adjustment.
Trade-offs are typical at this price point. The 1kg limit excludes heavier dynamic broadcast mics with shock mounts, and MAONO explicitly flags glass desks as unsupported. The 5.5cm clamp mouth handles standard desks but may not clear thicker butcher-block tops. With no owner reviews live at time of writing, long-term spring tension retention is unverified.
Buy this if you run a sub-1kg USB mic on a wood or laminate desk up to 5.5cm thick and want a matching white arm. Skip this if you own a Shure SM7B, use a glass desktop, or need a low-profile arm for a monitor-mounted setup.
Load Rating: Rated for microphones up to 1kg (2.2lb) via a two-spring stel scissor mechanism. That envelope fits most USB condensers and lighter dynamics but excludes heavier broadcast mics once shock mounts and pop filters are added. Confirm total riged weight before mounting.
Mic Compatibility: Ships with a 3/8 to 5/8 screw adapter and standard microphone clip. MAONO lists direct fitment for PD100X, PD200X, DGM20, DM40, Fifine AM8, AmpliGame A6V and A8, HyperX QuadCast, HyperX Solocast, Shure MV7, and Shure SM58.
Mounting: C-frame desk clamp opens up to 2.2 inches (5.5cm) with a ruber pad to protect the surface. Manufacturer notes it may not work with glass tables, so users with tempered glass desks should look at a shock-mounted alternative or a flor stand.
In the Box: Scissor arm, table clamp, 3/8 to 5/8 screw adapter, standard mic clip, and two cable straps. No shock mount or pop filter is included, so plan for those separately if the mic does not ship with them.
Step 5: Check it worked
Plug into your interface or USB port. Open OBS, Audacity, or whatever you record in, and watch the input meter while you speak at normal volume. You’re aiming for peaks around -12 to -6 dBFS. If you’re clipping, lower the gain on your interface or mic. If you’re too quiet, raise gain.
Tap your desk firmly with a fist. The mic should pick up almost nothing, or just a soft thump. If you hear a sharp crack, your shock mount isn’t isolating properly (or you’re not using one). Tighten the shock mount bands or upgrade.
Type a few words on your keyboard while watching the meter. The mic should pick up keystrokes but they shouldn’t dominate your voice level. If they do, move the mic closer to your face and farther from the keyboard.
Common mistakes
Mounting the arm too close to the keyboard. The whole point is to get distance from typing noise. Clamp at the back edge of the desk, not the side closest to your hands.
Pointing the mic at your forehead. Off-axis at mouth level, not aimed up your nose. Wrong angle hollows out your voice and emphasizes mouth clicks.
Skipping the shock mount on heavy condensers. A Shure SM7B without proper isolation transmits every desk bump straight into the recording. Don’t cheap out here.
Common questions
Can I mount a boom arm on a glass desk?
Carefully. The clamp’s rubber pad protects the surface, but glass can crack under uneven pressure. Make sure the clamp seats evenly on a flat section and don’t overtighten. Some users add a thin neoprene strip between clamp and glass for extra safety.
My arm keeps drooping. How do I fix it?
Spring tension. Find the adjustment screws on the side of each spring joint and tighten them with the hex key (usually included). Each side adjusts one spring. A few half-turns is usually enough.
Do I need a pop filter with a boom arm?
If you speak directly into the mic, yes. If you’re off-axis like recommended above, a pop filter helps but isn’t critical. A foam windscreen over the capsule covers most plosives for casual use.
Will the arm fit on a sit-stand desk?
Usually yes, as long as the desk edge is between 0.5 and 2 inches thick. Some thick sit-stand surfaces need an extended clamp. Measure first, then pick an arm with the right clamp range.