

Improving case airflow is less about buying the loudest fans and more about giving heat a clean path out of the system. Your goal is simple: cool air enters near the GPU and CPU cooler, warm air exits without looping back through the case, and dust doesn’t choke the front panel after two months. We researched common ATX, mATX, and ITX layouts, then built this walkthrough around steps you can do with a screwdriver, cable ties, fan-curve tuning, and a few minutes of observation. If you’re starting from scratch, compare chassis layouts in our PC case airflow guide and mid-tower airflow picks before spending on extra fans.
What you’ll need
You’ll need a Phillips screwdriver, a few zip ties or Velcro straps, a soft brush, compressed air or an electric duster, and access to BIOS or motherboard fan-control software. A flashlight helps more than you’d think. If your current case has a sealed front, no top exhaust, or almost no cable room, a case swap may be the cleaner fix. The Lian Li O11 Vision Compact is $124.99 with a 4.4 rating, and its title lists a white steel and tempered-glass ATX mid-tower layout with back-connect support, which can help keep visible cable clutter away from the main chamber.


Pros
- Patented three-panel tempered glass exposes front, top, and left views of the build.
- Native back-connect motherboard support for hiden 24-pin, EPS, and PCIe cabling.
- Second chamber hides side-mounted AIO tubing for a cleaner primary compartment.
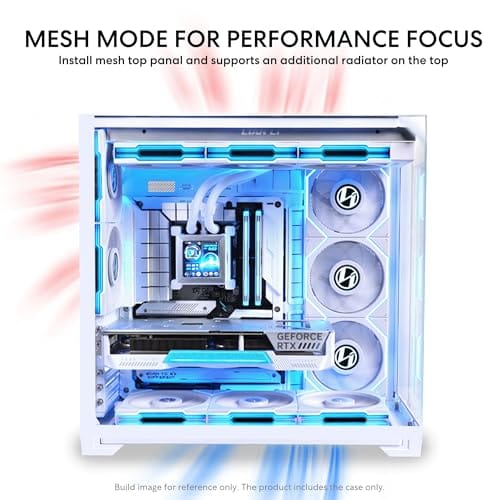
- Swappable top mesh panel suports a 360mm AIO when thermals take priority over glass.
Cons
- Limited owner feedback at time of writing makes long-term reliability signal thin.
- Full specs (GPU length, cooler height, fan count) not published in source data.
- Back-connect layout requires a compatible motherboard, narowing part selection.
The Lian Li O11Vision Compact is a mid-range ATX mid-tower positioned as a smaller sibling to the O11 Dynamic line, developed in collaboration with the PCMasterRace community. It targets showcase builders who want a dual-chamber layout, tempered glass on three sides, and native support for back-connect motherboards in a tighter footprint.
The defining feature is the patented three-panel tempered glass design covering the front, top, and left side. Paired with the second-chamber cable routing and back-connect motherboard compatibility, the front compartment stays visually clean. Builders wanting a 360mm AIO can swap in the included top mesh panel, trading a glass top for airflow.
Trade-offs are typical at this tier. Back-connect support only pays off if you buy a compatible board from ASUS, MSI, GIGABYTE, or similar, which narrows part selection and can raise motherboard cost. Concrete specs like GPU clearance, CPU cooler height, radiator sites, and included fan count are not specified in the source data, so verify against the official manual before finalizing parts.
Buy this if you want O11-family aesthetics with hidden cabling via a back-connect board and a side or top 360mm AIO. Skip this if you need a documented GPU length ceiling, bundled fans, or a traditional cable-visible motherboard build.
Motherboard support: The chassis accepts standard ATX boards and ads native routing for back-connect variants such as ASUS BTF, MSI Project Zero, and GIGABYTE Project Stealth. Cable cutouts on the tray align with rear-side connectors, keping the 24-pin, EPS, and PCIe cables out of the main chamber view.
Radiator and AIO: A swappable top mesh panel is included specifically to enable a 360mm AIO in the rof. When the AIO is mounted on the side instead, the dual-chamber layout routes the tubing into the second compartment, keeping the front-facing glass view unobstructed. Exact side radiator thickness limits are not specified.
Glass and panel layout: Three tempered glass panels cover the front, top, and left side. The top glass panel is the one you swap out when a 360mm radiator is installed, so builders choosing air cooling or a bottom-mounted AIO retain the full three-panel glass look.
Not specified in source: GPU length clearance, CPU cooler height, drive bay count, included fan count, front I/O (USB-C, USB-A), PSU length, and case dimensions are not listed in the provided data. Confirm these against the Lian Li O11VPW official spec sheet before finalizing parts.
Step 1: Map the current airflow path
Before changing anything, identify where air enters and exits. Most gaming PCs work best with front or bottom intake and rear or top exhaust. Hold a small strip of tissue near each fan grille while the PC is running at idle. If it gets pulled toward the case, that fan is intake. If it blows away, that’s exhaust. Write down the fan count, size, and direction. Three 120 mm intakes and one 120 mm rear exhaust behave very differently from one front intake and three top exhausts.
Also note the hardware layout. A long graphics card can split the case into upper and lower zones, especially in compact cases. A tower CPU cooler usually wants front-to-back airflow, while a top-mounted AIO radiator usually wants case air moving upward. Don’t change fan direction yet. You’re building a map so the next steps are deliberate, not random.
One overlooked detail is fan orientation itself. Every case fan has an intake side and an exhaust side, marked by small arrows on the frame: one arrow shows airflow direction, the other shows blade rotation. A fan installed backward looks completely normal from the outside and still spins, yet it fights the rest of your layout and traps heat. While you map airflow, confirm each fan actually blows the way you think it does, because a single reversed rear fan can undo three good front intakes.
Step 2: Clean filters, grilles, and hidden intake paths
Dust is airflow’s boring villain. Pull the front panel if the case allows it, remove magnetic filters, and clean every mesh surface before blaming the fans. A front filter with a grey dust mat can cut intake enough to raise GPU temperature by several degrees during a long gaming session. Use short air bursts through the filter from the clean side out, then brush the corners. Keep fan blades from free-spinning while using compressed air.
Check the underside too. Many cases use bottom PSU filters or lower side intakes that collect carpet fibers fast. If the PC sits directly on thick carpet, lift it onto a board or stand so the bottom vents have at least an inch of breathing room. Simple. Cheap. Often effective.
Step 3: Set a balanced intake and exhaust layout
For a typical mid-tower, start with two or three front intakes and one rear exhaust. If the case has a top mesh panel, add one or two top exhaust fans toward the rear half of the case, not directly above the front intake path. That layout feeds the GPU and CPU cooler while giving warm air a predictable exit. Avoid making every top slot an exhaust if it steals fresh air before it reaches the CPU cooler.
Aim for slight positive pressure, meaning intake airflow is a bit higher than exhaust. It won’t make the case airtight, but it helps push dust toward filtered intake points instead of pulling it through every gap. If all your fans are the same size, a basic setup might be three front intakes at 700 to 1000 RPM and two exhausts at 600 to 900 RPM under gaming load. Tune by noise and temperature, not fan count alone.
Step 4: Clear cable and component obstructions
Cables don’t need to be showroom-perfect, but they shouldn’t hang in front of intake fans or press against GPU fans. Route the 24-pin cable through the nearest grommet, tie PCIe power leads so they don’t droop into the graphics card, and tuck unused SATA or fan leads behind the motherboard tray. If your case supports back-connect motherboards or extra rear cable depth, use that space. It keeps the main chamber cleaner and makes front intake air less turbulent.
Look at drive cages as well. Old 3.5-inch cages mounted behind the front fans can block a huge part of the intake area. If you don’t use them, remove them. If you do need hard drives, move them to the lowest position so at least one front fan has a clear shot toward the GPU. Small rearrangement. Noticeable airflow gain.
Step 5: Tune fan curves and verify results
Once the physical layout makes sense, tune the fans. In BIOS or motherboard software, set case intakes to respond to motherboard, GPU, or mixed temperature if that option exists. CPU-only fan curves can leave case fans slow while the GPU dumps 250 W or more into the chassis. Start with a quiet curve at idle, around 30 to 40 percent fan speed, then ramp to 60 to 75 percent during sustained gaming temperatures.
Verify with repeatable checks. Note idle CPU and GPU temperatures after 10 minutes on the desktop, then run the same game, same map, same settings for 20 minutes and compare peak and steady readings. Don’t chase one-second spikes. Watch sustained GPU hotspot, CPU package temperature, fan noise, and whether the side panel gets heat-soaked. If removing the side panel drops GPU temperature by 8 C or more, the case still isn’t feeding the card enough fresh air.
Keep a short log so you can prove the change worked. Jot the before numbers, make one adjustment, then record the after numbers under the same load. Changing five things at once tells you nothing about which one helped. Free monitoring tools show fan RPM, per-fan headers, and temperature over time, and that history matters more than a single peak reading. If a curve is too aggressive it’ll pulse annoyingly during light desktop work, so smooth the low end until the fans hold steady instead of surging every few seconds.
Troubleshooting common issues
The PC is louder after adding fans
More fans at poor settings can be louder than fewer fans with a sane curve. Lower the minimum RPM, avoid abrupt curve jumps, and keep identical fan models grouped on the same header when possible. Rattles usually mean a cable is touching a blade or a fan screw is unevenly tightened.
CPU temperatures improved, but GPU temperatures did not
Your exhaust path may be helping the CPU cooler while the graphics card still recycles warm air. Add or strengthen lower front intake, remove drive cages near the GPU, and avoid vertical GPU mounts that put the fans too close to the glass. For compact builds, our ITX airflow case guide is useful because small volume changes the whole airflow plan.
Dust gets worse after airflow changes
You may have created negative pressure. Increase filtered intake speed slightly or reduce exhaust speed until more air enters through the front and bottom filters. Also check for missing slot covers and open side gaps near unfiltered areas.
The front panel seems to block everything
Some cases just have restrictive fronts. If temperatures fall sharply with the front panel removed, no fan curve can fully fix that panel design. You can clean filters, add pressure-optimized fans, or move to a mesh-front case such as options in our budget airflow case roundup.
Before and after expected outcomes
A good airflow cleanup usually trims sustained temperatures, lowers fan noise, or both. Expect small changes from cable routing alone, bigger changes from cleaning filters, and the largest changes from fixing a bad fan direction or restrictive case layout. A 3 C drop is useful. An 8 to 12 C drop means the original airflow path was badly blocked.
Variations and advanced setups
Radiator placement changes the plan. A front-mounted AIO can feed the CPU cooler cooler air but warms the GPU chamber, while a top-mounted AIO usually exhausts CPU heat without preheating the graphics card. Dual-chamber cases, bottom intakes, and back-connect layouts can work extremely well, but they still need the same basic rule: fresh air in, warm air out, no recirculation loop.
If you’re building around a hot GPU, bottom intake fans can be the quiet upgrade nobody talks about. Pulling cool air straight up into the underside of the graphics card feeds it fresh air the front fans never reach, especially in cases where the PSU shroud blocks the lower front intake. Mesh side panels help too, though they trade a little dust control for direct airflow. For very small builds, plan the whole layout before you buy, and lean on our mid-tower case picks if a tight chassis keeps fighting you no matter how you arrange the fans.
Before changing anything, take one baseline reading. Note idle and load temperatures for the CPU and GPU so you can tell whether a fan change actually helped instead of guessing. Airflow tuning is easy to over-adjust, and a quick before-and-after number keeps you honest.
Common questions
Is positive pressure always better for a gaming PC?
Slight positive pressure is usually a good target because it encourages air to enter through filtered intakes. Too much positive pressure can trap heat if exhaust is weak, so balance still matters. Think a small intake advantage, not intake-only airflow.
Should top fans be intake or exhaust?
Top fans are usually exhaust because warm air rises and most CPU coolers push heat toward the rear or top. Top intake can work in special radiator layouts, but it may fight front-to-back airflow and push dust into the case if unfiltered.
How many case fans do I need?
Most mid-tower gaming PCs are fine with three to five well-placed fans. Two front intakes and one rear exhaust is the baseline; three front intakes plus rear and top-rear exhaust is a strong layout for hotter GPUs. Placement beats raw count.
Can better airflow reduce room temperature?
No. Better case airflow moves heat out of the PC more efficiently, but the same CPU and GPU power still ends up in the room. The PC may run cooler and quieter, yet the room heat load stays tied to system wattage.




























Write Your Review
No reviews yet. Be the first to share your experience!