

A prebuilt PC that won’t boot is stressful because the failure can look expensive before you’ve narrowed it down. Fans may spin with no display. The power button may do nothing. Windows may start loading, then drop you into repair. We researched the usual failure points on modern prebuilts, from loose shipping connections to power supply protection, RAM seating, monitor input mistakes, BIOS confusion, and failed storage. If you’re comparing replacement options later, keep your expectations grounded with our budget prebuilt PC guide and the 1440p prebuilt picks, but don’t buy another tower until the simple checks are done.
Start with the symptom, not the panic. A system with no lights at all is a different problem from a tower that lights up, spins fans, and never reaches the motherboard logo. A PC that reaches BIOS but won’t load Windows points somewhere else again. Small clues matter. So does patience. You’ll save time if you work in 5-minute passes and change only one thing at a time, especially with a new tower that may still qualify for seller support.
First check the obvious (the 30-second check)
Confirm the wall outlet works with a lamp or phone charger, then make sure the power supply switch on the rear of the PC is set to I, not O. Check that the thick 24-pin motherboard cable and the CPU power cable near the top-left of the motherboard are fully seated. Prebuilt towers often ship with foam packing inside the case, and removing that packing can tug on a cable just enough to make the first boot fail.
Next, verify the monitor cable is plugged into the graphics card, not the motherboard video port, unless your CPU has integrated graphics and the builder intended that connection. On a gaming prebuilt with a dedicated GPU, the HDMI or DisplayPort cable usually belongs in the lower horizontal GPU ports. Also check the monitor’s input menu. HDMI 1, HDMI 2, and DisplayPort can all look identical from the chair. Easy miss.
Cause #1: the PC has power, but the display path is wrong
If the fans spin, RGB turns on, and the tower sounds alive, the problem may not be booting at all. It may be display output. A prebuilt with an AMD Ryzen 5 or Intel Core i7 badge may still depend on a discrete graphics card for video, and many motherboards leave the rear motherboard HDMI port inactive in that setup. Move the cable to the GPU, reseat the GPU power connector, and try one monitor cable at a time. DisplayPort can be picky during first setup, so HDMI is a good simple fallback.
Look for motherboard debug LEDs labeled CPU, DRAM, VGA, and BOOT. A VGA light means the board is unhappy with graphics detection. Power the PC down, unplug it, hold the power button for 10 seconds, then press the graphics card firmly into its PCIe slot and confirm any 6-pin, 8-pin, 12VHPWR, or adapter cable is fully latched. Don’t wiggle cables while the machine is powered. That’s how a small issue becomes a bigger one.
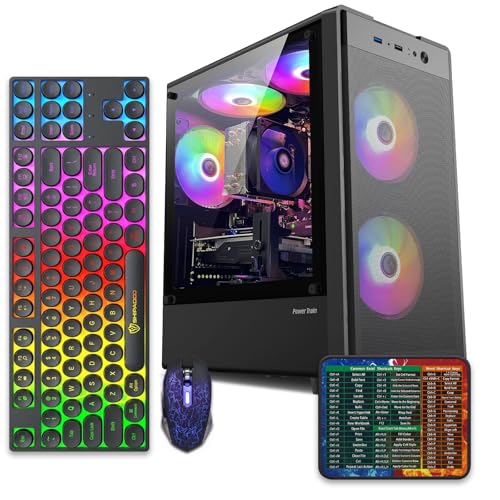
If the system remains unreliable and you’re still inside the return window, compare repair time against replacement value. The abytespark Intel Core i7 business office tower is listed at $499.99 with a 4.4 rating, and it represents the kind of full-system replacement some buyers consider when a low-cost tower arrives with shipping damage or repeated no-display behavior.
Pros
- 512GB SSD bot drive avoids the HDD bottleneck common in budget prebuilts
- RX 590 8GB VRAM buffer handles 1080p textures better than 4GB budget cards
- Complete bundle with RGB peripherals means no extra spend to start using
- Genuine Windows 11 Home 64-bit preinstalled, no activation hassle out of box
Cons
- Limited owner feedback at time of writing, verify seller reputation before purchase
- Core i7-4770 is Haswell era LGA150, no upgrade path and weak IPC versus modern CPUs
- Windows 11 on 4th-gen Intel is unsupported by Microsoft and may miss feature updates
- No CD/DVD-ROM support and RAM/GPU generation limits future workload headroom
This is an entry-tier prebuilt tower built around an Intel Core i7-4770 Haswell CPU, 16GB RAM, a 512GB SSD, and an AMD Radeon RX 590 8GB GDDR5 GPU. It targets budget buyers who need a working office and light gaming PC with peripherals bundled, not enthusiasts chasing current-gen performance.
The defining feature is the RX 590 8GB paired with a 512GB SSD, an uncommon combo at this price band. Cards in this class typically handle 1080p esports titles at 60+ FPS on medium to high, matching the vendor claim for CS:GO, League of Legends, Apex, and Overwatch. Newer AA titles will need lowered settings.
Trade-offs are significant. The i7-4770 launched in 2013, so IPC, single-thread performance, and platform features like NVMe bot, PCIe Gen4, and modern USB are limited. Windows 11 runs here but sits outside Microsoft's official supported CPU list. There is no realistic CPU or socket upgrade path on LGA1150.
Buy this if you need a plug-and-play 1080p esports and office tower with keyboard, mouse, and RGB included at a low outlay. Skip this if you want current-gen platform support, sustained AA 1440p gaming, or a build with a meaningful upgrade runway.
GPU class: The AMD Radeon RX 590 8GB GDDR5 is a Polaris-refresh card roughly equivalent to a GTX 1060 6GB tier. Expect 1080p 60+ FPS in esports titles like CS:GO, Overwatch, Apex, League, and Fortnite on medium settings, matching the listing's claims.
AAA and modern titles: The vendor lists GTA V, Warzone, Hogwarts Legacy, and The Division 2. Realistically, these run at 1080p low to medium with FSR upscaling where suported.Ray tracing is unsupported on RX 590. No DLSS, no frame gen, no AV1 encode.
CPU bottleneck: The Core i7-4770 quad-core with 8threads at up to 3.9GHz will bottleneck the RX 590 in CPU-heavy titles like Warzone and Escape from Tarkov. Expect frame time inconsistency in large team fights even when average FPS looks aceptable.
Storage and RAM fit: 512GB SSD holds Windows plus 3 to 5 modern game installs before space pressure. 16GB DR3-era RAM is adequate for current esports but leaves no headroom for heavy streaming, browser tabs, and OBS NVENC alongside a game session.
Cause #2: RAM moved during shipping or training is failing
RAM seating is one of the most common prebuilt first-boot gremlins. A memory module can look installed while one latch is not fully clicked. Shut the PC down, switch the power supply off, unplug the cable, then press the case power button for a few seconds to drain standby power. Open the side panel and press each memory stick straight down until both ends are locked. If the system has two sticks, use the motherboard manual’s preferred slots, usually A2 and B2 on a four-slot board.
DDR5 systems can also sit on a black screen while the board performs memory training. The first boot after shipping, BIOS reset, or RAM reseating can take several minutes. Give it 5 full minutes before assuming failure. If it still hangs with a DRAM debug light, boot with one stick at a time in the primary slot. That doesn’t prove the stick is permanently bad, but it tells you whether the system can reach BIOS with a simpler memory layout.
Cause #3: power supply protection or a loose main cable is stopping startup
A tower that clicks, flashes, and immediately shuts off often points to a short, a loose power cable, or power supply protection. Start outside the PC: use the original power cord, connect directly to the wall, and skip the power strip for one pass. Inside the case, check the 24-pin motherboard connector, CPU EPS connector, and GPU power cable. They take real pressure to seat. The latch should line up with the tab, not hover a millimeter above it.
Also inspect the front-panel power switch cable. It is a tiny two-pin connector, often labeled PWR SW, running from the case front to the motherboard header. If it came loose, the PC may appear dead even though the board has standby power. If your motherboard has an onboard power button, try that. If not, use the manual before touching front-panel pins. Tiny pins. Big headache.
If the power supply smells burnt, crackles, or trips the breaker, stop. Don’t keep trying. That is warranty or repair-shop territory, especially on a new prebuilt. A good shop can check the PSU with a known-good unit and verify the board without risking your GPU or drives.
Cause #4: the boot drive is not being found
When the PC reaches BIOS but says no boot device, the storage drive may be loose, missing from the boot order, or corrupted. Many current prebuilts use an M.2 NVMe SSD held by a tiny screw or latch. If the system shipped across the country, the drive may need reseating. Power down fully, touch the case metal to discharge static, then verify the M.2 drive sits flat in its slot and is secured. Don’t overtighten the screw. Snug is enough.
In BIOS, check whether the SSD appears under storage or NVMe information. If it appears there but Windows won’t load, use Windows Recovery from a USB installer and try Startup Repair. If the drive doesn’t appear at all after reseating, document it with photos and contact the seller. For a new machine, warranty replacement beats heroic repair. If you’re shopping because the boot drive failure exposed a weak old tower, our 1080p prebuilt guide gives a lower-cost baseline.
Cause #5: BIOS settings changed or Windows repair is looping
A PC that posts but loops into recovery may have a broken bootloader, a failed Windows update, or the wrong boot mode selected. Check BIOS first. If the machine was installed under UEFI, switching to legacy mode can make the drive appear unbootable. Secure Boot changes can do the same on some Windows 11 systems. Load optimized defaults, save, reboot, and see whether the Windows Boot Manager returns as the first boot option.
If Windows still loops, use recovery tools in order: Startup Repair, uninstall latest quality update, System Restore if a restore point exists, then command-line boot repair only if you’re comfortable. Don’t wipe the drive before copying important files. If BitLocker is active, you’ll need the recovery key from the Microsoft account tied to the install. Annoying, but recoverable.
Preventive maintenance
Once the PC boots, take 15 minutes to prevent repeat drama. Update Windows, install the motherboard chipset driver from the board maker or builder, and update the GPU driver from AMD, Nvidia, or Intel rather than a random driver bundle. Keep BIOS updates conservative; don’t flash BIOS unless the update fixes a real issue you have or the builder recommends it. Photograph the inside of the case while it works, including RAM slots and cable routing, so you’ll have a reference later.
Dust control matters too. A clogged front intake can push temperatures up and create shutdowns that feel like boot problems after the system cools and restarts. Clean filters every month or two if the tower sits on carpet. Keep the rear exhaust at least 4 inches from the wall. Basic stuff. It helps.
When it’s not fixable: what to replace
For a brand-new prebuilt, don’t replace parts before checking warranty terms. Sellers may deny coverage if you swap the PSU, motherboard, or cooler without approval. The right replacement depends on the symptom: a dead PSU for no standby power, RAM for repeated DRAM debug errors, an SSD for missing boot device, or the whole tower if the case arrived bent, the GPU slot is damaged, or the repair estimate approaches the purchase price.
The WIWB prebuilt gaming desktop is listed at $569.99 with a 4.7 rating and includes a Ryzen 5 up to 4.1 GHz, RX 560 4G graphics, 16GB DDR4 RAM, a 512GB SSD, and Wi-Fi 6. That’s not a high-end gaming tower, but it’s relevant as a budget replacement class for home office, student, and casual gaming use if your current low-cost machine is outside warranty and needs several major parts.

Pros
- Ryzen 5 3500X 6-core CPU bosts to 4.1GHz for smooth 1080p esports CPU load.
- Discrete RX 560 4GB handles DirectX 12 and Vulkan esports titles better than integrated graphics.
- 512GB SSD as bot drive keps Windows load times and app launches snappy out of box.
Cons
- Limited owner feedback at time of writing, no verified reviews to validate build quality.
- RX 560 is a legacy entry-tier GPU, skip if you want modern AAA at 1080p high.
- Ryzen 5 3500X sits on aging AM4, upgrade path is caped at Zen 3 with a BIOS update.
The WIWB is a budget prebuilt tower built around a Ryzen 5 3500X, RX 560 4GB, 16GB DDR4, and a 512GB SSD. It targets students, home office users, and casual gamers who want a plug-and-play box for esports at 1080p rather than a rig for current AAA titles.
The defining pairing here is the 3500X and RX 560. The 6-core, 6-thread CPU bosting to 4.1GHz is still competent for League, CS2, Valorant, and Overwatch, and typically pushes well above 100FPS at 1080p low-to-medium when paired with this GPU class. The RX 560 4GB is the bottleneck for anything heavier.
Trade-offs are typical at this tier. The RX 560 predates FSR frame generation and struggles with modern UE5 titles even at 1080p low. AM4 with a 3500X caps future CPU upgrades at Zen 3, and the case, PSU wattage, VRM phases, and included cooler are not specified, so headroom for a stronger GPU later is unclear.
Buy this if you need a cheap, pre-assembled Windows tower for schoolwork, browsing, and light esports at 1080p. Skip this if you plan to play current AAA releases, stream at 1080p60, or want a platform with a real multi-year upgrade path.
CPU workload: The Ryzen 5 3500X is a 6-core, 6-thread Zen 2 part with a 3.6GHz base and 4.1GHz boost. It stays viable for 1080p esports and light productivity like image editing and IDE work, but lacks SMT, which hurts streaming and modern CPU-bound AA titles.
GPU class and resolution fit: The RX 560 4GB GDDR5 is an entry esports card. Expect high frame rates in CS2, League, and Overwatch at 1080p low-to-medium, and playable frame rates in older AAA titles at 1080p low. 1440p and modern AA at medium are outside its envelope.
Memory and storage: 16GB DDR4 is the current baseline for gaming and multitasking, and the 512GB SSD covers Windows plus roughly 3 to 5 modern game installs. Exact DDR4 speed, dual-channel status, and SSD interface (SATA vs NVMe) are not specified.
Connectivity and upgrade path: WiFi 6 is included, and the board exposes an M.2 slot plus spare DDR4 slots for later expansion. PSU wattage, connector layout, case clearance, and waranty length beyond the stated 1-year coverage are not specified, so plan GPU upgrades cautiously.
Tools and parts needed
For diagnosis, you need a Phillips screwdriver, a working monitor cable, a known-good wall outlet, your motherboard manual, a flashlight, and a Windows installer USB if the system reaches BIOS but won’t load Windows. A cheap anti-static wrist strap is fine, but unplugging the system and touching bare case metal before handling parts is the minimum. Keep a phone nearby for photos. Before you unplug anything, take a picture.
A few more questions
Should I open a new prebuilt PC if it won’t boot?
Usually, yes, but only for basic checks such as removing shipping foam, reseating RAM, and confirming visible cables. Don’t disassemble the cooler, PSU, or motherboard unless the seller authorizes it. If the machine arrived damaged, photograph everything before changing anything.
How long should a first boot take?
Many DDR5 systems boot within a minute, but a first boot after shipping can take up to 5 minutes while memory training completes. If there is no display after that and a debug LED stays lit, move to targeted diagnosis. Don’t power-cycle every 10 seconds.
Is a black screen always a GPU problem?
No. It can be the wrong monitor input, a cable in the motherboard port, RAM training, BIOS boot order, or a loose GPU power cable. Start with the outside connections, then inspect internal seating only after the PC is unplugged.
If the system is still inside its return window, document each step as you go. Take a photo of the rear cable layout, note which outlet and monitor you used, and save any beep or LED pattern from the motherboard. That record makes a retailer or builder support chat move faster, and it keeps you from repeating the same checks twice.




























Write Your Review
No reviews yet. Be the first to share your experience!