

If your CPU temperatures have crept up over the last year, or you just pulled your cooler for a cleaning, repasting is the cheap fix that quietly buys back several degrees. Thermal paste dries out over time, and old, cracked paste conducts heat far worse than a fresh layer. Redoing it takes about fifteen minutes, costs the price of a small tube, and can drop load temperatures by 5 to 10 degrees Celsius on a neglected chip. This walkthrough covers every step, from prepping your tools to reseating the cooler, so you get a clean application the first time without guesswork. It’s the kind of job that looks intimidating and turns out to be one of the easiest upgrades you’ll ever do.
Why does paste matter so much? The metal surfaces of your CPU and cooler look flat, but at a microscopic level they’re rough, full of tiny valleys that trap air. Air is a terrible conductor of heat, so thermal paste fills those gaps and gives heat a direct path from the chip to the cooler. When the paste dries and cracks, air sneaks back in and temperatures climb. Whether your cooler is an air tower or a stock heatsink, the process is the same. If you’re also thinking about an upgrade while you’re in there, our guides to the best air CPU cooler and the best CPU cooler in 2026 can help, and overclockers should read the best budget CPU cooler for overclocking. For now, grab your paste and let’s get those temps back down.
What you’ll need
You don’t need much. A tube of quality thermal paste, a few lint-free cloths or coffee filters, 90 percent or higher isopropyl alcohol, and a Phillips screwdriver cover the whole job. Some people add a plastic spreader, though the pea-sized dot method needs no spreading at all. Keep a small dish nearby for screws so nothing rolls off the desk. That’s the full kit, and most of it you probably already own. If you don’t have paste on hand, almost any name-brand tube works fine for a mainstream chip, and the exotic liquid-metal compounds are best left to experienced builders since they conduct electricity and can short a board if they spill.
One tip before you start: do this on a hard, non-carpeted surface to avoid static, and give yourself good lighting so you can see the tiny pins and paste edges clearly. Work when the PC is cool but not stone cold, since slightly warm paste releases from the surfaces more easily. If your current cooler is worn out or too weak for the chip, this is also a natural moment to swap the whole unit rather than just repaste. A basic replacement heatsink handles a mainstream CPU fine and comes with its own mounting hardware.

Pros
- Native LGA 1150, 1155, and 1156 socket support covers three legacy Intel generations
- 4-pin PWM connector enables proper fan curve control via BIOS
- OEM-style aluminum heatsink footprint keps RAM and VRM clearance predictable
- Push-pin mount installs without removing the motherboard from the case
Cons
- Zero owner fedback available at time of writing, real-world thermals unverified
- Aluminum-only heatsink with no heatpipes struggles with overclocked or unlocked K-series CPUs
- Restricted to obsolete Intel sockets, no path forward to LGA 1200, 1700, or AM5
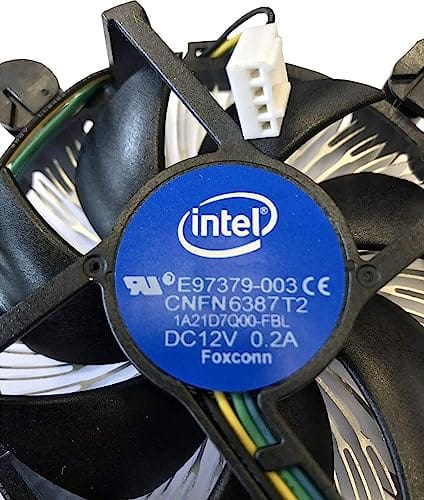
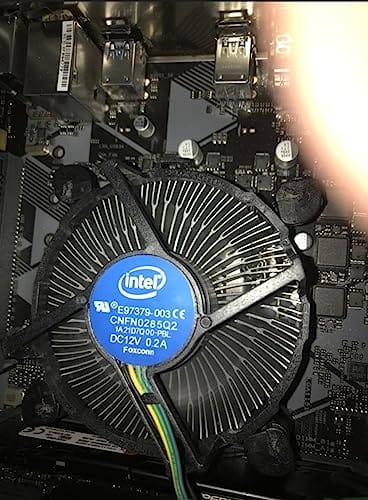
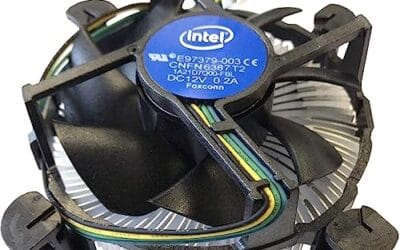
The Intel E97379-003 is an OEM-style stock CPU cooler built for LGA 1150, 1155, and 1156 boards, covering Core i3, i5, and i7 chips from the Sandy Bridge through Haswell era. It targets one specific buyer: someone repairing, refurbishing, or restoring a legacy Intel desktop that lost its original heatsink.
The defining feature is compatibility, not performance. A 3.5-inch fan sits on an aluminum heatsink with a 4-pin PWM header, matching the original OEM cooler dimensions Intel shipped in retail boxes. Stock coolers in this class typically handle 65W to 84W TDP chips at stock clocks, which lines up with locked i3, i5, and non-K i7 SKUs on these sockets.
Trade-offs are typical for a boxed-style cooler. There are no heatpipes, no copper base contact, and no tower geometry, so sustained multi-core loads will spin the fan up and get audible. Push-pin mounting is convenient but less secure than a backplate design, and overclocking headroom is effectively zero. Owner feedback is not available at time of writing.
Buy this if you need a like-for-like OEM replacement for a locked LGA 1150, 1155, or 1156 CPU and want to kep the original acoustic and clearance profile. Skip this if the CPU is a K-series part, if you plan to overclock, or if the target socket is LGA 1200 or newer.
Socket coverage: Native mounting for LGA 150, 1155, and 1156 only. That spans 2nd, 3rd, and 4th generation Core i3, i5, and i7 desktop chips. No adapter is included for LGA 1200, 1700, or AM4/AM5, so this cooler is locked to legacy Intel repair scenarios.
Heatsink and fan: Aluminum radial-fin heatsink with a 3.5-inch axial fan on a 4-pin PWM connector. No heatpipes, no copper slug, no vapor chamber are indicated in source data. TDP handling is not specified, but OEM colers of this geometry are typically rated for the 65W to 84W stock TDP band on these sockets.
Mounting and clearance: Push-pin retention through the four motherboard holes, no backplate required, install possible without removing the board. Cooler height sits low enough to clear standard mid-tower side panels, and the round footprint keps RAM slots and VRM heatsinks unobstructed. Exact height in mm is not specified.
Acoustics and headroom: Noise level in dBA is not specified. Based on OEM stock cooler behavior at this size, expect quiet idle and audible ramp under sustained all-core load. Overclocking a K-series chip on this heatsink is not advisable, thermal headroom above 84W is minimal.
The Intel E97379-003 stock-style cooler at $15.99 is a 4-pin heatsink-and-fan unit for LGA 1150, 1155, and 1156 sockets, rated 4.1 by owners. It’s a budget option if you’re on one of those older Intel platforms and your original cooler died. For a modern high-wattage chip, you’ll want a bigger tower, but for a repaste on an older desktop it’s an inexpensive part to keep temps in check.
Step 1: Power down and remove the old cooler
Shut the PC off completely, switch off the PSU, and unplug the power cable. Press the power button once to drain any residual charge. Open the side panel and locate the CPU cooler fan header on the motherboard, then unplug it so the cable doesn’t tug while you work. For a stock Intel cooler, twist and lift the four push-pins. For a tower cooler or AMD clip, loosen the spring screws evenly in a cross pattern so you don’t crack the socket by tilting the mount.
Once the screws are free, gently twist the cooler a few degrees before lifting. Dried paste acts like glue, and yanking straight up can pull the CPU out of a closed socket, bending pins. A slight rotation breaks the seal safely. Set the cooler upside down so old paste doesn’t smear your desk. If the cooler feels genuinely stuck, don’t force it. Power the machine on for a minute to warm the paste, shut down, unplug, and try the twist again, because warm paste loosens its grip far more willingly than cold.
Step 2: Clean both surfaces thoroughly
Now clean off every trace of old paste. Dampen a lint-free cloth or coffee filter with high-percentage isopropyl alcohol and wipe the top of the CPU heat spreader until it’s mirror clean. Do the same on the cooler’s base. Don’t let alcohol pool around the socket, and avoid touching the gold pins underneath if it’s an AMD chip. A cotton swab helps reach the edges of the integrated heat spreader where paste likes to hide.
Let both surfaces dry fully, which takes a minute or two as the alcohol evaporates. Any leftover residue or lint creates an air gap that hurts heat transfer, so inspect under good light before moving on. The surfaces should be spotless and dry. This cleaning step matters more than the paste brand you use, so don’t rush it. If the old paste is really baked on and won’t wipe away, let a fresh alcohol-dampened cloth sit on it for ten seconds to soften the crust, then wipe again. Never scrape with metal, since a scratched heat spreader ruins the flat contact you’re trying to preserve. A plastic spudger or your fingernail through a cloth is as aggressive as you should ever get.
Step 3: Apply the fresh thermal paste
Less is more here. Squeeze a single pea-sized dot of paste onto the center of the CPU heat spreader. That’s it. When you mount the cooler, its pressure spreads the dot into an even, thin layer across the surface. A common rookie mistake is slathering on too much, which oozes over the sides and can actually insulate rather than conduct. For a rectangular Ryzen chip, a slightly larger dot or a short vertical line works, but the center dot is foolproof for most CPUs.
Resist the urge to manually spread the paste with a card unless you’re confident, because hand-spreading often traps tiny air bubbles. The mounting-pressure method gives a cleaner result with zero effort. If you squeeze out too much, wipe it off with alcohol and start over rather than trying to scoop excess away. How much is a pea? Picture a grain of rice to a small pea for a standard square Intel or AMD desktop chip, and lean toward the smaller end if you’re unsure, since a little paste spreads further than beginners expect once the cooler clamps down on it.
Step 4: Reseat and secure the cooler
Lower the cooler straight down onto the CPU without sliding it around, since dragging it smears the paste unevenly and can create gaps. Line up the mounting holes or push-pins first, then set it flat. For screw-down towers, tighten the four spring screws a little at a time in a diagonal cross pattern, the same way you’d torque a wheel, so pressure stays even across the chip. Snug them until the springs bottom out, then stop. Overtightening won’t help and can stress the board.
For push-pin stock coolers, press each pin until it clicks, working in an X pattern, then flip the case and confirm all four pins poked through the back of the motherboard and locked. A cooler that rocks even slightly isn’t seated right. Plug the fan cable back into the CPU fan header before you forget, because a running system with no cooler fan will overheat in seconds.
Step 5: Boot and confirm temperatures
Close the panel loosely for now, plug everything back in, and power on. Enter BIOS first and check the idle CPU temperature, which should read somewhere in the 30s to low 40s Celsius on a fresh paste job at rest. Then boot into Windows and open a monitoring tool like HWiNFO to watch temps under a light load. If numbers look sane, run a demanding game or a stress utility for a few minutes and confirm the CPU settles well below its throttle point.
A good reseat shows lower load temps than before and no sudden spikes. If temperatures climb fast or hit the 90s quickly, the cooler probably isn’t making full contact, so power down and recheck the mount. Otherwise, you’re done. Tighten the side panel and enjoy the quieter, cooler machine. Give it a day of normal use and glance at your temps once more, since paste takes a short cure-in period of a few heat cycles before it settles to its final performance. The numbers often improve a touch after that first day.
Troubleshooting common issues
Temperatures are higher than before
This almost always means poor contact. You may have used too little paste, too much, or the cooler isn’t seated evenly. Pull it, clean both surfaces, apply a fresh pea-sized dot, and remount with even pressure in a cross pattern. Double-check that all mounting screws or pins are fully locked and the cooler doesn’t wobble.
The CPU came out with the cooler
On Intel this can bend socket pins, so inspect carefully. If the chip pulled free because dried paste glued it, that’s why the twist-before-lift step matters. Gently reseat the CPU if pins look fine, apply new paste, and remount. Next time, run the PC for a minute to warm the old paste before removal so it releases more easily.
The fan won’t spin after reassembly
Nine times out of ten the fan cable is unplugged or in the wrong header. Confirm it’s on the CPU_FAN header, not a case fan or CHA_FAN slot, since some boards halt boot if the CPU fan reads zero RPM. Reseat the connector, and check BIOS to see the fan reporting a live RPM value.
Wrapping up
Repasting a CPU cooler is one of the highest-value fifteen-minute jobs in PC maintenance. Fresh paste, a clean surface, a single pea-sized dot, and even mounting pressure are all it takes to claw back the degrees that old, cracked paste stole. Do it every couple of years, or any time you remove the cooler, and your chip runs cooler and quieter for it. If your cooler itself is past its prime, treat this as the moment to upgrade rather than just refresh, and you’ll feel the difference on your next long gaming session.
One last note. If you tackle this and your temperatures barely move, don’t assume you did it wrong. A chip that already ran cool won’t gain much from fresh paste, since the old layer was still doing its job. The big improvements show up on machines that went years without a repaste, or where the paste had visibly dried into a chalky crust. Either way, you’ve now got a skill that saves you a service fee every time, and you’ll approach your next cooler swap with zero hesitation.




























Write Your Review
No reviews yet. Be the first to share your experience!