

You unboxed a shiny new graphics card, popped the side panel off, and the thing just will not slide home. Maybe the tip bumps a drive cage. Maybe the bracket lines up but the card floats a full centimeter above the slot. It’s one of the most common build-day headaches out there, and it almost never means the GPU is broken. It means a physical dimension somewhere in your case does not agree with the card you bought.
Modern GPUs have ballooned in size. A high-end triple-fan card can push past 330mm long and eat three slots of vertical space, so a chassis that swallowed a card fine in 2019 might choke on a 2026 model. Before you return anything or start hacking at metal, work through the causes below in order. If the answer turns out to be the case itself, our guides to the best mid-tower cases and the best cases for airflow can point you at a shell that clears today’s monster cards without drama.
First check the obvious (the 30-second check)
Start with a tape measure and the card’s spec sheet, not a screwdriver. Card makers publish three numbers that matter: length (front to back), height (how far it rises above the PCIe slot), and slot width (2, 2.5, 3, or even 4 slots). Case makers publish a “maximum GPU length” figure. Compare them. If your card is 340mm and the case lists 330mm of clearance, no amount of wiggling fixes that.
Also confirm you’re seating the card in the top PCIe x16 slot and that you removed the correct expansion-slot covers on the rear. It sounds basic. But plenty of “it won’t fit” posts end when someone realizes a leftover slot cover was blocking the bracket, or a stray cable was pinned behind the card. Pull the side panel fully off, get good light, and look at exactly what’s making contact before you assume the worst.
Do one more pass with your eyes level with the slot. Is the card catching on the retention clip at the end of the PCIe slot? Is the I/O bracket snagging the top edge of the rear opening? These tiny mechanical hangups masquerade as a size problem when they’re really an alignment problem. Nudge the clip open, flex the bracket a hair, and try again gently. If the card drops in with light pressure once you clear those, you never had a fitment issue at all, and you just saved yourself a return.
Cause #1: The card is longer than the case clearance
This is the number-one culprit. Length conflicts usually show up at the front of the case, where a hard-drive cage, a front-mounted radiator, or the front fans sit directly in the card’s path. Your GPU’s rear bracket screws in fine, but the front end has nowhere to go. On a lot of older mid-towers, the drive cage is the single biggest obstacle, and many of them are removable with two or four screws.
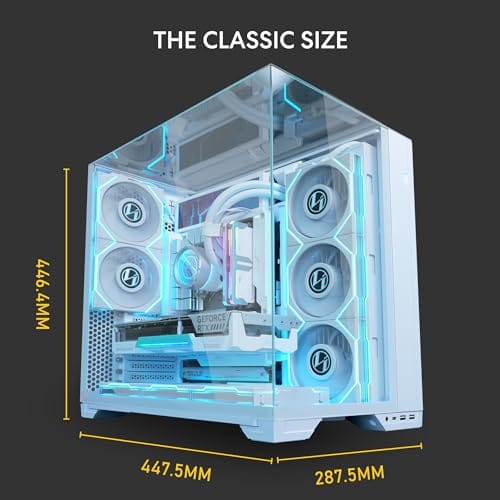
If pulling the drive cage buys you the 20 to 40mm you need, great, that’s a five-minute fix. If the case simply has no room even with the cage gone, you’re looking at a chassis swap. A roomy modern case like the Lian Li O11 Vision Compact ($124.99, rated 4.4) is built around big GPUs and radiators, with a dual-chamber layout and back-connect support that keeps cables out of the card’s way. Steel and tempered glass, ATX, and enough front clearance to house a long triple-fan card without a fight.
The dual-chamber trick is the key detail. By shoving the power supply and drives into a separate compartment behind the motherboard tray, a case like this frees up the entire main chamber for the GPU and cooling. That’s why back-connect-friendly designs have taken off. There’s simply more usable depth for the card. If your current shell crams the PSU right behind the front fans, you’re fighting for space a dual-chamber layout never wastes.

Pros
- Patented three-panel tempered glass exposes front, top, and left views of the build.
- Native back-connect motherboard support for hiden 24-pin, EPS, and PCIe cabling.
- Second chamber hides side-mounted AIO tubing for a cleaner primary compartment.
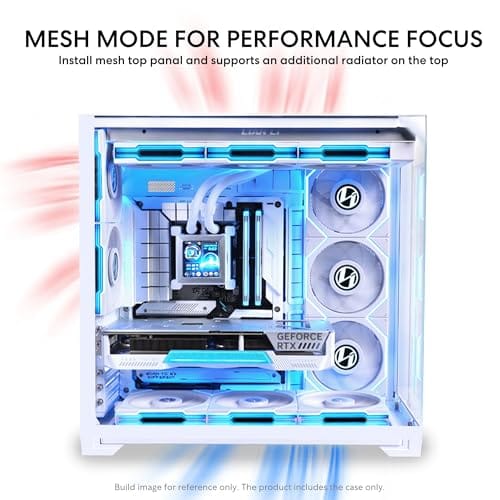
- Swappable top mesh panel suports a 360mm AIO when thermals take priority over glass.
Cons
- Limited owner feedback at time of writing makes long-term reliability signal thin.
- Full specs (GPU length, cooler height, fan count) not published in source data.
- Back-connect layout requires a compatible motherboard, narowing part selection.
The Lian Li O11Vision Compact is a mid-range ATX mid-tower positioned as a smaller sibling to the O11 Dynamic line, developed in collaboration with the PCMasterRace community. It targets showcase builders who want a dual-chamber layout, tempered glass on three sides, and native support for back-connect motherboards in a tighter footprint.
The defining feature is the patented three-panel tempered glass design covering the front, top, and left side. Paired with the second-chamber cable routing and back-connect motherboard compatibility, the front compartment stays visually clean. Builders wanting a 360mm AIO can swap in the included top mesh panel, trading a glass top for airflow.
Trade-offs are typical at this tier. Back-connect support only pays off if you buy a compatible board from ASUS, MSI, GIGABYTE, or similar, which narrows part selection and can raise motherboard cost. Concrete specs like GPU clearance, CPU cooler height, radiator sites, and included fan count are not specified in the source data, so verify against the official manual before finalizing parts.
Buy this if you want O11-family aesthetics with hidden cabling via a back-connect board and a side or top 360mm AIO. Skip this if you need a documented GPU length ceiling, bundled fans, or a traditional cable-visible motherboard build.
Motherboard support: The chassis accepts standard ATX boards and ads native routing for back-connect variants such as ASUS BTF, MSI Project Zero, and GIGABYTE Project Stealth. Cable cutouts on the tray align with rear-side connectors, keping the 24-pin, EPS, and PCIe cables out of the main chamber view.
Radiator and AIO: A swappable top mesh panel is included specifically to enable a 360mm AIO in the rof. When the AIO is mounted on the side instead, the dual-chamber layout routes the tubing into the second compartment, keeping the front-facing glass view unobstructed. Exact side radiator thickness limits are not specified.
Glass and panel layout: Three tempered glass panels cover the front, top, and left side. The top glass panel is the one you swap out when a 360mm radiator is installed, so builders choosing air cooling or a bottom-mounted AIO retain the full three-panel glass look.
Not specified in source: GPU length clearance, CPU cooler height, drive bay count, included fan count, front I/O (USB-C, USB-A), PSU length, and case dimensions are not listed in the provided data. Confirm these against the Lian Li O11VPW official spec sheet before finalizing parts.
Before you buy, jot down your card’s exact length and add roughly 15mm of breathing room for the power connector, which now often sticks straight up or bends off the top edge. That connector clearance trips people up constantly. A card that “fits” on paper can still fight you if the 12V-2×6 plug has nowhere to route.
Cause #2: Front fans, a radiator, or the drive cage are in the way
Sometimes the raw length is fine, but something you added is stealing the space. A 240mm or 360mm radiator mounted on the front intake pushes into the exact zone a long GPU wants to occupy. Thick radiators plus thick fans can rob you of 55mm or more. If your card and radiator are playing tug-of-war, you’ve got a few moves.
Option one, move the radiator to the top of the case if the roof supports it. Option two, switch front fans from a 25mm-thick model to slim 15mm fans, which claws back a little room. Option three, relocate or remove the drive cage entirely and run your SSDs off the motherboard tray instead. Cable management gets tighter, so plan your routing. A case with good airflow design makes this juggling act easier, and if you’re rethinking cooling anyway, our small-form-factor case picks show how compact builds solve the same clearance math in a smaller footprint.
Watch out for the hidden thief here too: front-panel cables and the fan hub. On some cases a bundle of wires tucks into the exact corner where the GPU’s nose wants to sit. Reroute those cables behind the motherboard tray, tuck them into a channel, and you might find the millimeter or two that lets the card seat. It’s worth a five-minute cleanup before you conclude the radiator has to move. Owner reports on airflow-focused cases often mention this exact win.
Cause #3: The card is too tall or too thick for the slots
Length gets all the attention, but height and slot width sink plenty of builds too. Many premium cards now run 2.5 to 4 slots thick. If your case only exposes seven expansion slots and your card needs four of them, the lower fans can collide with a vertically mounted SSD, a sound card, or the bottom lip of the chassis. Height matters in slim cases especially, where the side panel bows or won’t close over a tall cooler shroud.
Check that nothing is installed in the PCIe slots directly beneath the GPU, and that your case actually has enough physical slots for the card’s girth. In a tight tower, a card that’s 2.5 slots thick effectively occupies three, because that half-slot has to land somewhere. There’s no bending metal to fix thickness. Either the case accommodates it or it doesn’t, which is why measuring slot count and internal depth up front saves a return trip.
Height sneaks up on people too. The distance from the PCIe slot to the top edge of the card, where the power connectors live, has grown as coolers got taller. In a compact case the side panel may bulge or refuse to latch over that raised shroud. If the panel won’t close by a few millimeters, don’t force it and crack the glass. Measure the card’s height against the case’s listed clearance, and remember the power cable adds bulk on top of the card itself.
Preventive maintenance
Once your card is in and happy, keep it that way. Heavy modern GPUs sag over time, and a sagging card can slowly pull its bracket out of alignment or crack a solder joint years down the line. A cheap anti-sag support bracket or a bit of fishing line anchored to the top of the case keeps the far end level. Dust the fans every few months so the card runs cool and quiet, since heat is what shortens a GPU’s life more than anything.
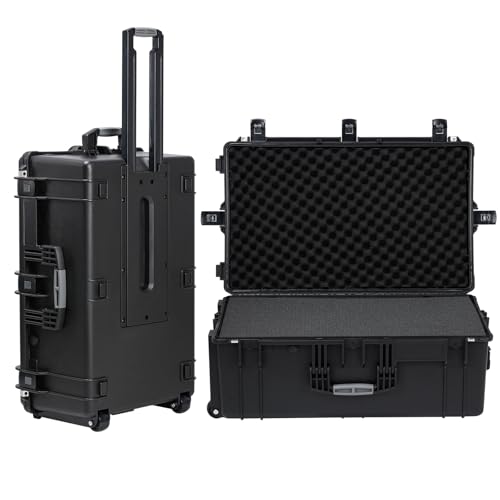
If you haul your rig to LAN events or move houses often, treat the whole system like fragile cargo. A wheeled hard case such as the Regetek Rolling Hard Case ($279.99, rated 4.6) gives you a 32.5 by 20.5 by 13 inch shockproof, waterproof shell with foam inserts, wheels, and a retractable handle. It’s overkill for a desk-bound build, but for anyone who transports a tower with a pricey card inside, foam protection beats a torn tote bag every time.
The other prevention habit worth building is documentation. Snap a photo of your finished build and note the card’s exact dimensions in your phone. Next time you upgrade a component or eye a new case, you’ve got the numbers on hand instead of guessing. Fitment surprises almost always trace back to a missing measurement, and a 30-second note today spares you the reseat-and-return loop down the road.
Pros
- IP67 seal with air-lock valve keeps kit dry during rain, dust, or airline handling
- Pick-and-pluck foam in four layers adapts to cameras, lenses, tools, or medical gear
- Dual padlock holes on the latches allow TSA locks for checked-luggage transport
Cons
- No verified owner fedback at time of writing, so long-term wheel and latch durability is unproven
- Case with foam weighs 32.73 lb empty, which pushes loaded weight near airline checked limits
- Standard-density pluck foam is less protective than custom cut foam for heavy optics or precision instruments
The Regetek Rolling Hard Case is a mid-size wheeled transport case in the Pelican-style category, measuring 32.5 by 20.5 by 13 inch externally with a 28.94 by 17.72 by 9.65 inch usable interior. It targets photographers, drone operators, field service techs, and musicians who need airline-checkable protection for fragile gear.
The defining feature is the IP67 rating paired with a full-length steel hinge and double-latch closure. Cases at this size and seal class typically survive shallow submersion to about 3.3 ft, and the air-lock valve equalizes pressure after altitude changes so the lid does not vacuum shut. Owner feedback is unavailable, so real-world seal longevity cannot be confirmed.
Trade-offs are typical at this tier. The 32.73 lb empty weight with foam eats into airline allowances before gear is loaded, and standard-density pick-and-pluck foam is a compromise between adaptability and impact absorption compared with custom cut foam. Wheels and retractable handles on cases in this class are also the most common long-term failure points.
Buy this if you need a lockable, waterproof rolling case sized for a full mirrorless kit, mid-size drone, or field tolset. Skip this if your payload exceeds the28.94 inch interior length, or if you need documented drop-test certification for professional broadcast use.
Dimensions and weight: Exterior measures 32.5 by 20.5 by 13 inch with an internal usable volume of 28.94 by 17.72 by 9.65 inch. Total weight with foam is 32.73 lb, which is consistent with rotomolded polymer cases in this size class and leaves useful payload room for airline checked baggage.
Sealing and ingress protection: The case is rated IP67 with an O-ring gasket, watertight buckles, and an air-lock pressure equalization valve. Manufacturer states safe submersion to 3.3 ft, and the valve prevents lid suction after temperature or altitude changes during air transit.
Foam configuration: Interior includes four pick-and-pluck layers of standard density foam, one top egg-crate layer, and one bottom pad. The pluck grid lets you shape custom cavities without a knife, though density is not specified in pounds per cubic foot.
Structure and security: Shell uses high-impact polymer with one full-length steel hinge instead of two-point hinges, a double-latch system, dual padlock holes for redundant locking, a heavy-duty top handle, integrated whels, and a retractable pull handle. Waranty is stated at 2 years including replacement parts.
When it’s not fixable: what to replace
If you’ve measured, pulled the drive cage, moved the radiator, and the card still won’t seat, the case is the wrong tool for the job. That’s not a failure on your part. Card sizes outran a lot of older designs. Rather than force it, swap the chassis for one rated to hold your card’s full length and slot count with margin to spare. Budget-minded builders can find plenty of roomy options in our budget case guide that still clear 330mm-plus cards.
One thing not to do: never cut, grind, or bend structural parts of the case to make a card fit. You risk shorting the board, voiding warranties, and creating sharp edges that nick cables. A replacement case costs less than a new GPU, and it’s the clean fix. Measure twice, buy once, and your next upgrade drops in without the panic.
Tools and parts needed
You don’t need much to work through GPU fitment. A Phillips #2 screwdriver handles nearly every screw in a modern case, from the drive cage to the expansion-slot covers. A basic tape measure or a ruler marked in millimeters lets you check clearance against spec sheets. Keep a small magnetic parts tray or a cup nearby so the thumbscrews don’t vanish into the carpet.
If sag turns out to be a concern, an anti-sag support bracket runs about $10 to $20 and props up the far end of the card. And if the real fix is a new chassis, that’s the biggest “part” on the list. Beyond those, a flashlight and a few zip ties for tidy cable routing round out the kit. Nothing exotic, nothing pricey.
A few more questions
How do I know my exact GPU clearance before buying?
Look up your case model’s spec page and find “maximum GPU length” or “graphics card clearance,” usually listed in millimeters. Then check your card’s length on the manufacturer’s site. Subtract, and leave at least 15mm for the power connector. If the gap is negative or under 10mm, pick a bigger case or a shorter card.
Can I use a vertical GPU mount to make it fit?
Sometimes, but be careful. Vertical mounts rotate the card to face the glass, which can help with slot-width conflicts, yet they often reduce the gap between the card’s fans and the side panel. That starves the cooler for air and raises temps. It solves a fitment problem while creating a thermal one, so only go vertical in a case designed for it with real clearance behind the panel.
Will a smaller GPU perform noticeably worse?
Not necessarily. Compact dual-fan cards from the same GPU tier deliver nearly identical frame rates to their triple-fan siblings, they just run a few degrees warmer and a touch louder under load. If your case can’t hold a 340mm card, a well-cooled 270mm version of the same chip is a smart trade that keeps performance high and the fitment headache gone.

































Write Your Review
No reviews yet. Be the first to share your experience!