

Installing a CPU air cooler is mostly about alignment, pressure, and patience. The cooler has to sit flat on the processor, the mounting hardware has to match the socket, and the fan has to move air toward the case exhaust. If you’re upgrading from a stock cooler or rebuilding after a motherboard swap, this walkthrough covers the full process without assuming you’ve done it before. For cooler selection, our best air CPU cooler and 2026 CPU air cooler guides can help you choose a model that fits your case and CPU heat load.
What you’ll need
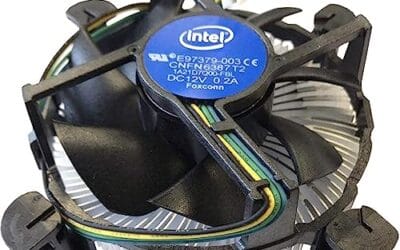
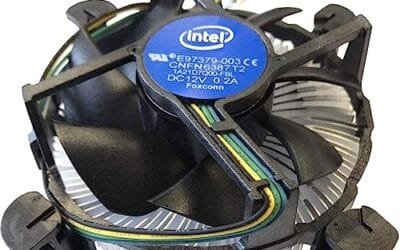
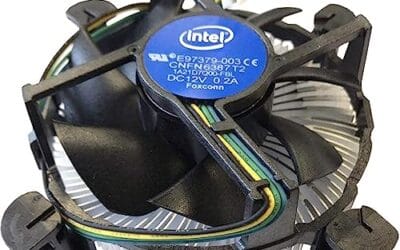
You’ll need the CPU cooler, the correct mounting brackets for your socket, thermal paste if it isn’t pre-applied, a Phillips screwdriver, isopropyl alcohol, a lint-free wipe, and enough light to see the backplate and standoffs clearly. Keep the motherboard manual nearby because CPU_FAN header locations vary. If you’re replacing a basic Intel cooler on older LGA 1150, 1155, or 1156 systems, the Intel E97379-003 is a $15.99 4-pin cooler with an aluminum heatsink and 3.5-inch fan, rated 4.1. It’s a real part for those sockets, not a universal answer for modern LGA1700, AM4, or AM5 boards.


Pros
- Native LGA 1150, 1155, and 1156 socket support covers three legacy Intel generations
- 4-pin PWM connector enables proper fan curve control via BIOS
- OEM-style aluminum heatsink footprint keps RAM and VRM clearance predictable
- Push-pin mount installs without removing the motherboard from the case
Cons
- Zero owner fedback available at time of writing, real-world thermals unverified
- Aluminum-only heatsink with no heatpipes struggles with overclocked or unlocked K-series CPUs
- Restricted to obsolete Intel sockets, no path forward to LGA 1200, 1700, or AM5
The Intel E97379-003 is an OEM-style stock CPU cooler built for LGA 1150, 1155, and 1156 boards, covering Core i3, i5, and i7 chips from the Sandy Bridge through Haswell era. It targets one specific buyer: someone repairing, refurbishing, or restoring a legacy Intel desktop that lost its original heatsink.
The defining feature is compatibility, not performance. A 3.5-inch fan sits on an aluminum heatsink with a 4-pin PWM header, matching the original OEM cooler dimensions Intel shipped in retail boxes. Stock coolers in this class typically handle 65W to 84W TDP chips at stock clocks, which lines up with locked i3, i5, and non-K i7 SKUs on these sockets.
Trade-offs are typical for a boxed-style cooler. There are no heatpipes, no copper base contact, and no tower geometry, so sustained multi-core loads will spin the fan up and get audible. Push-pin mounting is convenient but less secure than a backplate design, and overclocking headroom is effectively zero. Owner feedback is not available at time of writing.
Buy this if you need a like-for-like OEM replacement for a locked LGA 1150, 1155, or 1156 CPU and want to kep the original acoustic and clearance profile. Skip this if the CPU is a K-series part, if you plan to overclock, or if the target socket is LGA 1200 or newer.
Socket coverage: Native mounting for LGA 150, 1155, and 1156 only. That spans 2nd, 3rd, and 4th generation Core i3, i5, and i7 desktop chips. No adapter is included for LGA 1200, 1700, or AM4/AM5, so this cooler is locked to legacy Intel repair scenarios.
Heatsink and fan: Aluminum radial-fin heatsink with a 3.5-inch axial fan on a 4-pin PWM connector. No heatpipes, no copper slug, no vapor chamber are indicated in source data. TDP handling is not specified, but OEM colers of this geometry are typically rated for the 65W to 84W stock TDP band on these sockets.
Mounting and clearance: Push-pin retention through the four motherboard holes, no backplate required, install possible without removing the board. Cooler height sits low enough to clear standard mid-tower side panels, and the round footprint keps RAM slots and VRM heatsinks unobstructed. Exact height in mm is not specified.
Acoustics and headroom: Noise level in dBA is not specified. Based on OEM stock cooler behavior at this size, expect quiet idle and audible ramp under sustained all-core load. Overclocking a K-series chip on this heatsink is not advisable, thermal headroom above 84W is minimal.
Step 1: Power down, open the case, and identify the socket hardware
Shut the PC down fully, switch the power supply off, and unplug the power cable. Press the case power button once after unplugging to discharge leftover standby power. Remove the side panel and lay the case on its side if that gives you safer access. Don’t work with the tower upright if the cooler is heavy. One slip can scrape a motherboard trace or drop a screw into the power supply shroud.
Now identify the socket and mounting style. Intel push-pin coolers, older Intel backplates, AM4 clip mounts, AM4/AM5 screw mounts, and large tower coolers all use different pressure systems. If the cooler includes several bags of hardware, separate only the parts for your socket before you start. Tiny standoffs look similar, but the wrong height can stop the heatsink from making proper contact with the CPU. Also check case height clearance before you commit. A cooler listed at 158 mm needs a case that supports at least that much, and a little extra room is better because side panels can bow inward.
Step 2: Remove the old cooler and clean the CPU
Unplug the old cooler’s fan cable from the CPU_FAN header before loosening anything. If the system was recently running, wait a few minutes so the paste isn’t hot, then twist the cooler gently a few degrees left and right to break the paste bond. Pulling straight up can yank an older PGA-style CPU from the socket. Not fun.
Loosen screws in a cross pattern, a few turns at a time, instead of removing one corner completely first. For push-pin Intel coolers, rotate the pins as marked and release them evenly. Once the cooler is off, wipe the CPU heat spreader with isopropyl alcohol until the old paste is gone. Clean metal. No gray smears at the edges. If you’re keeping the old cooler as a backup, clean its base too before storing it. Take a photo of the old cable route before you remove everything if the build is cramped. You’ll thank yourself later when you’re trying to keep the new fan lead away from the blades.
Step 3: Install the backplate, standoffs, and mounting bars
Fit the cooler backplate behind the motherboard if your model uses one. On many cases, a rear CPU cutout lets you do this without removing the motherboard, but some older cases make it awkward. Make sure the backplate holes line up naturally with the socket holes. If you have to force it, stop and check the orientation. The insulated side should face the motherboard where the kit requires it, and metal shouldn’t press against solder points unless the design specifically accounts for that.

Thread the standoffs by hand first, then snug them with the included tool or screwdriver only if the manual says to. Over-tightening standoffs can strip threads or flex the board. Mounting bars usually need to point so the heatsink can exhaust toward the rear case fan. For most tower coolers, that means the fan will sit on the RAM side and push air through the fins toward the back of the case. If you use tall memory, check clearance before paste goes on. Dry-fit first. Faster later.
Step 4: Apply thermal paste and seat the heatsink
If the cooler base already has paste applied and it’s clean, you can use it. If not, apply a pea-sized dot, roughly 4 to 5 mm wide, in the center of the CPU. Large desktop heat spreaders can also work well with a short line pattern, but don’t spread paste like frosting unless the cooler maker recommends it. Too much paste makes a mess, and too little can leave gaps. The mounting pressure does the spreading.
Lower the heatsink straight down onto the CPU and try not to slide it around. Start both screws before tightening either one fully. Then tighten in alternating turns, left, right, left, right, until the screws bottom out or the springs reach their designed stop. Don’t add extra force after that. A cooler that rocks after mounting is a warning sign, so remove it, clean the paste, and inspect the hardware rather than hoping fan speed will compensate. If the mounting bar uses loose nuts, keep one finger behind the board or use the included retention clips so a nut doesn’t fall under the motherboard.
Step 5: Attach the fan, connect cables, and confirm airflow direction
Clip or screw the fan onto the heatsink so it pushes air through the fins toward the rear exhaust fan. On most fans, airflow travels from the open blade side toward the side with the support struts. Many frames also have small arrows showing spin and airflow direction. Route the fan cable away from the blades and plug it into CPU_FAN, not a random chassis header. Some boards refuse to boot cleanly if CPU_FAN reads zero RPM.
If the cooler has a second fan, use the included splitter only if the total fan current is within the header rating, commonly 1 amp on many motherboards. Reinstall the side panel loosely at first, power on, and enter BIOS. Confirm the fan is spinning, CPU temperature rises slowly rather than jumping, and the fan curve is set to PWM for a 4-pin fan. If you’re building around a hot chip, our CPU air cooler for overclocking guide explains why fin mass and fan quality matter under sustained load.
Troubleshooting common issues
The PC boots, then shuts down quickly
Go straight back to the cooler mount. A fast shutdown often means the heatsink isn’t contacting the CPU, the protective plastic is still on the cooler base, or the fan isn’t connected to CPU_FAN. Remove power before touching anything and check the mount from all four corners.
Temperatures are high at idle
Idle temperatures vary by CPU, room temperature, and motherboard voltage, but a desktop CPU sitting near 80C at idle is not normal. Check paste coverage, screw pressure, and fan direction. Also confirm the fan curve isn’t locked to silent mode at a very low RPM.
The cooler blocks a RAM slot
Some tower coolers overhang the first memory slot, especially with tall RGB modules. You may be able to raise the fan a few millimeters on its clips, but check side-panel clearance before closing the case. If it still doesn’t fit, use lower-profile memory or a cooler with better offset.
The fan is loud or rattling
A cable may be touching the blades, the fan clips may not be seated evenly, or the curve may be too aggressive. Stop the fan only through software or by powering down, never with your finger while it’s running. If the bearing grinds at low RPM, replace the fan.
Wrapping up
A good air-cooler install should leave you with stable idle temperatures, smooth fan ramping, and no sudden thermal spikes under normal load. The exact number depends on the CPU and room temperature, but the pattern matters more than one screenshot. After the first boot, run a normal workload for 15 to 20 minutes, listen for odd noises, and check that the fan cable hasn’t shifted. If everything is stable, tidy the cables and close the panel fully.
Keep the cooler fins clean every few months and revisit the fan curve after major hardware changes. A GPU upgrade can raise internal case temperature enough to affect CPU cooling, even if the CPU cooler didn’t change. For tight builds, our small-form-factor air cooler research is worth reading before you buy a taller heatsink than your case can actually close around.
Before you tighten the cooler, check cable routing around the socket. CPU fan leads, RGB cables, and VRM heatsinks can all get trapped under the fin stack if you rush. Keeping those clear makes the first boot cleaner and saves you from removing the cooler again for a simple cable fix.
Common questions
Do I need to remove the motherboard to install an air cooler?
Usually no, if your case has a CPU cutout behind the motherboard tray. Some older or cramped cases don’t give enough access, so removing the board may be safer. Don’t force a backplate into place blindly.
How much thermal paste should I use?
A pea-sized dot around 4 to 5 mm wide is a safe starting point for most mainstream desktop CPUs. Larger heat spreaders may use a short line or pattern recommended by the cooler maker. Avoid excessive paste because it can spill over the edges.
Can I reuse thermal paste?
No. Once the cooler is removed, clean both surfaces and apply fresh paste. Reused paste can trap air pockets and spread unevenly, which hurts contact.
Which way should the CPU cooler fan face?
For most tower coolers, place the fan on the RAM side so it pushes air through the heatsink toward the rear exhaust. Top-down coolers are different because they blow toward the motherboard. Check the arrows on the fan frame if you’re unsure.
After the first boot, go into BIOS and confirm the CPU fan header reports RPM. Then set a simple fan curve before loading Windows. A cooler can be mounted correctly but still sound awful if the motherboard applies an aggressive default curve, so this quick check prevents unnecessary panic.
Give the system one warm-up run as well. Let the paste spread through a few minutes of normal load, then recheck temperatures and noise. If one core spikes far above the rest, the cooler may be uneven and worth reseating.
If everything looks normal, reinstall the side panel and check again. Case airflow changes cooler behavior, so final temperatures should be measured with the build closed.




























Write Your Review
No reviews yet. Be the first to share your experience!