

Mounting an AIO radiator seems simple until you’re holding it inside the case wondering whether it belongs on top or up front. The choice isn’t just cosmetic. It affects your coolant temperatures, your pump longevity, the air path through the whole build, and even the gurgling noise you might hear at idle. Get it right and your CPU runs cooler while the pump stays quiet for years. Get it wrong and you trap an air bubble against the pump or fight your case’s airflow the whole time. This walkthrough covers both mounting positions, when each makes sense, and the exact steps to install a radiator cleanly the first time.
We researched the airflow tradeoffs and owner-reported gotchas so you can decide with confidence. If you’re still choosing a cooler, our roundups of the best AIO liquid coolers in 2026 and the best CPU coolers in 2026 lay out strong picks, and the best cooler for a 7800X3D guide helps if you’re building around that chip. Let’s get the radiator mounted.
What you’ll need
The good news is you don’t need much beyond what ships in the box. A Phillips screwdriver, the mounting screws and washers from the AIO kit, the case fan screws, and a few minutes of patience. Have your motherboard standoffs and backplate ready, thermal paste if the cooler didn’t come pre-applied, and a flashlight to check clearances.
A small magnetic parts tray is a nice extra, since AIO kits ship with several sizes of screws and standoffs that look almost identical and roll away the moment you set them down. Keep the fan screws separate from the radiator screws, because forcing a coarse fan screw into a fine radiator thread strips the mount in seconds. If your cooler didn’t include paste, a decent tube of thermal compound is worth having on hand rather than reusing a dried-out pea from an old build.
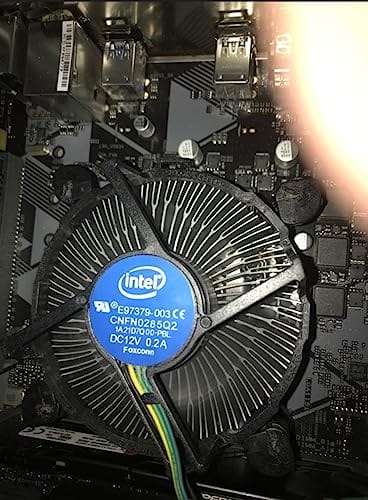
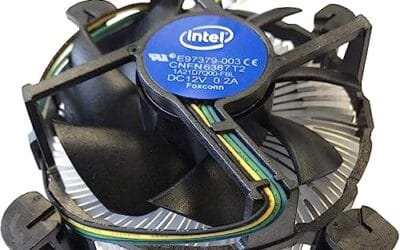
If you decide liquid cooling isn’t the path you want after weighing the effort, a solid air cooler is a legitimate alternative, and a basic unit like the Intel stock-style cooler with an aluminum heatsink and 3.5-inch fan covers modest thermal needs on older sockets without any radiator mounting at all.

Pros
- Native LGA 1150, 1155, and 1156 socket support covers three legacy Intel generations
- 4-pin PWM connector enables proper fan curve control via BIOS
- OEM-style aluminum heatsink footprint keps RAM and VRM clearance predictable
- Push-pin mount installs without removing the motherboard from the case
Cons
- Zero owner fedback available at time of writing, real-world thermals unverified
- Aluminum-only heatsink with no heatpipes struggles with overclocked or unlocked K-series CPUs
- Restricted to obsolete Intel sockets, no path forward to LGA 1200, 1700, or AM5
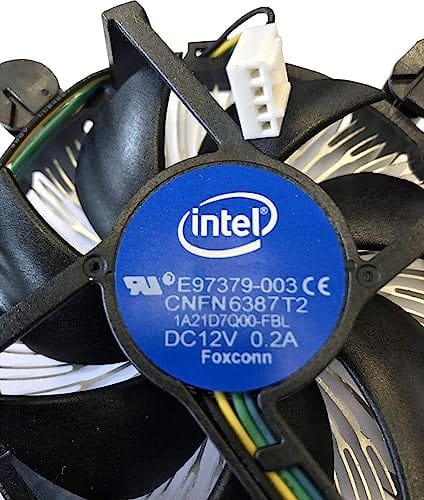
The Intel E97379-003 is an OEM-style stock CPU cooler built for LGA 1150, 1155, and 1156 boards, covering Core i3, i5, and i7 chips from the Sandy Bridge through Haswell era. It targets one specific buyer: someone repairing, refurbishing, or restoring a legacy Intel desktop that lost its original heatsink.
The defining feature is compatibility, not performance. A 3.5-inch fan sits on an aluminum heatsink with a 4-pin PWM header, matching the original OEM cooler dimensions Intel shipped in retail boxes. Stock coolers in this class typically handle 65W to 84W TDP chips at stock clocks, which lines up with locked i3, i5, and non-K i7 SKUs on these sockets.
Trade-offs are typical for a boxed-style cooler. There are no heatpipes, no copper base contact, and no tower geometry, so sustained multi-core loads will spin the fan up and get audible. Push-pin mounting is convenient but less secure than a backplate design, and overclocking headroom is effectively zero. Owner feedback is not available at time of writing.
Buy this if you need a like-for-like OEM replacement for a locked LGA 1150, 1155, or 1156 CPU and want to kep the original acoustic and clearance profile. Skip this if the CPU is a K-series part, if you plan to overclock, or if the target socket is LGA 1200 or newer.
Socket coverage: Native mounting for LGA 150, 1155, and 1156 only. That spans 2nd, 3rd, and 4th generation Core i3, i5, and i7 desktop chips. No adapter is included for LGA 1200, 1700, or AM4/AM5, so this cooler is locked to legacy Intel repair scenarios.
Heatsink and fan: Aluminum radial-fin heatsink with a 3.5-inch axial fan on a 4-pin PWM connector. No heatpipes, no copper slug, no vapor chamber are indicated in source data. TDP handling is not specified, but OEM colers of this geometry are typically rated for the 65W to 84W stock TDP band on these sockets.
Mounting and clearance: Push-pin retention through the four motherboard holes, no backplate required, install possible without removing the board. Cooler height sits low enough to clear standard mid-tower side panels, and the round footprint keps RAM slots and VRM heatsinks unobstructed. Exact height in mm is not specified.
Acoustics and headroom: Noise level in dBA is not specified. Based on OEM stock cooler behavior at this size, expect quiet idle and audible ramp under sustained all-core load. Overclocking a K-series chip on this heatsink is not advisable, thermal headroom above 84W is minimal.
For most AIO installs though, the kit has everything. Confirm your case supports your radiator size, whether that’s a 240mm, 280mm, or 360mm unit, in both the top and front positions before you commit. Clearance is the thing people overlook.
It’s also worth reading your case manual for the listed radiator support. Manufacturers publish maximum radiator lengths and thicknesses for each mounting spot, and a thick rad with fans in push-pull can eat clearance you didn’t budget for. Measure twice here. A 360mm radiator that fits up top on paper can still foul your RAM if the case only lists that support with low-profile memory, so knowing the real numbers before you build saves a frustrating teardown later.
Step 1: Decide top or front based on airflow and pump position
Start with the decision, because it drives everything else. The single most important rule is keeping the pump lower than the highest point of the radiator whenever you can. Air trapped in the loop naturally rises, and you want it collecting away from the pump rather than inside it. A pump fed air bubbles gets noisy and wears faster. That physics fact is the reason mounting position matters beyond looks.
Front mounting almost always keeps the radiator’s top edge above the pump, which is the safest orientation for pump health, and it feeds fresh cool air across the radiator into the case. Top mounting looks clean and exhausts heat upward, which suits many builds, but it’s only safe if the radiator sits higher than the pump, which it usually does with a top-mounted rad and a CPU block below it. If your case is short or your tubes route awkwardly, front mounting is the more forgiving choice. Pick your position now.
Step 2: Set your fan orientation and airflow direction
Fans move air one way, and the arrows on the fan frame tell you which. For a front-mounted radiator, you typically want the fans pulling cool outside air in through the rad as intake, which gives the coolant the coldest possible air and pressurizes the case for better overall flow. For a top-mounted radiator, fans usually push warm case air out through the rad as exhaust, since heat rises and you’re helping it leave.
Decide whether the fans mount between the radiator and the case panel or on the inside face of the rad. A push configuration puts fans on the intake side pushing air through the fins; a pull setup places them on the exit side. Either works, but push is the common default. Attach the fans to the radiator now if your case needs them sandwiched, using the long screws from the kit, and don’t overtighten into the fin stack. Snug is enough.
Step 3: Mount the radiator to the case
Hold the radiator-and-fan assembly against your chosen mounting location and line up the screw holes with the case slots. Most cases give you slotted rails so you can slide the rad forward or back to dodge memory or GPU clearance issues. Start every screw by hand a few turns before tightening any of them, so you don’t cross-thread and so the whole assembly can shift into alignment. Once all screws are threaded, tighten them in a crossing pattern for even seating.
Watch two clearances closely. Up top, tall RAM sticks can collide with a radiator that hangs too low into the case, so slide the rad toward the rear or front to clear them. Out front, a long graphics card might meet the radiator or its fans, so check that before final tightening. Leave the screws firm but not cranked, since the case metal is thin and you don’t want to strip a mount. The rad should sit flat and solid.
Step 4: Install the CPU block and connect the pump
With the radiator secured, turn to the CPU block. Fit the correct mounting bracket for your socket onto the block, apply a pea-sized dot of thermal paste to the center of the CPU if the block isn’t pre-pasted, and lower the block straight down onto the chip without smearing. Secure it in a crossing pattern, tightening each standoff a little at a time so pressure stays even across the die. Even mounting pressure is what gives you good contact and low temperatures.
Now route the tubes so they exit the block in a way that avoids kinks and keeps the pump below the radiator’s high point. Plug the pump’s power header into the CPU_FAN or a dedicated pump header on the motherboard, and connect the radiator fans to their headers or a splitter. Double-check that the pump header is set to run at full speed in BIOS later, since a pump throttled like a fan can starve your cooling. Dress the cables so nothing rubs a fan.
Step 5: First boot, bleed the loop, and verify temperatures
Before closing the case, power on and confirm the pump runs and the fans spin. You’ll often hear some gurgling for the first few minutes to a few hours as trapped air works its way out of the loop toward the radiator. Gently tilting the case in different directions during the first boot helps coax bubbles away from the pump and up into the rad, which is exactly why pump position matters. The gurgle should fade as the loop settles.
Enter BIOS and set the pump header to full or performance mode, then verify idle CPU temperatures look sane, usually in the low 30s to low 40s Celsius depending on ambient. Run a light load and watch the temperature climb and stabilize rather than spiking uncontrolled. If temps look reasonable and the pump noise has quieted, you’re done. Close the panel and enjoy the cool, quiet result of a properly mounted radiator.
One habit worth building here: let the loop run for an hour or two before you judge the temperatures for good. Fresh AIOs often shed a little more trapped air over the first day of use, and the numbers can drift down a degree or two as the coolant fully settles. If your idle temps start a bit high and creep lower over the first few sessions, that’s normal settling, not a fault. Give it time before you second-guess the mount.
Troubleshooting common issues
Even a careful install can throw a surprise or two on first boot, so here are the problems owners run into most and how to sort them without pulling the whole build apart. Work through them one at a time, since jumping straight to a full reinstall usually isn’t necessary.
The pump is making a constant gurgling or rattling noise
Persistent gurgling past the first few hours usually means air is trapped against the pump. Power down, and if your radiator sits at or below the pump, that’s the cause. Re-orient so the rad’s top edge clears the pump, or gently tilt and tap the case to move the bubble up into the radiator. Front-mounting the rad often cures a stubborn air-in-pump situation for good.
CPU temperatures are much higher than expected
High temps right after install point at mounting pressure or pump speed. Reseat the CPU block with a fresh, even layer of thermal paste and tighten in a crossing pattern. Then confirm the pump header is set to full speed in BIOS, not throttled like a case fan. A pump running at reduced RPM moves too little coolant and lets temperatures climb even with a perfectly mounted radiator.
The radiator won’t fit alongside my RAM or GPU
Clearance conflicts are common with 360mm rads in mid-tower cases. Slide the radiator along its mounting slots to shift it away from tall memory or a long graphics card. If a top-mounted 360 fouls your RAM, switching to front mounting frequently solves it, or stepping down to a 280mm or 240mm rad restores clearance while still cooling well for most chips.
Common questions
Is top or front mounting better for cooling?
Front mounting usually gives slightly cooler coolant temperatures because the radiator gets fresh outside air as intake, while top mounting exhausts already-warmed case air. The difference is often only a couple of degrees. Front mounting also tends to protect the pump better since the rad sits higher. Top mounting keeps the front open for airflow and looks tidy. For pure coolant temps, front has a small edge.
Does the pump really need to be below the radiator?
Ideally yes. Air in the loop rises, and you want it collecting in the radiator rather than the pump. Keeping the pump lower than the radiator’s highest point stops bubbles from pooling in the pump, which causes noise and premature wear. It’s the single most important orientation rule for AIO longevity, and it’s why front mounting and top mounting both work as long as the rad clears the pump.
How long does the gurgling noise last after installing an AIO?
Some gurgling on first boot is normal as trapped air moves through the loop. It typically fades within a few minutes to a few hours as the coolant settles and bubbles migrate to the radiator. Gently tilting the case during that first boot speeds it along. If the noise persists for days, air is likely stuck near the pump, and re-orienting the radiator or the case usually resolves it.




























Write Your Review
No reviews yet. Be the first to share your experience!